概要
実運用可能なLINE BOTサーバを考えると、次の参考URLでyoichiro6642さんが書いているように非同期の処理が必要になります。
参考URL:大量メッセージが来ても安心なLINE BOTサーバのアーキテクチャ
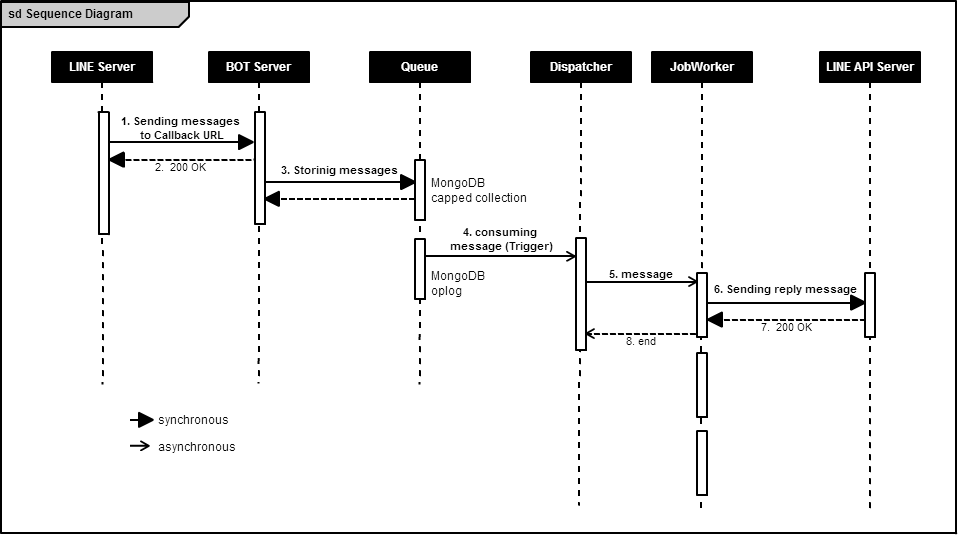
小中規模の環境で、ある程度大量メッセージが来ても耐えられることを目的として、上記に沿ったLINE BOTサーバ(のスケルトン)を書いてみました。
最後の「APIの呼び出し回数を減らす」(メッセージ送信で複数MIDを指定してPIの呼び出し回数を減らす)ところは実装してません。
利用した環境は以下です。
- OS : CentOS 7.2.1511 x86_64
- BOT Server : Node.js v6.2.0
- Queue : MongoDB v3.2.6
- Dispatcher & jobWorker: Python 2.7.5
Amazon API Gateway+Lambda+DynamoDBという選択肢もありましたが、Node.js+MongoDB+Pythonでオーバーヘッドの少ない軽量Dispatcher&jobWorkerを実装できるのではないかと考えました。
Queueは、RabbitMQ, memcached, Redisなども考えられましたが、次の理由からMongoDBを利用しました。
- ポーリングではなくQueueに追加されたことを契機に処理をキックできるトリガーが欲しい。
- MongoDBは、シングルで(勿論シングルでなくても良い)マスターとして使えばoplogが利用でき、oplog監視することでトリガーとして使える。
- 受け付けたMIDごとの情報の格納や参照に、所詮高速なDBが必要。
前提知識
- CentOS 7
- Node.js
- MongoDB, MongoDB.oplog
- Python
実装例
MongoDBの準備
特に指定したのはreplication, oplogSizeMBくらいです。
systemLog:
  destination: file
  logAppend: true
  path: /var/log/mongodb/mongod.line_bot.log
storage:
  dbPath: /var/lib/mongo/line_bot
  journal:
    enabled: true
processManagement:
  fork: false  # fork and run in background
  pidFilePath: /var/run/mongodb/mongod.line_bot.pid  # location of pidfile
net:
  port: 27017
  bindIp: 127.0.0.1  # Listen to local interface only, comment to listen on all interfaces.
replication:
  oplogSizeMB: 3072
Mongodの起動
マスターモードで起動します。
$ mongod --master -f mongod.line_bot.conf
コレクションの作成
コレクションはcapped collectionにして、容量増加を気にしなくてもいいようにしてます。
# !/bin/bach -v
mongo --port=27017 <<EOF
use line_bot;
db.createCollection("recvq", {
  capped: true,
  size: 1048576000 // 1GB
});
EOF
BOT Server(Node.js)
frontDesk.jsでは、LINE Serverからのメッセージを受け取り、即座に応答を返します。
// Settings of the this program
var httpsPort = 443;
var allowPath = "/callback";
var httpsOpt  = {
    "caKey"  : "/etc/letsencrypt/live/xxx/privkey.pem",
    "caCert" : "/etc/letsencrypt/live/xxx/fullchain.pem",
    "caCa"   : "/etc/letsencrypt/live/xxx/chain.pem"
};
local = {};
local['channelSecret'] = "xxxxxxxxxxxxxxxxxxxxxxxxxxxxxxxx";

// Settings of the MongoDB
var mongoHost = "127.0.0.1";
var mongoPort = 27017;
var mongoDb   = "line_bot";
var mongoCol  = "recvq";

var express= require('express'),
bodyParser = require('body-parser'),
log4js     = require('log4js'),
https      = require('https'),
fs         = require('fs'),
mongo      = require('mongodb'),
path       = require('path');

var accept = require(__dirname+'/accept');
var app    = express();
app.use(bodyParser.json());
app.use(bodyParser.urlencoded({ extended: true }));

// MongoDB
var MongoClient = require('mongodb').MongoClient, assert = require('assert');
var mongoUrl = 'mongodb://'+mongoHost + ":" + mongoPort + "/" + mongoDb;
set_col(local, mongoUrl, function(rc, local, mongoUrl) {
    if (!rc) {
        console.log("set_col.rc:"+rc);
        local.db.close();
        process.exit(1);
    }
    console.log("Connected succesfully to "+mongoUrl);
});

// handle a request
app.post(allowPath, function(req, res, next) {
    local['acceptTime'] = new Date().getTime();  // record accept time(ms)

    // response ASAP
    res.status(200).send("OK");
    res.end();

    accept.post_callback(req, res, next);  // Handle the request
});

// server certificate authority
var httpsOpt = {
    key:  fs.readFileSync(httpsOpt.caKey),
    cert: fs.readFileSync(httpsOpt.caCert),
    ca:   fs.readFileSync(httpsOpt.caCa)
};
// listen port
var httpsServer = https.createServer(httpsOpt, app);
httpsServer.listen(httpsPort, function() {
    console.log('Listening on port '+httpsPort+'...');
}).on('error', function(err) {
    if (err.errno === 'EADDRINUSE') {
        console.log('This program is already running.');
    } else {
        console.log(err);
    }
    process.exit(1);
});

function set_col(local, url, callback) {
    // Use connect method to connect to the MongoServer
    MongoClient.connect(url, function(err, db) {
        if (err) {
            console.log("MongoDB connection error."); console.log(err);
            process.exit(1);
        }
        local['db'] = db;

        local.db.collection(mongoCol, function(err, collection) {
            if (err) {
                console.log("MongoDB collection error."); console.log(err);
                process.exit(1);
            }
            local.db['collection'] = collection;
            callback(true, local, url);
        });
    });
}
その後、accept.jsで、署名の検証、MongoDBへの登録を行います。
var crypto = require('crypto');
var assert = require('assert');

exports.post_callback = function(req, res) {
    // signatureの有無をチェック
    if ((! req.headers) || (! req.headers["x-line-channelsignature"])) {
        console.log("400. Bad Request. The request does not have a x-line-channelsignature");
        return;
    }

    // requestのresultの有無をチェック
    if ((! req.body) ||
        (! req.body['result'])) {
        console.log("400. Bad Request. The request does not have result");
        return;
    }
    var result_num = req.body.result.length;

    // HTTP bodyをchannelSecretでsha256暗号化, base64ダイジェストを求める.
    var body_str = new Buffer(JSON.stringify(req.body), 'utf8');
    computedSignature = crypto.createHmac("sha256",local['channelSecret']).update(body_str).digest("base64");

    // signatureを比較し、正当性を確認
    if (req.headers["x-line-channelsignature"] != computedSignature) {
        console.log("400. Bad Request. The x-line-channelsignature is wrong.");
        return;
    }

    // 受け付けた時刻を入れておく
    for (var i=0; i<Object.keys(req.body.result).length; i++) {
        req.body.result[i]['acceptTime'] = local['acceptTime'];
    }

    // メッセージをMongoDBに登録
    local.db.collection.insertMany(req.body.result, function(err, r) {
        assert.equal(null, err);
        assert.equal(result_num, r.insertedCount);

        toQueueTime = new Date().getTime() - local['acceptTime'];
        console.log("necessary time to store to queue: "+toQueueTime+" ms");

        return;
    });

}
Dispatcher & jobWorker
Pythonのマルチスレッドで実装しました。
jobWorkerスレッドは、生成されたらwait()でthreading.Event()を待ちます。
トリガースレッドは、oplogをtsで監視することで、Queueへの追加を契機に処理を開始します。
読み込んだQueueの内容を空きjobWorkerスレッドに割り当て、EventをsetしてjobWorkerに処理を開始させます。
リスト、変数に対するスレッドの参照、更新は意識しているので、ロックはしていません...
の予定だったのですが、LINE APIサーバにマルチスレッドでアクセスしてしまうと、同時接続数のエラーが発生しました。なので、jobWorkerからLINE APIサーバへのアクセスにはacquire()で排他ロックを使用してます。ドキュメントにその辺の事は書かれてないので、1多重、アクセス間隔100msにしています。
なお、私はPythonのマルチスレッドは初心者なので、誤りがあればご指摘ください。
# !/usr/bin/env python
# -*- coding: utf-8 -*-

# Settings of the this program
NumOfThread       = 20
searchInterval    = 100000  # uSec
mainSleepInterval = 60      # Sec

# Settings of the MongoDB
mongoHost = "127.0.0.1";
mongoPort = 27017;
mongoDb   = "line_bot";
mongoCol  = "recvq";

import os,os.path
import sys
import threading
import time
import json
import pymongo
from   pymongo.cursor import CursorType
from   datetime import datetime
import datetime
import jobWorker

usleep = lambda x: time.sleep(x/1000000.0)  # マイクロ秒スリープ


##### workerスレッド
def workerThread(tt):
    tno = str(tt[0])
    while True:
        tt[2].clear()  # Eventをクリアし、Evant発生まで待機
        tt[3] = 'w'
        tt[2].wait()
        if verbose:  # 待機終了。処理開始
            print '\nworker['+tno+']: wake up'

        # ここで実際の処理関数を呼び出す
        jobWorker.jobWorker(verbose, tno, tt[4]['o'])


##### MongoDBトリガースレッド
def TriggerMongo(t, tchain, last, searchInterval, host, port, db, col):
    dbCol = db + '.' + col
    c = pymongo.MongoClient(host, port)
    # Uncomment this for master/slave.
    oplog = c.local.oplog['$main']
    # Uncomment this for replica sets.
    #oplog = c.local.oplog.rs

    first = next(oplog.find().sort('$natural', pymongo.DESCENDING).limit(-1))
    ts = first['ts']

    while True:
        cursor = oplog.find({'ts': {'$gt': ts}}, cursor_type=CursorType.TAILABLE_AWAIT, oplog_replay=True)
        while cursor.alive:
            for doc in cursor:
                # 定期的に {h:0,ts:Timestamp(nn.., 1),o:{},v:2,ns:'',op:'n'} が返る
                # が op:'n' は単なるインフォメーション。無視する。
                if doc['ns']==dbCol and doc['op']!='n':
                    # 空きスレッドを探す
                    i = tchain[last]
                    while t[i][3] != 'w':
                        i = tchain[i]
                        if i == tchain[last]:  # 1周探したら
                            usleep(searchInterval)

                    t[i][4] = doc  # 空きスレッドのt[n][4]にデータを格納
                    t[i][3] = 'r'
                    t[i][2].set()  # t[n]に処理開始指示
                    last = i
                # Work with doc here
                ts = doc['ts']
        print "got out of a while corsor.alive loop"


#######################################################################

# Check of the parameter
verbose = False
if len(sys.argv)==2 and sys.argv[1]=='-v':
    verbose = True
elif len(sys.argv)!=1:
    print "Usage: %s [-v]" % (sys.argv[0],)
    quit()

# workerスレッド管理データ作成 & workerスレッド生成
# [ThreadNo, ThreadObj ,EvantObj, status, スレッドに渡すデータ]
#   (status ' ':準備中, 'w':待機中・空き, 'r':実行中)
#  :
t = [ [0 for i in range(5)] for i in range(NumOfThread)]
for i in range(NumOfThread):
    t[i][0] = i                  # Thread No.
    t[i][2] = threading.Event()  # Evantオブジェクト生成
    t[i][3] = ' '                # is_running
    # workerスレッド生成
    t[i][1] = threading.Thread(name='worker['+str(i)+']', target=workerThread,
                               args=(t[i],))
    t[i][1].setDaemon(True)

# Thread list of circulation
tc = [0 for i in range(NumOfThread)]  # 値は次のスレッドNo.
for i in range(NumOfThread):
    tc[i] = i+1
tc[i] = 0  # make a list of circulation

lastThread = i  # 最後に使ったスレッド. 次はtc[lastThread]番目のスレッドを使う.

# workerスレッド起動
for i in range(NumOfThread):
    t[i][1].start()

# workerスレッド起動後wait状態待ち
yetAllThread = True
while yetAllThread:
    for i in range(NumOfThread):
        if t[i][3] == ' ':
            break
        else:
            usleep(100)  # 監視間隔は0.1ミリ秒
    if i == NumOfThread-1:
        yetAllThread = False
    else:
        usleep(100)  # 監視間隔は0.1ミリ秒

# MongoDBトリガースレッド生成
t_mongo = threading.Thread(name='t_mongo', target=TriggerMongo, args=(t,tc,lastThread,searchInterval,mongoHost,mongoPort,mongoDb,mongoCol,))
t_mongo.setDaemon(True)
t_mongo.start()  # 開始

# mainスレッド
while True:
    time.sleep(mainSleepInterval)
jobWorker.pyが実際の処理を行うスレッドです。ここは送信コンテンツ種別に応じてオウム返しするだけのサンプルです。
MID(from)の取り方がopTypeによって異なりますので注意してください。
# !/usr/bin/env python
# -*- coding: utf-8 -*-
# Note of caution:
# - This program is one of the threads.
# - Must not do exit(),quit()
# - Please use only return()

# Settings of the LINE API Server
lineApiHost      = "trialbot-api_line_me"
accessIntervalMS = 100  # ms
getProfilesUrl   = "https://trialbot-api.line.me/v1/profiles"
postUrl          = "https://trialbot-api.line.me/v1/events"
getContentUrl    = "https://trialbot-api.line.me/v1/bot/message/$messageId/content"
header =  {
    "Content-Type"                : "application/json; charser=UTF-8",
    "X-Line-ChannelID"            : "xxxxxxxxxx",
    "X-Line-ChannelSecret"        : "xxxxxxxxxxxxxxxxxxxxxxxxxxxxxxxx",
    "X-Line-Trusted-User-With-ACL": "xxxxxxxxxxxxxxxxxxxxxxxxxxxxxxxx"
}
postBodyTemplate = {
    "to"          : [],
    "toChannel"   : 1383378250,
    "eventType"   : "138311608800106203",
    "content"     : {}
}

import threading
import time
import datetime
import json

usleep = lambda x: time.sleep(x/1000000.0)  # マイクロ秒スリープ

# LINE APIサーバに複数jobWorkerスレッドからの同時アクセスを回避するためのロック関連
globalLock = {}            # 接続先ごとのロック
globalLastAccessTime = {}  # 接続先ごとの最終アクセスタイム
loadTime = int(time.time()*1000)

def jobWorker(verbose, mynum, recvBody):
    global globalLock
    global globalLastAccessTime

    # 接続先ごとのロックの初期設定
    if not globalLock.has_key(lineApiHost):
        globalLock[lineApiHost] = threading.Lock()
    # 接続先ごとの最終アクセスタイムの初期設定
    if not globalLastAccessTime.has_key(lineApiHost):
        globalLastAccessTime[lineApiHost] = loadTime

    if verbose:
        recvBody['_id'] = 'ObjectId("'+str(recvBody['_id'])+'")'
        print 'worker['+mynum+'] recvBody: '+str(int(time.time()*1000)-recvBody['acceptTime'])+' ms to here from accept'
        print recvBody

    opType = recvBody['content'].get('opType')

    # blocked from user
    if opType == 8:
        # ユーザ管理からブロックユーザのMID(recvBody['content']['params'][0])を削除
        print 'please delete user "'+recvBody['content']['params'][0]+'" from management data.'
        return

    # POSTのBody部をコピー
    postBody = {}
    postBody['to'] = ''
    postBody['toChannel'] = postBodyTemplate['toChannel']
    postBody['eventType'] = postBodyTemplate['eventType']
    postBody['content'] = {}

    # メッセージ返信先
    if opType==4:  # New user
        postBody['to'] = [ recvBody['content']['params'][0] ]
    else:
        postBody['to'] = [ recvBody['content']['from'] ]

    # New user
    if opType==4:
        # ユーザプロフィールを取得
        result = apiServer(verbose, mynum, 'get', lineApiHost, getProfilesUrl, header, postBody['to'][0], accessIntervalMS)
        userProfile = json.loads(result.text)
        resText = 'ようこそ!'
        # ユーザ管理DBにユーザのMIDでプロフィールを追加すべき
        print 'please add '+userProfile['contacts'][0]['displayName']+'\'s profile to user management db.'
        print json.dumps(userProfile, sort_keys = True, indent=4)

    # メッセージに応じた処理
    contentType = recvBody['content'].get('contentType')
    resText = ''
    if contentType == 1:  # Text
        resText = u'はい、'+recvBody['content']['text']+u'、ですね。'
    elif contentType == 2:  # Image
        resText = u'写真ですね...'
    elif contentType == 3:  # Video
        resText = u'動画ですね...'
    elif contentType == 4:  # Audio
        resText = u'ボイスメッセージですね...'
    elif contentType == 7:  # Location
        resText = u'位置情報ですね...'
        if verbose:
            print recvBody['content']['text'].encode('utf-8')
            print recvBody['content']['location']['title'].encode('utf-8')
            print recvBody['content']['location']['address'].encode('utf-8')
    elif contentType == 8:  # Sticker
        resText = u'スタンプですね'
        if verbose:
            print recvBody['content']['contentMetadata']['STKTXT'].encode('utf-8')
    elif contentType == 10: # Contact
        # Contact(contentType==10)ならcontentMetadataのmidプロフィールを取得
        resText = recvBody['content']['contentMetadata']['displayName']+u'さんの連絡先ですね'
        result = apiServer(verbose, mynum, 'get', lineApiHost, getProfilesUrl, header, recvBody['content']['contentMetadata']['mid'], accessIntervalMS)
        contactProfile = json.loads(result.text)
        if verbose:
            print '\ncontactProfile: ' + str(contactProfile)

    # 応答メッセージ送信
    if resText:
        # ユーザプロフィールを取得(本来はユーザ登録時にDBに登録、必要に応じて取得)
        result = apiServer(verbose, mynum, 'get', lineApiHost, getProfilesUrl, header, postBody['to'][0], accessIntervalMS)
        userProfile = json.loads(result.text)
        resText = userProfile['contacts'][0]['displayName'] + u'さん、' + resText
        if verbose:
            print '\nprofile: ' + str(userProfile)

        # 送信メッセージはtext(ContentType=1). その他にImage,Video,Audio,Location,Sticker,multiple messages,rich messagesが送れる
        postBody['content'] = {
            'contentType': 1,
            'toType'     : 1,
            'text'       : resText
        }
        if verbose:
            print '\nworker['+mynum+'] ' + postUrl
            print 'worker['+mynum+'] postHeader: ' + json.dumps(header, sort_keys = True, indent = 4)
            print 'worker['+mynum+'] postBody: ' + json.dumps(postBody, sort_keys = True, indent = 4)

        # メッセージ送信
        r = apiServer(verbose, mynum, 'post', lineApiHost, postUrl, header, postBody, accessIntervalMS)

    return


# LINE APIサーバアクセス
def apiServer(verbose, mynum, method, host, url, header, body, accessIntervalMS):
    import requests
    global globalLock
    global globalLastAccessTime

    globalLock[host].acquire()  # Lock

    # LINE APIサーバへのアクセスに一定時間空ける場合、あとどのくらい待てば良いか
    currentTime = int(time.time()*1000)
    remain = accessIntervalMS - (currentTime - globalLastAccessTime[host])

    if verbose:
        print 'worker['+mynum+'] time since last access(ms): '+str(currentTime - globalLastAccessTime[host])
        print 'worker['+mynum+'] remain='+str(remain)+' ms'

    # wait accessIntervalMS from last access
    if remain > 0:
        usleep(remain*1000)

    if method=='get':
        if body:
            payload = { 'mids': body }
            r = requests.get(url, params=payload, headers=header)
        else:
            if verbose:
                print url, header
            r = requests.get(url, headers=header)
    else:
        r = requests.post(url, data=json.dumps(body), headers=header)

    if verbose and r.status_code!=200:
        print 'worker['+mynum+'] HTTP status code: ' + str(r.status_code)
        print 'worker['+mynum+'] response: ' + r.text

    globalLastAccessTime[host] = int(time.time()*1000)

    globalLock[host].release()  # release
    return r
まとめ
大量メッセージが来ても使える軽量Queue機構、Dispatcher&jowWorkerのスケルトンを実装できたと思います。
64bit CentOS 7の初期状態だとシステム全体でスレッド数の上限は30118なのですが..5000スレッドだと生成に失敗します。(...ってそんなにいらないけど)
このような機構はBOTサーバだけでなく、複数のSMTPサーバを使って大量メールを効率良く配信する時にも必要になります。
jobWorker側を別言語アプリにするなら、マイクロサービス化するか別プロセスでpipeで通信するように変更すれば使えると思います。
この仕組みで負荷分散させるなら、MongoDBを別サーバやShardingにしたり、「4.consurring message」以降を別マシンに持っていきます。それ以上にjobWorkerを分散させたい時はマイクロサービス化するか別のリクエストブローカーの仕組みにした方が良いです。