OS: MAC ELCaptaion 10.11.6
VM: Cent OS7.0
1. VirtualBox Box CentOS7 インストール
こちらを参考にCentOS7をいれます。
1.ネットワーク設定
ディスクからInstallを開始後にNetworkが疎通できている事を確認します。
*メニューからNETWORK&HOSTNAMEを選択しアダプタを一つ一つONにする必要があります。
2.インストール元の設定
下記URLをInstallation Sourceとして指定します。
これがないと後でパッケージが選べません。
http://mirror.centos.org/centos/7/os/x86_64/
3.インストールするパッケージの指定
開発ツールなどをいれておきましょう
4.固定IP割り振り
こちらを参考に起動後に固定IPのeth1を作成します
net-toolsをいないとipconfigができないらしい・・
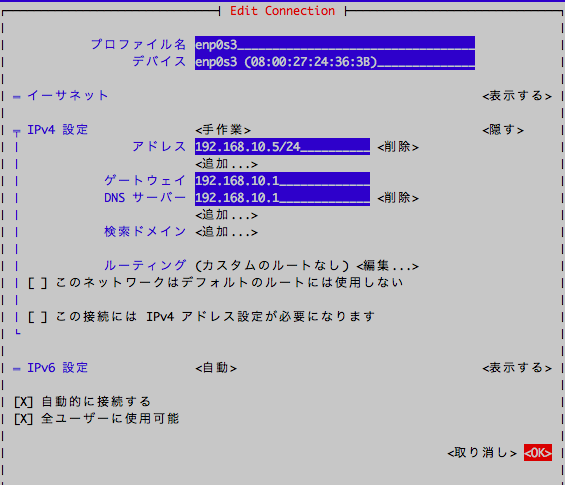
nmtuiでIPアドレスの設定をします。
enp0s3にIPが自動で振られているので固定値に変更します。
[admin@localhost ~]$ nmcli device
デバイス  タイプ    状態                       接続
enp0s3    ethernet  接続済み                   enp0s3
enp0s9    ethernet  接続中(IP 設定を取得中)  Wired connection 1
enp0s8    ethernet  切断済み                   --
lo        loopback  管理無し                   --

[admin@localhost ~]$ nmcli device show enp0s3
GENERAL.デバイス:                       enp0s3
GENERAL.タイプ:                         ethernet
GENERAL.ハードウェアアドレス:           08:00:27:24:36:3B
GENERAL.MTU:                            1500
GENERAL.状態:                           100 (接続済み)
GENERAL.接続:                           enp0s3
GENERAL.CON パス:                       /org/freedesktop/NetworkManager/ActiveConnection/0
WIRED-PROPERTIES.キャリア:              オン
IP4.アドレス[1]:                        192.168.10.5/24
IP4.ゲートウェイ:                       192.168.10.1
IP4.DNS[1]:                             192.168.10.1
IP6.アドレス[1]:                        2408:210:a626:5400:a00:27ff:fe24:363b/64
IP6.アドレス[2]:                        fe80::a00:27ff:fe24:363b/64
IP6.ゲートウェイ:                       fe80::212:e2ff:fe70:911c
IP6.ルート[1]:                          dst = 2408:210:a626:5400::/64, nh = ::, mt = 100
IP6.DNS[1]:                             2404:1a8:7f01:b::3
IP6.DNS[2]:                             2404:1a8:7f01:a::3
nmcli device show enp0s3
で設定されている内容と同じ内容を設定します。
nmtui
systemctl restart NetworkManager
を実行します。
5. SSHD 再起動
vi /etc/ssh/sshd_config
PasswordAuthentication yes # コメントはずす
systemctl restart sshd.service
今回は開発環境用なので上記のコメントを外してsshdを再起動
6.SE Linuxを無効化
setenforce 0
sed -i.bak "/SELINUX/s/enforcing/disabled/g" /etc/selinux/config
7.firewalldを停止
[root@localhost admin]# systemctl stop firewalld
[root@localhost admin]# systemctl disable firewalld
Removed symlink /etc/systemd/system/dbus-org.fedoraproject.FirewallD1.service.
Removed symlink /etc/systemd/system/basic.target.wants/firewalld.service.
[root@localhost admin]# systemctl is-enabled firewalld
disabled
8.共有フォルダーの割当
MACのローカルフォルダとファイル共有できるようにします。
こちらを参考に
1.共有フォルダ設定
2.VboxGuestAdditionのISOを設定
3.Vbox Additionのインストール
/dev/cdromを新規に作成した/media/cdromにマウントして先ほど指定したVboxGuestAdditionの中身を参照できるようにします。
sh VBoxLinuxAdditions.run
を実行してインストール後再起動
[root@localhost admin]# mkdir -p /media/cdrom
[root@localhost admin]# mount -r /dev/cdrom /media/cdrom
[root@localhost admin]# cd /media/cdrom/
[root@localhost cdrom]# ls -al
合計 50775
dr-xr-xr-x  6 root root     2048  7月 22 00:52 .
drwxr-xr-x. 3 root root       18  8月  3 12:00 ..
dr-xr-xr-x  2 root root     2048  7月 22 00:52 32Bit
dr-xr-xr-x  2 root root     2048  7月 22 00:52 64Bit
-r-xr-xr-x  1 root root      647  9月  3  2014 AUTORUN.INF
dr-xr-xr-x  2 root root     2048  7月 22 00:52 OS2
-r-xr-xr-x  1 root root  8058304  7月 22 01:48 VBoxLinuxAdditions.run
-r-xr-xr-x  1 root root 17492480  7月 22 01:49 VBoxSolarisAdditions.pkg
-r-xr-xr-x  1 root root 16242448  7月 22 01:52 VBoxWindowsAdditions-amd64.exe
-r-xr-xr-x  1 root root  9907680  7月 22 01:48 VBoxWindowsAdditions-x86.exe
-r-xr-xr-x  1 root root   268640  7月 22 01:47 VBoxWindowsAdditions.exe
-r-xr-xr-x  1 root root     6381  2月  5 03:40 autorun.sh
dr-xr-xr-x  2 root root     2048  7月 22 00:52 cert
-r-xr-xr-x  1 root root     4824 10月 21  2015 runasroot.sh

[root@localhost cdrom]# sh VBoxLinuxAdditions.run
Verifying archive integrity... All good.
Uncompressing VirtualBox 5.1.2 Guest Additions for Linux...........
VirtualBox Guest Additions installer
Copying additional installer modules ...
Installing additional modules ...
vboxadd.sh: Building Guest Additions kernel modules.
vboxadd.sh: Starting the VirtualBox Guest Additions.

Could not find the X.Org or XFree86 Window System, skipping.

[root@localhost cdrom]# sync;sync
[root@localhost cdrom]# reboot
4.フォルダマウント
mount -t vboxsf [VirtualBox設定で設定したフォルダ名] [CentOS内で新規作成したディレクトリパス]
でマウントできるのでマウント後testディレクトリ作成
[root@localhost cdrom]# mount -t vboxsf SharedCent7 /home/admin/share
[root@localhost admin]# mkdir -p /home/admin/share/test
[root@localhost admin]# ls -al /home/admin/share
合計 4
drwxr-xr-x  1 root  root   102  8月  3 12:09 .
drwx------. 9 admin admin 4096  8月  3 11:41 ..
drwxr-xr-x  1 root  root    68  8月  3 12:09 test
お好みで/etc/fstabに追加してください。
5.フォルダマウント自動化
せっかくCentOS7になったのでこちらを参考に/etc/systemd/systemの下にサービスとして置いてみましょう。systemctに自動マウント用のスクリプトを登録してみましょう。
/home/admin/mountshared.shに下記のmountコマンドを記録しておきます。
[root@localhost admin]# cat /etc/group | grep admin
admin:x:1000:admin
vboxsf:x:991:admin
adminでmountしたいので1000を指定します。
mount -o uid=1000,gid=1000 -t vboxsf SharedCent7 /home/admin/share
systemdに登録しましょう。
[root@localhost system]# cd /etc/systemd/system
[root@localhost system]# vi sharemout.service
[Unit]
Description=mount shared directory
After=NetworkManager.service

[Service]
ExecStart=/usr/bin/sh /home/admin/mountshared.sh
Restart = always
Type = simple

[Install]
WantedBy=multi-user.target

[root@localhost system]# systemctl enable sharemout
[root@localhost system]# systemctl list-unit-files --type=service  | grep sharemout
sharemout.service                           enabled
[root@localhost system]#
[root@localhost system]# systemctl start sharemout
[root@localhost system]# df
ファイルシス            1K-ブロック      使用   使用可 使用% マウント位置
/dev/mapper/centos-root    10754048   2398956  8355092   23% /
devtmpfs                     485448         0   485448    0% /dev
tmpfs                        508428         0   508428    0% /dev/shm
tmpfs                        508428      6700   501728    2% /run
tmpfs                        508428         0   508428    0% /sys/fs/cgroup
/dev/sda1                    508588    127628   380960   26% /boot
tmpfs                        101688         0   101688    0% /run/user/1000
SharedCent7               243941376 144818488 99122888   60%

[admin@localhost ~]$ ls -al ~
.....
drwxr-xr-x  1 admin admin  102  8月  3 13:43 share
shareフォルダが無事にadminで登録されている事を確認し、リブート後にもmountされていればOKです。


