はじめに
メール送信によりデータを投稿してみたいことあると思います。
mandrillを利用すれば簡単に実現できたので今回はサンプルプロジェクトを作りつつ覚書がてら綴っておこうと思います。
サンプルプロジェクトの概要
- ユーザー登録が必要なコメントが出来る掲示板アプリ
- 特定のメールに送信すると新しい掲示板を作成できる
- 自分の作成した掲示板にコメント通知メールが届く
- コメント通知メールに返信すると該当の掲示板にコメントできる
サンプルプロジェクトのER図
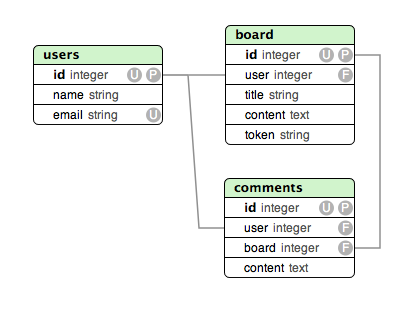
boardにもったtokenはコメント通知返信時にどのboardか特定するのに利用する感じ。
まずはメール関連以外を作成
deviseとbootstrapを利用してサクっと作成。
この時点のコードはこちら。
メールを受信して掲示板を作成できるようにする
- mandrillのgemを追加
gem 'mandrill-rails'
- evendis/mandrill-railsを参考にinbound用の処理を追加
class Board < ActiveRecord::Base
  belongs_to :user
  has_many :comments, dependent: :destroy

  validates :title, presence: true
  validates :content, presence: true

  # 以下のメソッドを追加
  def self.save_inbound_mail!(event_payload)
    user = User.find_by!(email: event_payload.sender_email)
    user.boards.create!(title: event_payload.subject, content: event_payload.message_body(:text))
  end
end
class InboxController < ApplicationController
  include Mandrill::Rails::WebHookProcessor

  skip_before_action :authenticate_user!

  def handle_inbound(event_payload)
    Board.save_inbound_mail!(event_payload)
  end
end
Rails.application.routes.draw do
  devise_for :users
  resource :inbox, controller: :inbox, only: %i(show create) # 追加
  resources :boards, except: %i(edit update) do
    resources :comments, only: %i(create destroy)
  end
  root 'boards#index'
end
ここまで書いて一度herokuへdeploy。
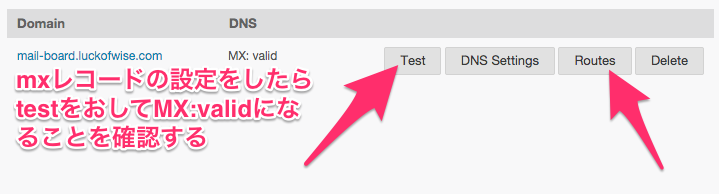
mandrillで設定時に作成したアクションへアクセスできるかチェックするため。
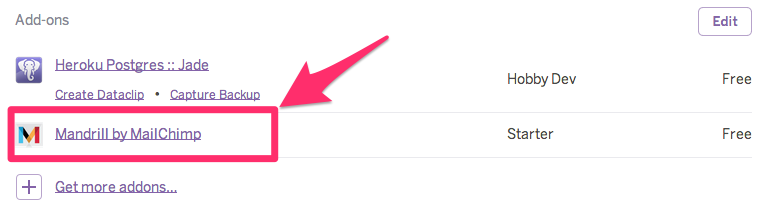
- mandrillの設定
-
herokuからmandrillへアクセス
-
inboundの設定へ

-
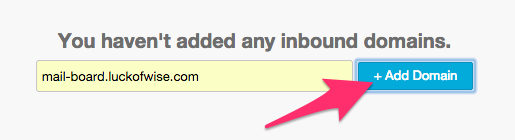
受信するメールのドメインを追加
-
DNSの設定

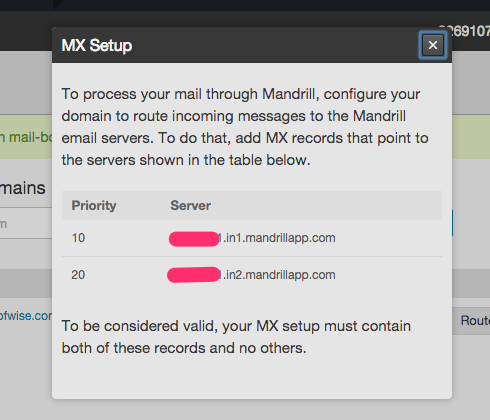
Route53の場合はこんな感じでMXレコードを追加。
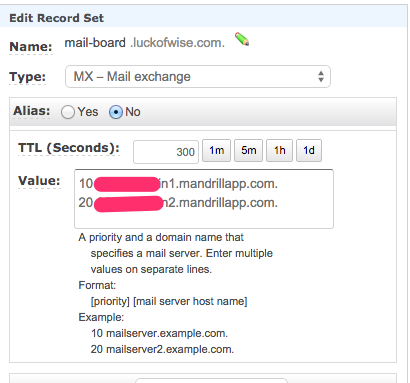
value-dominで同様の設定をしようとしたら上手くいかなかった。
原因は深く調べてないけどルートのMXレコードがあるとサブドメインのMXレコードをうまく設定できないのかな。。。 -
受信メールの設定へ
-
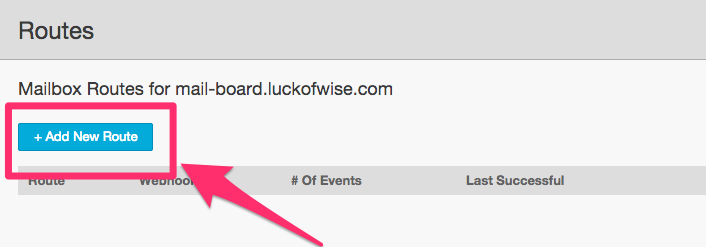
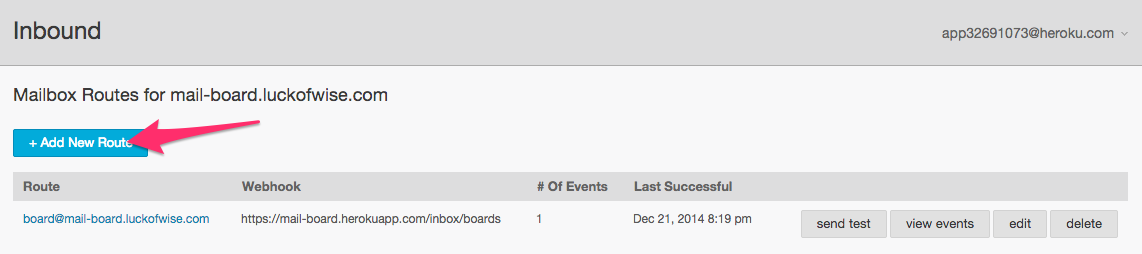
Routeを追加
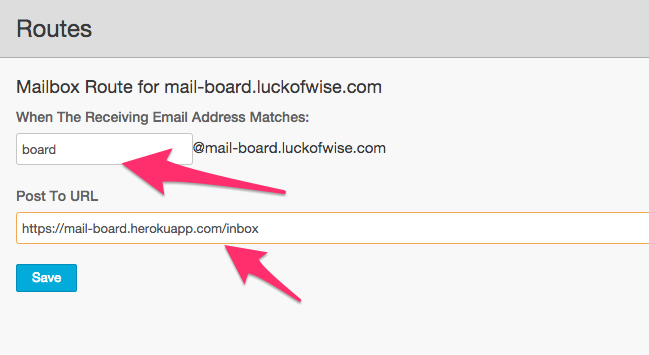
今回は board@mail-board.luckofwise.com にメールを送信すると掲示板を作成するように設定。
Post To URLへアクセス出来ないと設定できないので予めアプリをデプロイしておく必要があります。
これでMandrillの設定は完了。
board@mail-board.luckofwise.com にメールを送信すると掲示板を作成するようになりました。
この時点のコードはこちら。
コメント通知メールを送信するようにする
次に作成した掲示板にコメントが投稿されると作成者に通知メールが送信されるように改修します。
class UserMailer < ActionMailer::Base
  default from: 'no-reply@' + Rails.application.secrets.mail_domain_name

  def comment_created(comment)
    @comment = comment
    mail to: comment.board.user.email, subject: '新しいコメントがつきました'
  end
end
%p 「#{@comment.board.title}」にコメントがつきました。

%div{style: 'border: 1px dashed gray; padding: 0 10px; margin-bottom: 20px;'}
  %p #{@comment.user.name} #{l @comment.created_at}

  = simple_format(@comment.content)

= link_to board_url(@comment.board), board_url(@comment.board)
class CommentsController < ApplicationController
  before_action :set_board

  def create
    @comment = @board.comments.build(comment_params)
    @comment.user = current_user
    if @comment.save
      # 以下の行を追加
      UserMailer.comment_created(@comment).deliver! unless @comment.user == @comment.board.user
      redirect_to @board, notice: 'コメントしました。'
    else
      render 'boards/show'
    end
  end
  略
end
ここは特に変わったことしてないです。
この時点のコードはこちら。
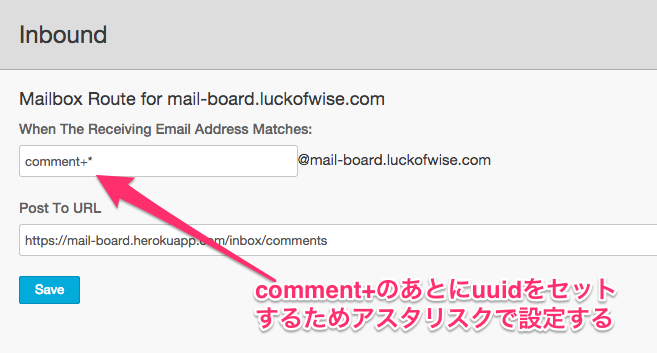
コメント通知メールに返信でコメントできるようにする
- メールからboardを特定するためのtokenをセット
今までに作ったboardはよしなにセットするか作り直すかしてください。
gem 'uuidtools' #追加
class Board < ActiveRecord::Base
  略
  # 以下を追加
  before_create :generate_token
  def generate_token
    self.token = UUIDTools::UUID.random_create.to_s
  end
  略
end
- コメント投稿用のinboundの処理を追加
class Comment < ActiveRecord::Base
  略
  # 以下を追加
  def self.save_inbound_mail!(event_payload)
    user = User.find_by!(email: event_payload.sender_email)
    board = Board.find_by!(token: event_payload.recipient_emails.first.split('@').first[/^.*\+(.*)$/, 1])
    board.comments.create!(user: user, content: event_payload.message_body(:text))
  end
end
class Inbox::CommentsController < ApplicationController
  include Mandrill::Rails::WebHookProcessor

  skip_before_action :authenticate_user!

  def handle_inbound(event_payload)
    Comment.save_inbound_mail!(event_payload)
  end
end
Rails.application.routes.draw do
  devise_for :users
  namespace :inbox do
    resource :boards, only: %i(show create)
    resource :comments, only: %i(show create)
  end
  resources :boards, except: %i(edit update) do
    resources :comments, only: %i(create destroy)
  end
  root 'boards#index'
end
メール受信用のコントローラーが複数になるので構成を少し変更。
- コメント通知メールにreply_toを設定
class UserMailer < ActionMailer::Base
  default from: 'no-reply@' + Rails.application.secrets.mail_domain_name

  def comment_created(comment)
    @comment = comment
    mail to: comment.board.user.email, subject: '新しいコメントがつきました',
         reply_to: "comment+#{comment.board.token}@#{Rails.application.secrets.mail_domain_name}"
  end
end
- mandrillにコメント投稿用の設定を追加
これでコメント通知メールに返信してコメントを投稿することができます。
これでサンプルアプリは完成です。
この時点のコードはこちら。
その他
HerokuにはMandrill以外にメール受信でpostしてくれるAddonesは存在します。
CloudMailInを利用するとドメインをもっていなくてもCloudMailInが受信用のメールアドレスを用意してくれるので気軽に試せるかと思います。
おわりに
比較的簡単にメールを送信することによりデータを登録することが出来たと思います。
Herokuのアドオンには便利なのがいっぱいありますねー。
今回作ったサンプルプロジェクトはこちらで動作の確認ができます。
https://mail-board.herokuapp.com/
(そのうち消すかもしれないですが。。。)
今回作ったコード
https://github.com/LuckOfWise/mail-board