iOSアプリのログ収集を実装してみたのでまとめ。
タイトルの通り、ログ収集ライブラリとしてクックパッド様のPureeを使い、
CognitoでAWSの認証を行いつつS3にログをアップロードした。
Pureeについては以下を参照。
Puree概要
Puree iOS版の使い方
Cognitoについては以下を参照。
Cognito概要
Cognito設定方法
実装
Objective-Cでゴメンナサイ。
ライブラリ導入
CocoaPodsにて。
  pod "Puree"
  pod 'AWSiOSSDKv2'
  pod 'AWSCognitoSync'
$ pod install
Cognitoの認証部分実装
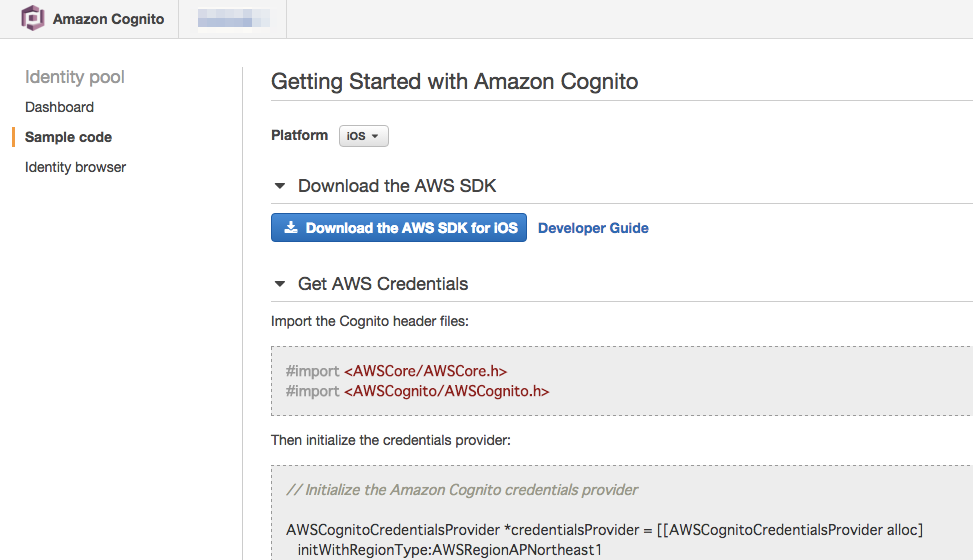
AWSのコンソールで、ご丁寧にサンプルコードを表示してくれるのだけれども…。
ここに表示されるコードをそのままコピペすると、S3へのデータ転送時に以下のようなエラーが出てうまく動かなかった。
Upload failed: [Error Domain=com.amazonaws.AWSS3ErrorDomain Code=0 "(null)" UserInfo={HostId=XXXXXXXXXXXX}, Bucket=XXXXXXXXXXXX, Endpoint=XXXXXXXXXXXX.s3.amazonaws.com, Message=The bucket you are attempting to access must be addressed using the specified endpoint. Please send all future requests to this endpoint., Code=PermanentRedirect, RequestId=XXXXXXXXXXXX}]
いろいろ試行錯誤した結果、どうやらサンプルコード内でAWSCognitoCredentialsProviderのリージョンとAWSServiceConfigurationのリージョンが食い違っていることが原因らしい。
AWSCognitoCredentialsProviderのリージョンに統一することでうまくいくようになった。
(何か設定がおかしいのか、サンプルコードがミスってるのか…?)
今回はAWSRegionAPNortheast1だったので、以下のように修正。
- AWSServiceConfiguration *configuration = [[AWSServiceConfiguration alloc] initWithRegion:AWSRegionUSEast1 credentialsProvider:credentialsProvider];
+ AWSServiceConfiguration *configuration = [[AWSServiceConfiguration alloc] initWithRegion:AWSRegionAPNortheast1 credentialsProvider:credentialsProvider];
S3へのログ転送クラス実装
S3への転送には、AWSS3TransferManagerクラスを使う。でもこれ、ファイルのアップロードしかできない。
そこでNSDataオブジェクトを直接転送データとして指定できたりするAmazon S3 Transfer Utilityというのができてる。
(バイナリを直接転送してるわけではなくて、裏で一時ファイルを作成してから転送してる。)
ただし今のところBeta版。
使ってみたところ、先のCognitoのエラーによって転送できてないにも関わらず、エラー無しで完了した!ってなるので、ちょっと見送り。もちろん本当にエラーがなければ転送自体はできるけれども。
ということで今回は以下のサンプルを参考にデータ転送部分を実装しつつ、
https://github.com/awslabs/aws-sdk-ios-samples/blob/master/S3TransferManager-Sample/Objective-C/S3TransferManagerSample/UploadViewController.m
以下のAmazon S3 Transfer Utilityのコードを参考に、一時ファイルの生成、削除処理をくっつけた。
https://github.com/aws/aws-sdk-ios/blob/master/AWSS3/AWSS3TransferUtility.m
それでできたのがコチラ。
@interface DataUploader: NSObject

-(id)initWithBucket:(NSString*)bucket;
-(void)uploadWithObjectKey:(NSString*)objectKey dataToUpload:(NSData*)data completion:(void(^)(BOOL))callback;
-(void)cleanUpTemporaryDirectory;

@property (strong, nonatomic) NSString *temporaryDirectoryPath;
@property (strong, nonatomic) NSString *bucketName;
@end
# import <AWSS3/AWSS3.h>

NSString *const DataUploaderIdentifier = @"DataUploaderIdentifier";
NSTimeInterval const TimeoutIntervalForTempLogfile = 60 * 60; // 1hours

@implementation DataUploader

-(id)initWithBucket:(NSString*)bucket
{
    if (self = [super init]) {

        // 一時ファイル用のディレクトリ作成
        _temporaryDirectoryPath = [NSTemporaryDirectory() stringByAppendingPathComponent:[DataUploaderIdentifier aws_md5String]];
        NSURL *directoryURL = [NSURL fileURLWithPath:_temporaryDirectoryPath];
        NSError *error = nil;
        BOOL result = [[NSFileManager defaultManager] createDirectoryAtURL:directoryURL
                                               withIntermediateDirectories:YES
                                                                attributes:nil
                                                                     error:&error];
        if (!result) {
            AWSLogError(@"Failed to create a temporary directory: %@", error);
        }

        // 一時ファイル用ディレクトリから不要なファイルを削除
        __weak DataUploader *weakSelf = self;
        dispatch_async(dispatch_get_global_queue(DISPATCH_QUEUE_PRIORITY_BACKGROUND, 0), ^{
            [weakSelf cleanUpTemporaryDirectory];
        });

        // バケット名保存
        _bucketName = bucket;
    }
    return self;
}

// S3へのアップロード
-(void)uploadWithObjectKey:(NSString*)objectKey dataToUpload:(NSData*)data completion:(void(^)(BOOL))callback
{
    // 一時ファイル生成
    NSString *fileName = [NSString stringWithFormat:@"%@.tmp", [[NSProcessInfo processInfo] globallyUniqueString]];
    NSString *filePath = [_temporaryDirectoryPath stringByAppendingPathComponent:fileName];
    NSFileManager *fileManager = [NSFileManager defaultManager];
    BOOL result = [fileManager fileExistsAtPath:filePath];
    if(!result){
        NSFileManager *fileManager = [NSFileManager defaultManager];
        result = [fileManager createFileAtPath:filePath contents:[NSData data] attributes:nil];
        if(!result){
            NSLog(@"Failed to create file: %s", strerror(errno));
            callback(NO);
            return;
        }
    }
    NSFileHandle *fileHandle = [NSFileHandle fileHandleForWritingAtPath:filePath];
    if(!fileHandle){
        NSLog(@"Failed to create file handle: %s", strerror(errno));
        callback(NO);
        return;
    }

    [fileHandle writeData:data];
    [fileHandle synchronizeFile];
    [fileHandle closeFile];
    NSURL *url = [NSURL fileURLWithPath:filePath];

    // S3への転送リクエスト生成
    AWSS3TransferManagerUploadRequest *uploadRequest = [AWSS3TransferManagerUploadRequest new];
    uploadRequest.body = url;
    uploadRequest.key = objectKey;
    uploadRequest.bucket = self.bucketName;
    uploadRequest.contentType = @"text/plain";

    // S3への転送
    AWSS3TransferManager *transferManager = [AWSS3TransferManager defaultS3TransferManager];
    [[transferManager upload:uploadRequest] continueWithBlock:^id(AWSTask *task) {
        if (task.error) {
            NSLog(@"Failed to upload log data: %@", task.error);
            callback(NO);
        }
        if (task.result) {
            dispatch_async(dispatch_get_main_queue(), ^{
                NSLog(@"Scucess to upload log data!");
                callback(YES);
            });
        }
        return nil;
    }];
}

// 一時ファイルを保存しているディレクトリから不要なファイルを削除
- (void)cleanUpTemporaryDirectory {
    NSError *error = nil;
    NSArray *contentsOfDirectory = [[NSFileManager defaultManager] contentsOfDirectoryAtPath:self.temporaryDirectoryPath
                                                                                       error:&error];
    if (!contentsOfDirectory) {
        AWSLogError(@"Failed to retrieve the contents of the tempoprary directory: %@", error);
    }

    // 一時ディレクトリのファイルを全てチェック
    __weak DataUploader *weakSelf = self;
    [contentsOfDirectory enumerateObjectsUsingBlock:^(id obj, NSUInteger idx, BOOL *stop) {
        NSString *fileName = (NSString *)obj;
        NSString *filePath = [weakSelf.temporaryDirectoryPath stringByAppendingPathComponent:fileName];
        NSError *error = nil;
        NSDictionary *attributes = [[NSFileManager defaultManager] attributesOfItemAtPath:filePath
                                                                                    error:&error];
        if (!attributes) {
            AWSLogError(@"Failed to load temporary file attributes: %@", error);
        }
        NSDate *fileCreationDate = [attributes objectForKey:NSFileCreationDate];

        // 作成されてから一時間以上経過しているファイルを削除
        if ([fileCreationDate timeIntervalSince1970] < [[NSDate date] timeIntervalSince1970] - TimeoutIntervalForTempLogfile) {
            BOOL result = [[NSFileManager defaultManager] removeItemAtPath:filePath
                                                                     error:&error];
            if (!result) {
                AWSLogError(@"Failed to remove a temporary file: %@", error);
            }
        }
    }];
}

@end
Amazon S3 Transfer Utilityを使う場合のコードも作ったので一応上げておく。
uploadWithObjectKey:dataToUpload:completionを以下に差し替えると動くはず。
またこの場合、一時ファイル関連の処理(initWithBucketの一時ファイル用ディレクトリ作成処理/ファイル削除処理、cleanUpTemporaryDirectory)はAmazon S3 Transfer Utilityがやってくれるので不要になる。
-(void)uploadWithObjectKey:(NSString*)objectKey dataToUpload:(NSData*)data completion:(void(^)(BOOL))callback
{
    AWSS3TransferUtilityUploadExpression *expression = [AWSS3TransferUtilityUploadExpression new];
    expression.uploadProgress = ^(AWSS3TransferUtilityTask *task, int64_t bytesSent, int64_t totalBytesSent, int64_t totalBytesExpectedToSend) {
        dispatch_async(dispatch_get_main_queue(), ^{});
    };

    AWSS3TransferUtilityUploadCompletionHandlerBlock completionHandler = ^(AWSS3TransferUtilityUploadTask *task, NSError *error) {
        dispatch_async(dispatch_get_main_queue(), ^{
            if (error) {
                NSLog(@"Failed to upload log data: %@", error);
                callback(NO);
            }
            else {
                NSLog(@"scucess to upload log data!");
                callback(YES);
            }
        });
    };

    AWSS3TransferUtility *transferUtility = [AWSS3TransferUtility defaultS3TransferUtility];
    [[transferUtility uploadData:data
                          bucket:self.bucketName
                             key:objectKey
                     contentType:@"text/plain"
                      expression:expression
                completionHander:completionHandler] continueWithBlock:^id(AWSTask *task) {
        if (task.error) {
            NSLog(@"Error: %@", task.error);
            callback(NO);
        }
        if (task.exception) {
            NSLog(@"Exception: %@", task.exception);
            callback(NO);
        }

        return nil;
    }];
}
Pureeへの導入
Configurationの設定と、Filter, BufferOutputプラグインの実装は公式の説明通りにやれば問題ないと思うので割愛。
ここでは上に書いたDataUploaderクラスの使い方のみ。
// BufferOutputプラグインのクラスにて。
- (void)writeChunk:(PURBufferedOutputChunk *)chunk completion:(void (^)(BOOL))completion
{
	// S3にアップロードするログデータ生成
    NSData *logData = 【ログデータ生成処理】;
    // S3でのファイルのキーを生成
    NSString *objectKey = 【オブジェクトキー】;

    // 送信
    DataUploader *dataUploader = [[DataUploader alloc] initWithBucket:【バケット名】];
    [dataUploader uploadWithObjectKey:objectKey dataToUpload:logs completion:^(BOOL result) { completion(result); }];
}
