はじめに
こんにちは![]()
UITableViewの上側にNavigationBarのようなViewを固定しつつ、スクロール値によって移動させる実装について少し悩んだので、共有してみたいと思います。
tableViewのheaderというか上部を、下にスクロールした時は固定で、上にやったら上に行くサンプル Qiita
http://qiita.com/mochizukikotaro/items/f48559630a639e7d467b
上記を拝見させて頂き、こちらの記事ではUITableViewにUIViewを乗せる実装(その手があったか!!)でしたが、今回は別の方法を書かせて頂きたいと思います。
至らぬ点など多々あると思いますが、コメントなど頂けたら幸いです。
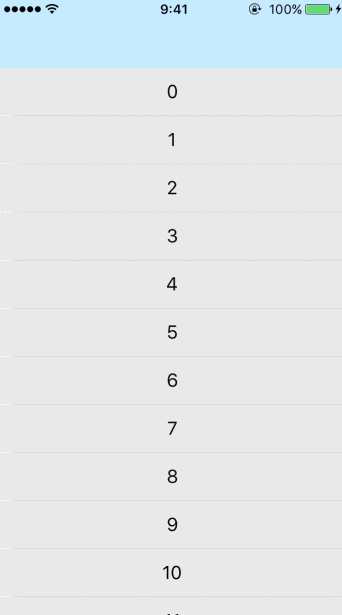
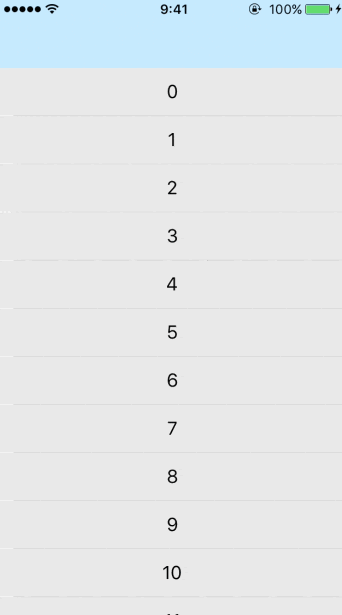
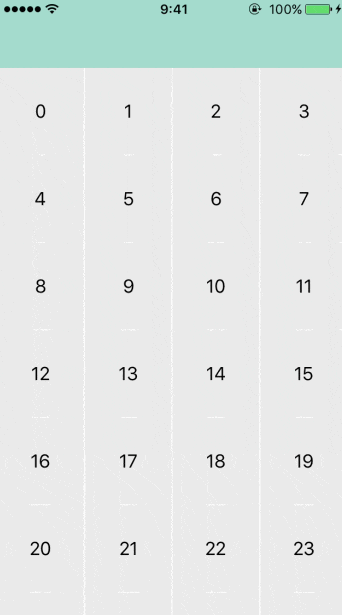
サンプル
![]() 以下は今回の記事の実装
以下は今回の記事の実装

![]()
TableHeaderViewやUICollectionReusableViewを利用すれば出来ると勘違いした私は、HeaderViewも一緒に動いてしまう事に実行して気が付きました![]()
実装について
UITableViewには、UICollectionViewLayout sectionInsetのようなプロパティが無いことで、UITableViewのcontentInsetを設定した時にoffSetがその値だけ差が出てしまうのが少しややこしかったです。
Insets around section of UITableView ?
ソースコード
UITableView
import UIKit

class MainViewController: UIViewController {

    var topBarView: UIView!
    @IBOutlet weak var tableView: UITableView!

    override func viewDidLoad() {
        super.viewDidLoad()
        //固定するTopBarを作成
        topBarView = UIView(frame: CGRect.init(x: 0, y: 0, width: UIScreen.main.bounds.size.width, height: 64))
        topBarView.backgroundColor = UIColor(red: 187/255, green: 231/255, blue: 255/255, alpha: 1)
        view.addSubview(topBarView)

        tableView.delegate = self
        tableView.dataSource = self

        tableView.contentInset = UIEdgeInsets(top: topBarView.frame.size.height, left: 0, bottom: 0, right: 0)
        tableView.scrollIndicatorInsets = UIEdgeInsets(top: topBarView.frame.size.height, left: 0, bottom: 0, right: 0)

        tableView.register(UINib(nibName: "CustomTableViewCell", bundle: nil), forCellReuseIdentifier: "CustomTableViewCell")
    }
}

extension MainViewController: UITableViewDataSource {
    //テーブルの行数を返却
    func tableView(_ tableView: UITableView, numberOfRowsInSection section: Int) -> Int {
        return 20
    }
    //テーブルの行ごとのセルを返却する
    func tableView(_ tableView: UITableView, cellForRowAt indexPath: IndexPath) -> UITableViewCell {
        let cell = tableView.dequeueReusableCell(withIdentifier: "CustomTableViewCell") as! CustomTableViewCell
        cell.titleLabel.text = "\(indexPath.row)"
        return cell
    }
}

extension MainViewController: UITableViewDelegate {
    //スクロールされた時
    func scrollViewDidScroll(_ scrollView: UIScrollView) {
        let height = topBarView.frame.size.height
        if scrollView.contentOffset.y <= -height {
            topBarView.frame.origin.y = 0
        } else {
            let max = -topBarView.frame.size.height
            topBarView.frame.origin.y = -scrollView.contentOffset.y - height <= max ? max : -scrollView.contentOffset.y - height
        }
    }
}
UICollectionView
import UIKit

class MainViewController: UIViewController {

    var topBarView: UIView!
    @IBOutlet weak var collectionView: UICollectionView!

    var layout: UICollectionViewLayout {
        let layout = UICollectionViewFlowLayout()
        layout.scrollDirection = .vertical
        layout.minimumLineSpacing = 1
        layout.minimumInteritemSpacing = 1
        layout.sectionInset = UIEdgeInsets(top: topBarView.frame.size.height, left: 0, bottom: 0, right: 0)
        let columnCount = 4
        let cellLength = (UIScreen.main.bounds.size.width / CGFloat(columnCount)) - layout.minimumInteritemSpacing
        layout.itemSize = CGSize(width: cellLength, height: cellLength)
        return layout
    }

    override func viewDidLoad() {
        super.viewDidLoad()
        //固定するTopBarを作成
        topBarView = UIView(frame: CGRect.init(x: 0, y: 0, width: UIScreen.main.bounds.size.width, height: 64))
        topBarView.backgroundColor = UIColor(red: 150/255, green: 216/255, blue: 197/255, alpha: 1)
        view.addSubview(topBarView)

        collectionView.dataSource = self
        collectionView.delegate = self
        collectionView.collectionViewLayout = layout
        collectionView.scrollIndicatorInsets = UIEdgeInsets(top: topBarView.frame.size.height, left: 0, bottom: 0, right: 0)
        collectionView.register(UINib(nibName: "CustomCollectionViewCell", bundle: nil), forCellWithReuseIdentifier: "CustomCollectionViewCell")
    }
}

extension MainViewController: UICollectionViewDataSource {
    //セルの個数を返す
    func collectionView(_ collectionView: UICollectionView, numberOfItemsInSection section: Int) -> Int {
        return 50
    }
    //セルを返却
    func collectionView(_ collectionView: UICollectionView, cellForItemAt indexPath: IndexPath) -> UICollectionViewCell {
        let cell = collectionView.dequeueReusableCell(withReuseIdentifier: "CustomCollectionViewCell", for: indexPath) as! CustomCollectionViewCell
        cell.label.text = "\(indexPath.row)"
        return cell
    }
}


extension MainViewController: UICollectionViewDelegate {
    //スクロールされた時
    func scrollViewDidScroll(_ scrollView: UIScrollView) {
        if scrollView.contentOffset.y <= 0 {
            topBarView.frame.origin.y = 0
        } else {
            let max = -topBarView.frame.size.height
            topBarView.frame.origin.y = -scrollView.contentOffset.y <= max ? max : -scrollView.contentOffset.y
        }
    }
}
参考にさせていただいた記事
見て頂いてありがとうございます。