はじめに
こんにちは。
XLPagerTabStripという素晴らしいSwift製のiOSライブラリを見つけたので使い方などを共有してみたいと思います。
至らぬ点など多々あると思いますが、コメントなど頂けたら幸いです。
※画像のリンクはGitHubから引用させていただきました
導入について
実行環境は(Swift3.0.2)(Xcode8.2.1)で、CocoaPodsを利用し、
今回は基本的なgifの左上のButton Barをサンプルにしてみたいと思います。
use_frameworks!

pod 'XLPagerTabStrip'
クラスの準備
管理元クラス(ButtonBarPagerTabStripViewController)
ViewControllerたちを管理するButtonBarPagerTabStripViewControllerを継承したクラスを用意します。
import UIKit
import XLPagerTabStrip

class MainViewController: ButtonBarPagerTabStripViewController {

    override func viewDidLoad() {
        super.viewDidLoad()
    }

    override func viewControllers(for pagerTabStripController: PagerTabStripViewController) -> [UIViewController] {
        //管理されるViewControllerを返す処理
        let firstVC = UIStoryboard(name: "Main", bundle: nil).instantiateViewController(withIdentifier: "First")
        let secondVC = UIStoryboard(name: "Main", bundle: nil).instantiateViewController(withIdentifier: "Second")
        let thirdVC = UIStoryboard(name: "Main", bundle: nil).instantiateViewController(withIdentifier: "Third")
        let childViewControllers:[UIViewController] = [firstVC, secondVC, thirdVC]
        return childViewControllers
    }
}
管理されるViewControllerたち(IndicatorInfoProviderプロトコルを実装したUIViewController)
スワイプやボタンを押されて遷移するViewControllerのクラスを用意します。
今回の例ではFirst(紫色),Second(緑色),Third(水色)を用意しましたが、FirstとなっているところをSecond,Thirdとしてあるだけです。
import UIKit
import XLPagerTabStrip

class FirstViewController: UIViewController, IndicatorInfoProvider {

    //ここがボタンのタイトルに利用されます
    var itemInfo: IndicatorInfo = "First"

    override func viewDidLoad() {
        super.viewDidLoad()
    }

    //必須
    func indicatorInfo(for pagerTabStripController: PagerTabStripViewController) -> IndicatorInfo {
        return itemInfo
    }
}
Storyboardの準備
- ViewControllerたちを管理するViewController 1つ (黒色)
- スワイプで切り替わるViewController 3つ (紫色,緑色,水色)
を用意し、StoryboardIDをFirst(紫色),Second(緑色),Third(水色)とそれぞれ設定し、それぞれのクラスの接続も行なっています。
黒色のViewControllerに対して切り替え部分になるScroll Viewとボタン部分になるCollection Viewを配置します。
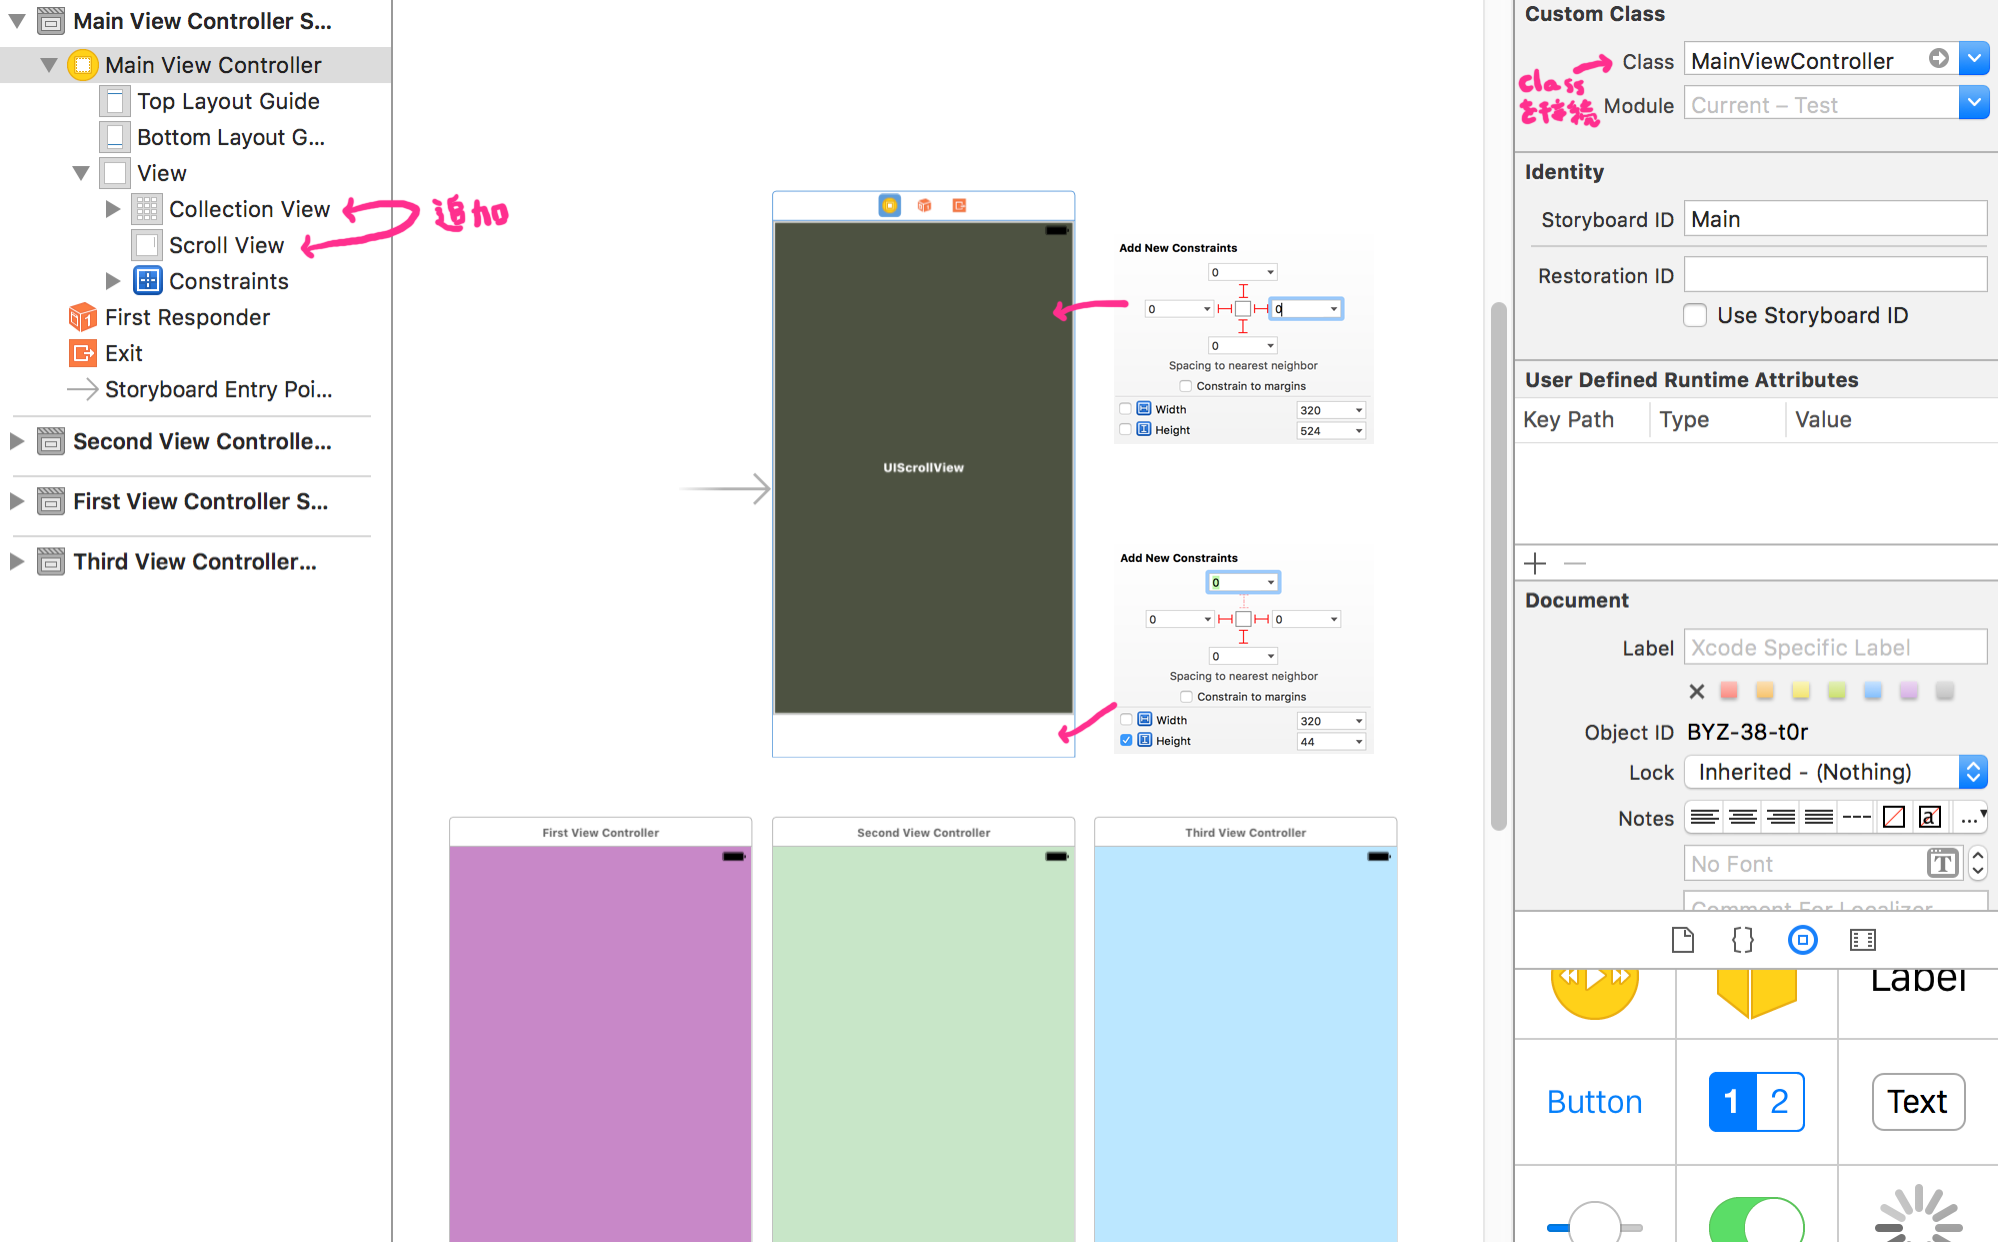
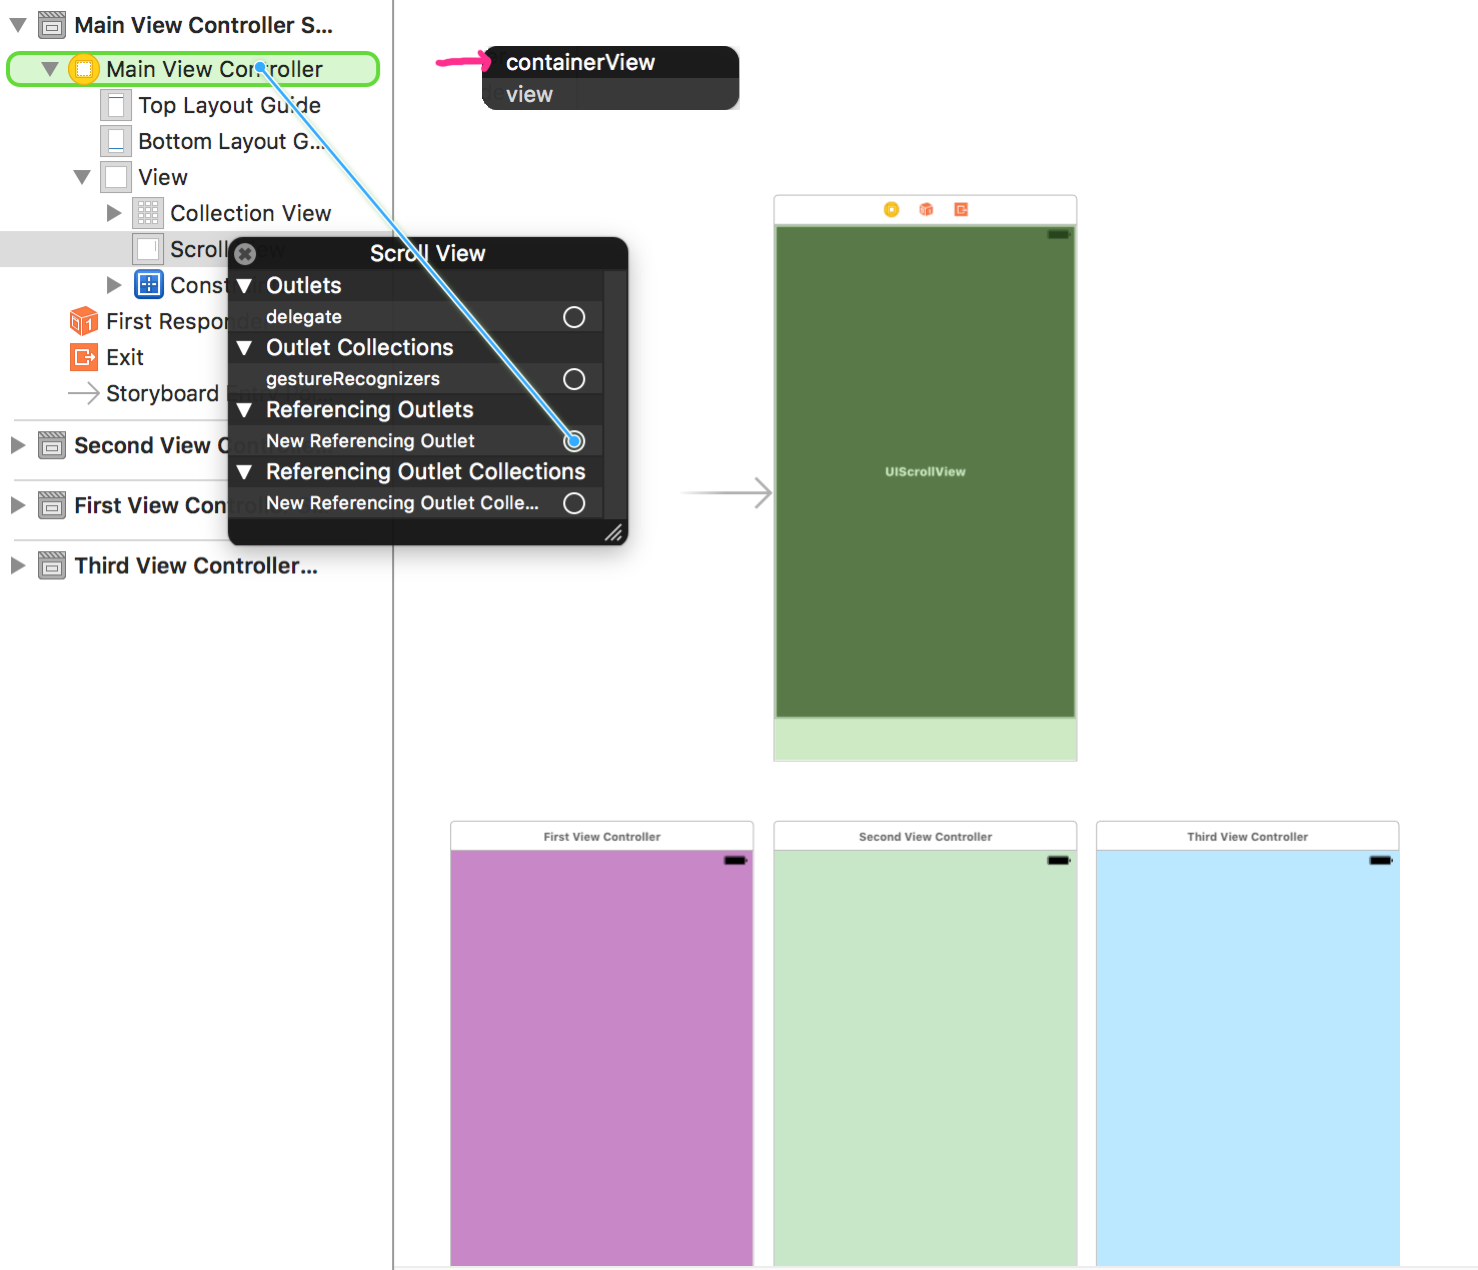
黒色のViewControllerのScroll Viewを選択して右クリックし、以下のように設定します。
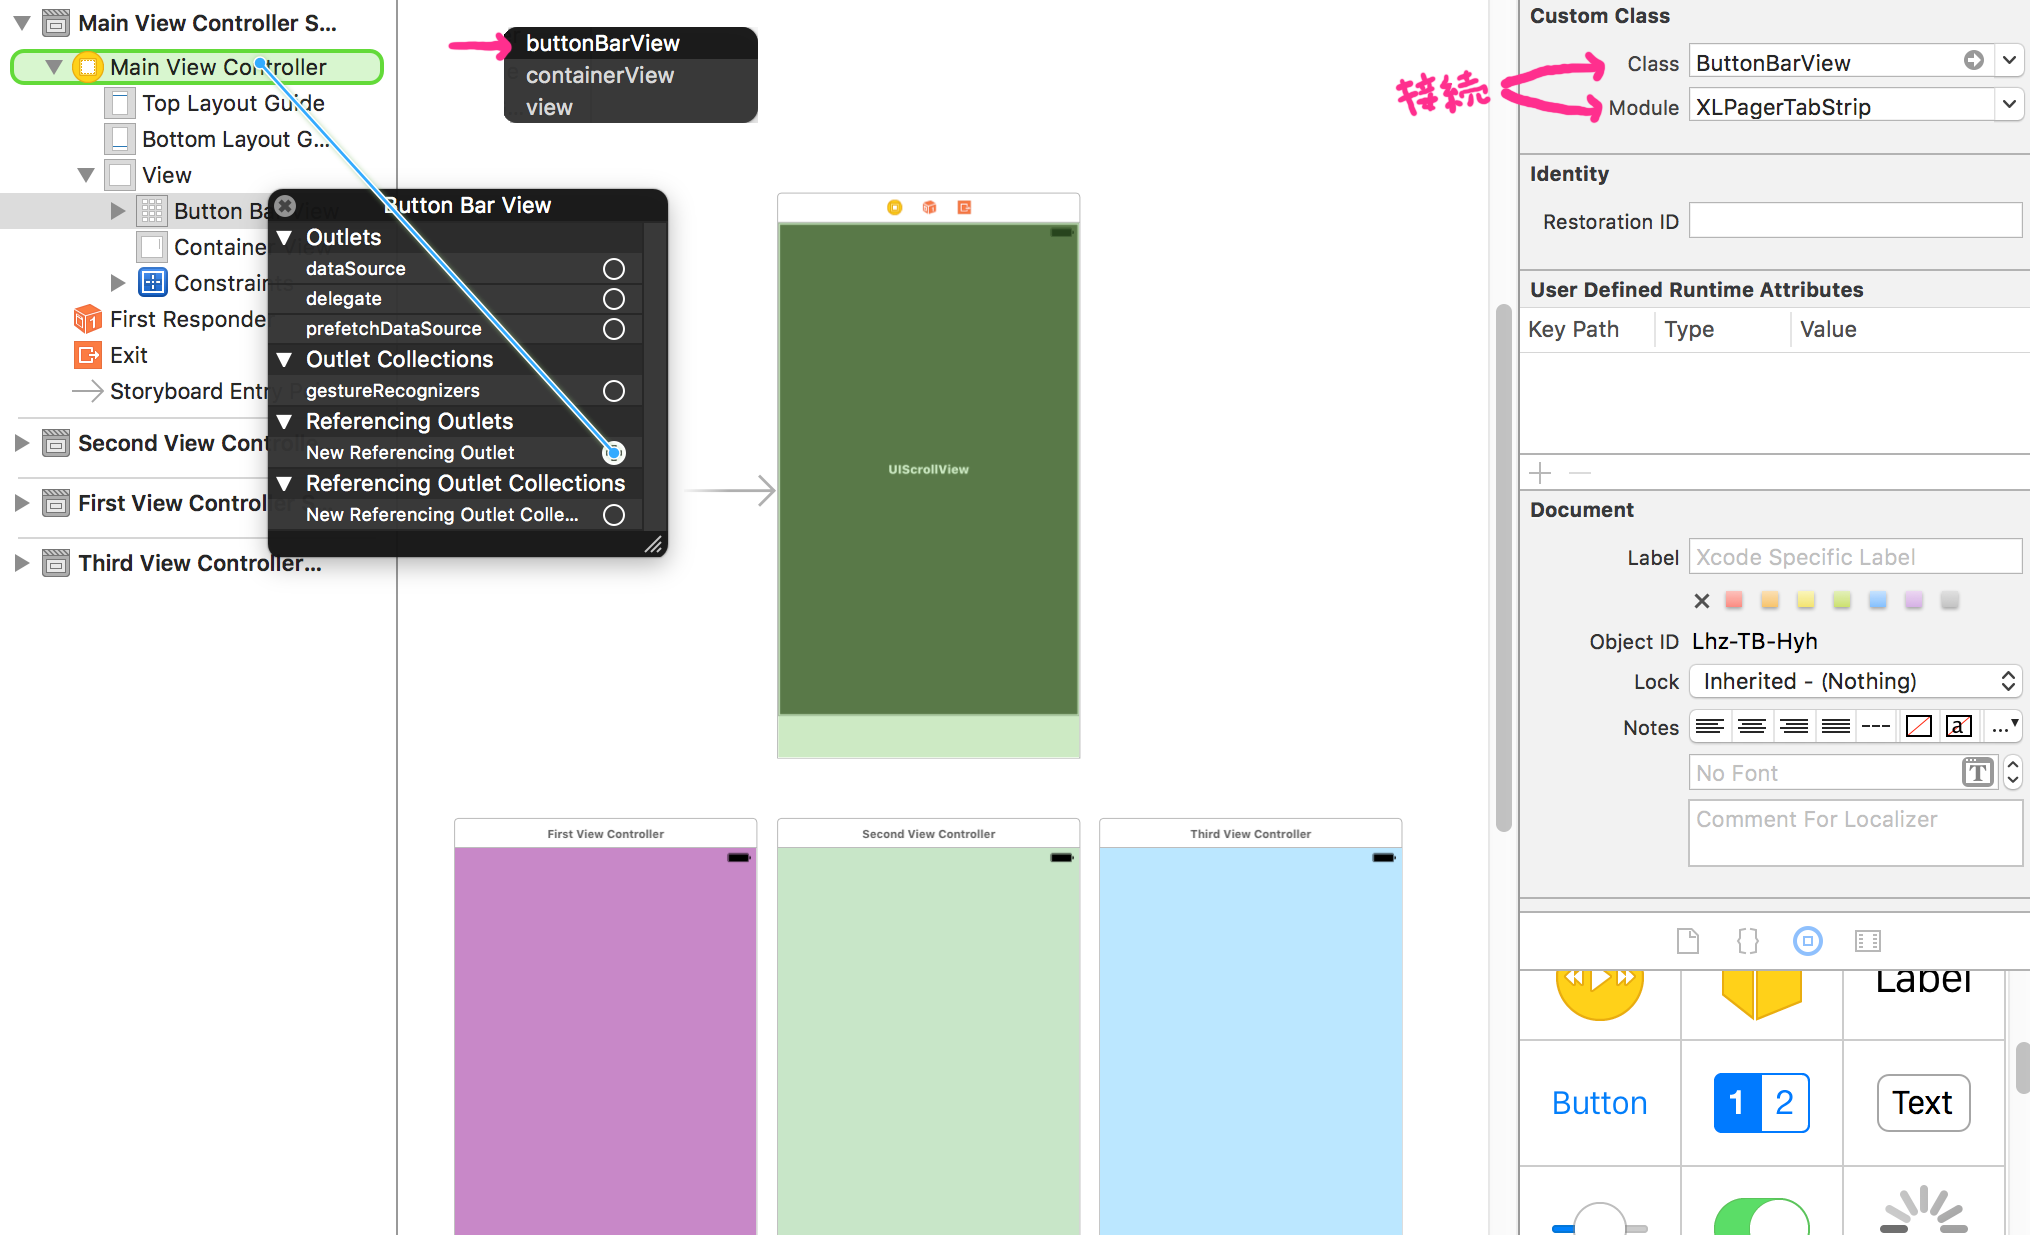
また、黒色のViewControllerのCollection Viewのクラスを「ButtonBarView」と結びつけ、Moduleを「XLPagerTabStrip」とします。そして、同じく以下のように設定します。
実行してみる
ここで1度実行してみます。今回の例では設置場所が自由であることを明示したくて、BarViewを下側に設置してみました。
カスタマイズについて
BarViewは色などを自由に変更することができます
注意点なのですが、設定はViewDidLoadの中で行いsuper.viewDidLoad()よりも前に記述します。
設定例

override func viewDidLoad() {
    //バーの色
    settings.style.buttonBarBackgroundColor = UIColor(red: 73/255, green: 72/255, blue: 62/255, alpha: 1)
    //ボタンの色
    settings.style.buttonBarItemBackgroundColor = UIColor(red: 73/255, green: 72/255, blue: 62/255, alpha: 1)
    //セルの文字色
    settings.style.buttonBarItemTitleColor = UIColor.white
    //セレクトバーの色
    settings.style.selectedBarBackgroundColor = UIColor(red: 254/255, green: 0, blue: 124/255, alpha: 1)
    super.viewDidLoad()
}
色の設定プロパティ
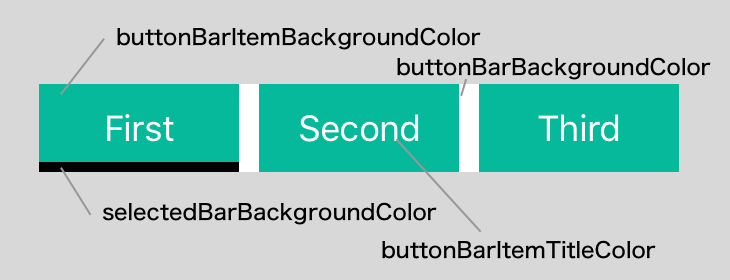
| コード | 説明 |
|---|---|
| buttonBarBackgroundColor: UIColor? | BarViewの背景色 |
| buttonBarItemBackgroundColor: UIColor? | ボタンの背景色 |
| buttonBarItemTitleColor: UIColor? | ボタンの文字色 |
| selectedBarBackgroundColor: UIColor | セレクトバーの色 |
マージンやスペースなどの設定プロパティ
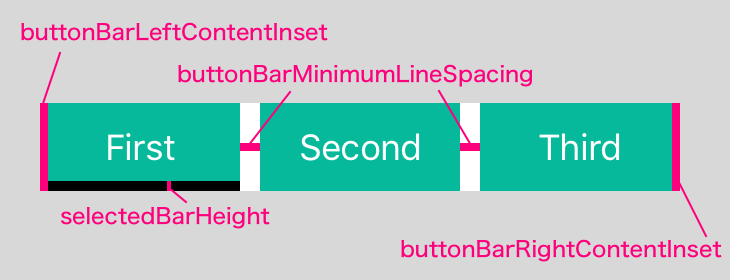
| コード | 説明 |
|---|---|
| buttonBarMinimumLineSpacing: CGFloat? | ボタンの間隔 |
| buttonBarLeftContentInset: CGFloat? | ボタンの左側のマージン |
| buttonBarRightContentInset: CGFloat? | ボタンの右側のマージン |
| selectedBarHeight: CGFloat | セレクトバーの高さ |
コードによる遷移や現在のViewController取得など
管理する**ButtonBarPagerTabStripViewController(黒色)**では、以下のプロパティやメソッドなどがあります。
初期位置もこれで設定することができますね。
| コード | 説明 |
|---|---|
| viewControllers: [UIViewController] | 管理するViewControllerの配列 |
| currentIndex: Int | 現在のViewControllerのIndexを示します |
| func moveToViewController(at index: Int, animated: Bool = true) | Indexを指定して遷移します |
参考にさせていただいた記事
見て頂いてありがとうございます。