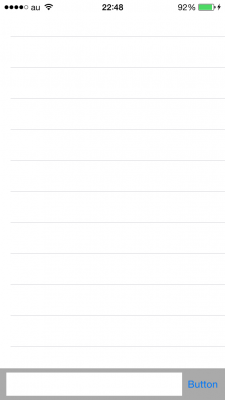
LINEとかチャット系アプリは大体踏襲しているアレです。
まとめて解説してるブログが見つからなかったので、必要最低限の部分だけメモっときたいと思います。
今回はメッセージ入力欄のみで、ポイントはこの二つ。
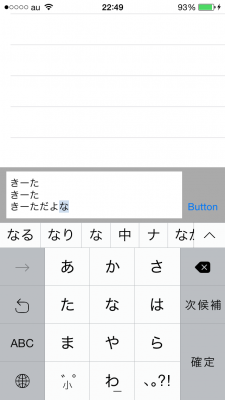
- メッセージ入力欄・送信ボタンは下部固定(キーボード出現時は隠れないように移動)
- 入力テキストの行数によってメッセージ入力欄の高さが変わる
実現方法は色々だと思いますが、今回は StoryBoardでAutoLayout を使ってやります。
【完成イメージ】
StoryBoardでレイアウトを作成
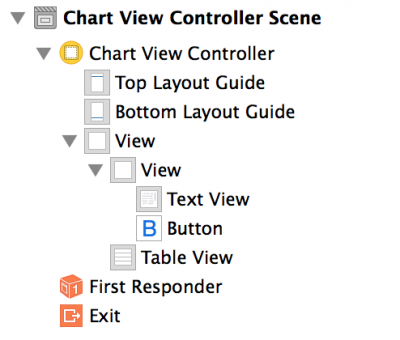
まずは以下の構造で各種UIパーツをレイアウトします。
Constraintを設定
Constraintについてここでは詳しい説明はしませんが、View間の相対位置やサイズ等を定義するルールといったところです。
画面サイズが異なる端末でもそれぞれいい感じにレイアウトが組めるので便利です。
StoryBoardで各種Constraintを定義し、TextViewの高さの定義をコードから動的に変更することで、高さ可変のメッセージ入力欄を実現します。
それぞれのUIパーツに、相対位置やサイズを定義していきましょう。
TableView
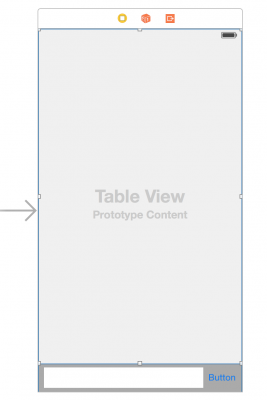
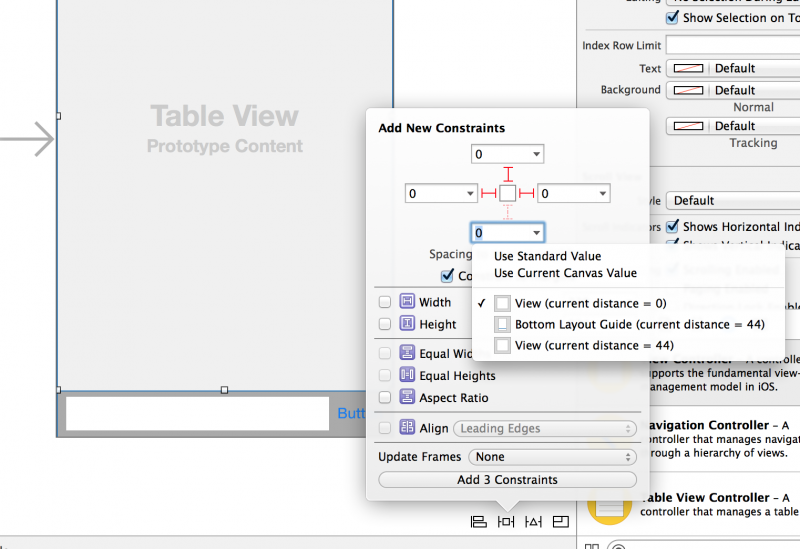
まずはTableViewの相対位置を以下のように設定します。
- 上左右 →SuperViewから0
- 下 →View(TextViewとButtonの親)から0
上の画像にあるように、キャンバス下部のボタンからConstraintを設定するメニューを表示できます。
※ 注意
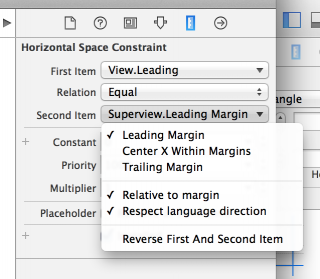
xcode6からrootView直下のViewには、自動で16pxのマージンが設定されるようになってるっぽいです。(このあたりはまだ理解不足っす)
とりあえず今回はそれを解除してマージン0にしたいので、ViewControllerSceneでそれぞれのConstraintを選択し「Relative to margin」のチェックを外します。
同じ要領で他のViewにもConstraintを設定していきましょう。
View(TextViewとButtonの親)
- 下左右 →superViewから0
TextView
- 上下左 →superViewからお好みの距離
- 右 →Buttonからお好みの距離
- width →お好みのサイズ
- height →お好みのイズ
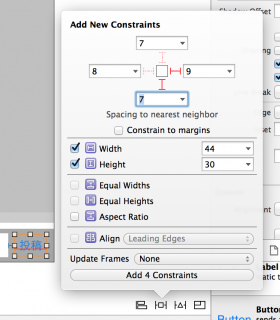
Button
- 下右 →superViewからお好みの距離(下の画像では7・9)
- width →お好みのサイズ(下の画像では44)
- height →お好みのサイズ(下の画像では30)
※ ButtonはTextViewと親Viewの高さが動的に変更された際でも下部に固定したいので、上との相対位置は設定しないでおきます。
Frameの調整とConstraintのOutlet接続
ConstraintsとFrameに矛盾がある場合、ViewControllerSceneに黄色の注意マークが用事されます。
それをクリックし「Update Frames」を選択して、FrameをConstraintsに合わせてあげましょう。
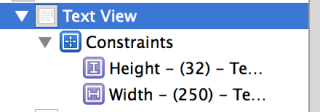
また、ConstrainはOutlet接続できちゃいます。
TextViewのHeightのConstraintは動的に変更させるので、outlet接続しておきます。
キーボード表示時に入力欄・送信ボタンが隠れないようにする
ここからはコードです。
まずはキーボード表示/非表示をNotificationで受け取れるようにします。
viewWillAppear/viewWillDisappearに、Observer登録/解除の処理を書いておきましょう。
-(void) viewWillAppear:(BOOL)animated{
    [super viewWillAppear:animated];

    //キーボード表示/非表示のObserver登録
    if (!_isObserving) {
        NSNotificationCenter *noticication = [NSNotificationCenter defaultCenter];
        [noticication addObserver:self selector:@selector(keyboardWillShow:) name:UIKeyboardWillShowNotification object:nil];
        [noticication addObserver:self selector:@selector(keyboardWillHide:) name:UIKeyboardWillHideNotification object:nil];

        //Observerになってるフラグをたてとく
        _isObserving = YES;
    }
}

- (void)viewWillDisappear:(BOOL)animated
{
    [super viewWillDisappear:animated];

    //Observer解除
    if (_isObserving) {
        NSNotificationCenter *noticication = [NSNotificationCenter defaultCenter];
        [noticication removeObserver:self name:UIKeyboardWillShowNotification object:nil];
        [noticication removeObserver:self name:UIKeyboardWillHideNotification object:nil];

        //Observerになってるフラグをおとす
        _isObserving = NO;
    }
}
続いてキーボード表示/非表示時に呼ばれるように設定したメソッド内に、Viewの位置を調整する処理を書きます。
//キーボード表示
-(void) keyboardWillShow:(NSNotification *) notification{

    // キーボードのサイズを取得
    CGRect rect = [[[notification userInfo] objectForKey:UIKeyboardFrameEndUserInfoKey] CGRectValue];

    // キーボード表示アニメーションのdurationを取得
    NSTimeInterval duration = [[[notification userInfo] objectForKey:UIKeyboardAnimationDurationUserInfoKey] doubleValue];

    // キーボード表示と同じdurationのアニメーションでViewを移動させる
    [UIView animateWithDuration:duration animations:^{
        CGAffineTransform transform = CGAffineTransformMakeTranslation(0, -rect.size.height);
        self.view.transform = transform;
    } completion:NULL];
}

//キーボード非表示
-(void) keyboardWillHide:(NSNotification *)notification{

    // キーボード表示アニメーションのduration
    NSTimeInterval duration = [[[notification userInfo] objectForKey:UIKeyboardAnimationDurationUserInfoKey] doubleValue];

    // Viewを元に戻す
    [UIView animateWithDuration:duration animations:^{
        self.view.transform = CGAffineTransformIdentity;
    } completion:NULL];
}
TextViewの高さを動的に変更
TextViewのDelegeteメソッド内で、先ほどOutlet接続したTextViewの高さを定義するConstraintの値を変更します。
//TextViewの入力や変更が終わると呼ばれる
- (void)textViewDidChange:(UITextView *)textView {

    //高さを広げる上限を適当に指定してみる
    float maxHeight = 80.0;

    if(_textView.frame.size.height < maxHeight){

        //高さを変更
        CGSize size = [_textView sizeThatFits:_textView.frame.size];
        _constraintTextViewHeight.constant = size.height;
    }
}

//TextViewの入力が始まると呼ばれる
- (BOOL)textView:(UITextView *)textView shouldChangeTextInRange:(NSRange)range replacementText:(NSString *)text
{
    //カーソルの位置へスクロールさせる
    [_textView scrollRangeToVisible:_textView.selectedRange];

    return YES;
}
TextViewのHeightConstraintを変更すれば、Buttonと親Viewは先ほど設定したConstraintに従ってうまい具合に自動で調整されるハズです。
また、とりあえず今回はButtonのタップでキーボードが閉じ、TextView等が元に戻るようにしておきます。
//BttonをAction接続しておく
- (IBAction)tapButton:(id)sender {

    //TextViewを元に戻す
    _textView.text = nil;
    CGSize size = [_textView sizeThatFits:_textView.frame.size];
    _constraintTextViewHeight.constant = size.height;

    //キーボードを閉じる
    [_textView resignFirstResponder];
}
終わりに
Swiftじゃなくてごめんなさい。
GitHubにあげておいたので、お役に立ちそうであればご自由にどうぞ!
https://github.com/Kaiketch/ChatUISample
