最近、Redmineのプラグインを開発する機会があったので、まとめ的なメモ
開発環境
- OS(Windows7)
- ruby (2.0.0p648)
- rails (4.2.7.1)
- 他
ちなみに、Redmineのプラグインを開発するに当たって下記記事に大変お世話になりました。
ありがとうございます。![]()
Redmine3.2プラグイン開発入門 (1) - 新規画面を追加する
Redmine プラグイン開発に学ぶパッチング作法
プラグインを作る
まずは下記コマンドを実行して、プラグインのBaseを作成します。
# WatashiNoPlugin plugin 作成
bundle exec rails generate redmine_plugin WatashiNo
# controller 作成
bundle exec rails generate redmine_plugin_controller watashi_no watashi_no index
# model 作成
bundle exec rails generate redmine_plugin_model watashi_now atashi_no_model
プラグインを作成すると
Redmine/plugins/
の配下にプラグインのフォルダが生成されます。
以降はその配下のファイルをいじっていきます。
init.rb
プラグインの基本情報を記載するファイル
Redmine::Plugin.register :watashi_no do
  name 'Watashi No Plugin'
  author 'Author name'
  description 'This is a plugin for Redmine'
  version '0.0.1'
  url 'http://example.com/path/to/plugin'
  author_url 'http://example.com/about'
end
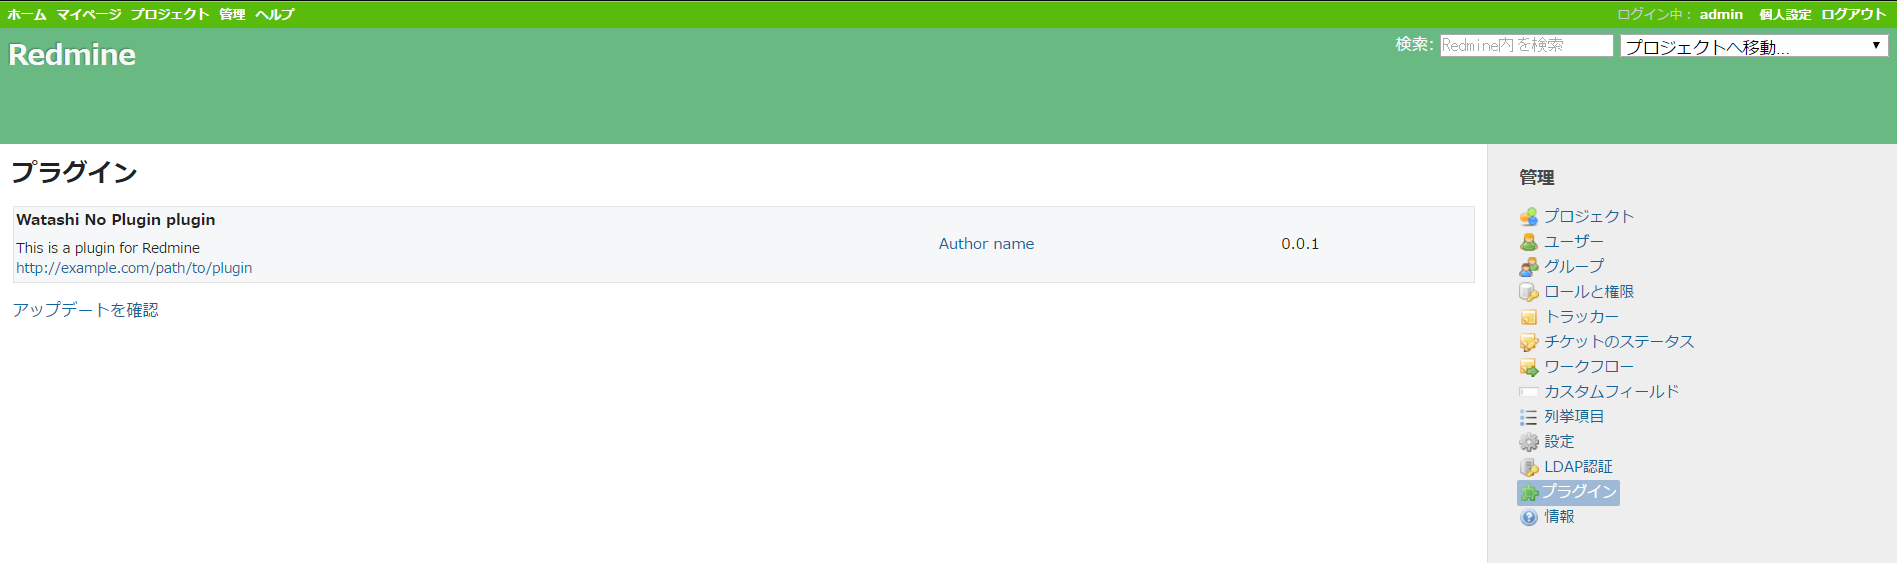
上記に記載されている情報はRedmineの管理⇒プラグインに記載されます。↓こんな感じ
model
依存関係の追加
プラグインでテーブルを作成したい場合はbundle exec rails generate redmine_plugin_modelコマンドを入力した後に、migrateを行います。
# dev環境下がよければRAILS_ENVをdevに変更
bundle exec rake redmine:plugins:migrate RAILS_ENV=production
なお、作成したmodelとRedmineの標準のモデルに関係を作りたい場合は下記のようにします。
1.追加したモデルにbelongs_to(has_manyなど)を追加する
class WatashiNo < ActiveRecord::Base
    unloadable
    belongs_to :user
    belongs_to :project
# ~~(略)~~
2.標準のモデルのPatchを作成し、belongs_to(has_manyなど)を追加する
require_dependency 'project'

module WatashiNo
    module ProjectPatch
        extend ActiveSupport::Concern

        included do
            unloadable
            has_many :watashi_no, dependent: :destroy
        end
# ~~(略)~~
3.[2]で作成したModuleをinit.rbで読み込む
Dir[File.expand_path('../lib/"plugin名"', __FILE__) << '/*.rb'].each do |file|
    require_dependency file
end

Redmine::Plugin.register :watashi_no do
  name 'Watashi No plugin'
  author 'Author name'
  description 'This is a plugin for Redmine'
  version '0.0.1'
  url 'http://example.com/path/to/plugin'
  author_url 'http://example.com/about'
end
既存モデルにメソッドを追加する
依存関係の追加:標準のモデルのPatchを作成し、belongs_to(has_manyなど)を追加するで作成したPatchに下記を記載します。
require_dependency 'project'

module WatashiNo
    module ProjectPatch
        extend ActiveSupport::Concern

        included do
            # クラスメソッドを追加したい場合
            extend ClassMethods
            # インスタンスメソッドを追加したい場合
            include InstanceMethods

            unloadable
            has_many :watashi_no, dependent: :destroy
        end

        # クラスメソッドを追加したい場合
        module ClassMethods
            def atarashi_class_method(hoge)
                # ~~(略)~~
            end
        end

        # インスタンスメソッドを追加したい場合
        module InstanceMethods
            def atarashi_instance_method(huga)
                # ~~(略)~~
            end
        end

# ~~(略)~~

# patchモジュールを読み込む
ActionDispatch::Reloader.to_prepare do
    unless Project.included_modules.include?(Watashino::ProjectPatch)
        Project.send(:include, Watashino::ProjectPatch)
    end
end
既存メソッドを上書く
もしかしたらあまり推奨はされないかもしれませんが、既存メソッドを上書く場合は
alias_method_chainを使用します。
私は、主にhelperの上書きで使用しました。
(下記はrender_project_hierarchyを上書く場合)
require_dependency 'projects_helper'

module WatashiNo
    module ProjectsHelperPatch
        extend ActiveSupport::Concern

        included do
            alias_method_chain :render_project_hierarchy, :watashi_no
        end

        def render_project_hierarchy_with_watashi_no(projects)
            #
            s << watashi_ga_uwagaki(projects)
            s.html_safe
        end
# ~~(略)~~
end
view
hook
既存ページのViewを編集する時には基本的にはRedmineが用意している箇所に自作したviewを埋め込んであげるイメージ
利用できるHookのリストは「rake redmine:plugins:hook_list」コマンドで確認できますと公式に書いていますが、どうやら現在はできない模様。
(公式ページには推奨されない旨が書かれていますが、使用できないとは書いていない気がする... 調査不足?)
PS C:\work\redmine-3.3.1> bundle exec rake redmine:plugins:hook_list
rake aborted!
Don't know how to build task 'redmine:plugins:hook_list' (see --tasks)

(See full trace by running task with --trace)
なので、HookListのページからさがしてあげるか、grep -r call_hook *といった感じでGrepしてあげると良いです。
menu
init.rb
ヘッダメニューや管理メニューにリンクを追加するときはinit.rbに記載します。
追加できるメニューのリストはRedmineJp様より以下を抜粋しました。
| 値 | 説明 |
|---|---|
| :top_menu | 左上の「ホーム」「マイページ」「プロジェクト」などが並んでいるメニュー |
| :account_menu | 右上の「個人設定」「ログアウト」などが並んでいるメニュー |
| :application_menu | プロジェクトを開いていない状態で表示されるメインメニュー |
| :project_menu | プロジェクトを開いている状態で表示されるメインメニュー (「概要」「活動」「チケット」などが並んでいるメニュー) |
| :admin_menu | 「管理」画面で表示されるメニュー (「設定」と「プラグイン」の間にのみ追加可能) |
なお、書き方の一例は以下のとおり
Dir[File.expand_path('../lib/"plugin名"', __FILE__) << '/*.rb'].each do |file|
    require_dependency file
end

Redmine::Plugin.register :watashi_no do
  name 'Watashi No plugin'
  author 'Author name'
  description 'This is a plugin for Redmine'
  version '0.0.1'
  url 'http://example.com/path/to/plugin'
  author_url 'http://example.com/about'

  # menuの記載ここから
  menu :top_menu, :watashi_menu, controller: 'watashi', action: 'index'
  menu :admin_menu, :watashi_admin_menu, { controller: 'watashi', action: 'admin_index' }, html: { class: 'admin_index' }
end
※admin menuのロゴ(画像)について
admin_menuのオプションに「html:」が存在するので、それに対象のクラス名を指定してあげ、必要ならばHookでロゴを指定してあげるStyleSheetを記載してあげます。
なお、標準で選択できる画像とクラスは以下のようです。
/* 対象のクラスリスト(抜粋) */
#admin-menu a.projects { background-image: url(../images/projects.png); }
#admin-menu a.users { background-image: url(../images/user.png); }
#admin-menu a.groups { background-image: url(../images/group.png); }
#admin-menu a.roles { background-image: url(../images/database_key.png); }
#admin-menu a.trackers { background-image: url(../images/ticket.png); }
#admin-menu a.issue_statuses { background-image: url(../images/ticket_edit.png); }
#admin-menu a.workflows { background-image: url(../images/ticket_go.png); }
#admin-menu a.custom_fields { background-image: url(../images/textfield.png); }
#admin-menu a.enumerations { background-image: url(../images/text_list_bullets.png); }
#admin-menu a.settings { background-image: url(../images/changeset.png); }
#admin-menu a.plugins { background-image: url(../images/plugin.png); }
#admin-menu a.info { background-image: url(../images/help.png); }
#admin-menu a.server_authentication { background-image: url(../images/server_key.png); }

新規ページを作る
rails generate controller/modelなどで基本となるControllerやModelを作成した後に
普通のRailsアプリを作成するノリで新規ページやロジックを作成していきます
# WatashiNoPlugin plugin 作成(再掲)
bundle exec rails generate redmine_plugin WatashiNo
# controller 作成
bundle exec rails generate redmine_plugin_controller watashi_no watashi_no index
# model 作成
bundle exec rails generate redmine_plugin_model watashi_no
なお、route.rbはplugins/"plugin名"/config/routes.rbが存在していますので、これも普段と同じように記載していきます。
# Plugin's routes
# See: http://guides.rubyonrails.org/routing.html
Rails.application.routes.draw do
    resources :watashi
end
作成したpluginを削除する
作成したプラグインにテーブルの追加などを行っていないのであれば、redmine/plugins/配下にある対象のディレクトリをそのまま消すだけでよいです。
ただし、プラグインにテーブルの追加を行っている場合は、下記コマンドで一度テーブルを削除してからプラグインディレクトリを削除したほうが良いです。
bundle exec rake redmine:plugins:migrate NAME='プラグイン名' VERSION=0 RAILS_ENV=production
まとめ
以上が大体私が理解した内容となります。
(ほとんど、冒頭に記載した参考サイトさまの内容ばかりですね...)
これを参考に自宅でつかっているRedmineももっと充実...
とはいえ、ほしい機能は大体他の方が開発していて、、、といった事実もありますが
ひとまずおしまい。