環境
CentOS7(minimal install)(/etc/redhat-release: CentOS Linux release 7.2.1511 (Core))
ElasticSearch(5.3.0)
ElasticSearchインストール
公式を参照する。
環境準備
Java
CentOS7(minimal)のデフォルトでは入っていません。
ファイルは本家からダウンロードして使用。
今回は「jdk-8u121-linux-x64.rpm」を使用する。以下のコマンドでインストールして確認。
# yum localinstall jdk-8u121-linux-x64.rpm
`# java -version'
/etc/profileに以下を記述。
export JAVA_HOME=/usr/bin/java
ユーザ作成
elasticsearchはrootユーザでは起動できないらしい。以下のようにエラーになります。
参考
[root@apricot bin]# ./elasticsearch
[2017-04-04T10:28:32,850][WARN ][o.e.b.ElasticsearchUncaughtExceptionHandler] [] uncaught exception in thread [main]
org.elasticsearch.bootstrap.StartupException: java.lang.RuntimeException: can not run elasticsearch as root
	at org.elasticsearch.bootstrap.Elasticsearch.init(Elasticsearch.java:127) ~[elasticsearch-5.3.0.jar:5.3.0]
	at org.elasticsearch.bootstrap.Elasticsearch.execute(Elasticsearch.java:114) ~[elasticsearch-5.3.0.jar:5.3.0]
	at org.elasticsearch.cli.EnvironmentAwareCommand.execute(EnvironmentAwareCommand.java:58) ~[elasticsearch-5.3.0.jar:5.3.0]
	at org.elasticsearch.cli.Command.mainWithoutErrorHandling(Command.java:122) ~[elasticsearch-5.3.0.jar:5.3.0]
	at org.elasticsearch.cli.Command.main(Command.java:88) ~[elasticsearch-5.3.0.jar:5.3.0]
	at org.elasticsearch.bootstrap.Elasticsearch.main(Elasticsearch.java:91) ~[elasticsearch-5.3.0.jar:5.3.0]
	at org.elasticsearch.bootstrap.Elasticsearch.main(Elasticsearch.java:84) ~[elasticsearch-5.3.0.jar:5.3.0]
Caused by: java.lang.RuntimeException: can not run elasticsearch as root
そのため、elasticsearch用のユーザ「elasticsearch」を作成します。
useradd elasticsearch
passwd elasticsearch
ファイヤーウォール無効化
検証環境なので、無効化してしまう。CentOS7なので、firewalldで設定します。
# systemctl stop firewalld
# systemctl disable firewalld
確認は以下。
[root@apricot ~]# systemctl status firewalld
● firewalld.service - firewalld - dynamic firewall daemon
   Loaded: loaded (/usr/lib/systemd/system/firewalld.service; enabled; vendor preset: enabled)
   Active: inactive (dead) since Tue 2017-04-04 18:11:27 JST; 20s ago
  Process: 601 ExecStart=/usr/sbin/firewalld --nofork --nopid $FIREWALLD_ARGS (code=exited, status=0/SUCCESS)
 Main PID: 601 (code=exited, status=0/SUCCESS)

Apr 04 17:41:36 apricot.ngy.local systemd[1]: Starting firewalld - dynamic firewall daemon...
Apr 04 17:41:36 apricot.ngy.local systemd[1]: Started firewalld - dynamic firewall daemon.
Apr 04 18:11:27 apricot.ngy.local systemd[1]: Stopping firewalld - dynamic firewall daemon...
Apr 04 18:11:27 apricot.ngy.local systemd[1]: Stopped firewalld - dynamic firewall daemon.
[root@apricot ~]# systemctl is-enabled firewalld
disabled
Ipv6無効化
[root@apricot ~]# ss -ant
State      Recv-Q Send-Q                                 Local Address:Port                                                Peer Address:Port
LISTEN     0      128                                                *:9100                                                           *:*
LISTEN     0      128                                                *:22                                                             *:*
LISTEN     0      100                                        127.0.0.1:25                                                             *:*
ESTAB      0      96                                    192.168.11.121:22                                                 152.62.23.123:61133
ESTAB      0      0                                     192.168.11.121:22                                                 152.62.23.123:61089
ESTAB      0      0                                     192.168.11.121:22                                                 152.62.23.123:61097
LISTEN     0      128                                               :::9200                                                          :::*
LISTEN     0      128                                               :::9300                                                          :::*
LISTEN     0      128                                               :::22                                                            :::*
LISTEN     0      100                                              ::1:25                                                            :::*
Ipv6にバインドされているようなので、無効化しておく。
[root@apricot ~]# cat /etc/sysctl.conf
# Added by User
net.ipv6.conf.all.disable_ipv6 = 1
net.ipv6.conf.default.disable_ipv6 = 1
net.ipv6.conf.lo.disable_ipv6 = 1
これで、IPv6でのListenはなくなりました。
[root@apricot ~]# ss -ant
State       Recv-Q Send-Q                              Local Address:Port                                             Peer Address:Port
LISTEN      0      128                                             *:9100                                                        *:*
LISTEN      0      128                                             *:9200                                                        *:*
LISTEN      0      128                                             *:9300                                                        *:*
LISTEN      0      128                                             *:22                                                          *:*
ESTAB       0      0                                  192.168.11.121:22                                              152.62.23.123:61425
ESTAB       0      0                                  192.168.11.121:22                                              152.62.23.123:61441
LISTEN      0      128                                            :::22                                                         :::*
各種パラメータ設定
公式
インストールのところは何も書き換えずにいきなり起動していますが、実際にはいろいろとパラメータを変えておかないとメモリ等々の問題で起動に失敗しました。
/etc/sysctl.conf
vm.max_map_count
これは1つのプロセスで使えるメモリマップ(ページ)の数。1つのスレッド当たり2つ消費されるため、この値の半分が使用可能なスレッド数らしい。公式に合わせて増やしておく。デフォルトは65530。
1ページあたりは4096Byte=4kB(getconf PAGESIZEで確認できる)らしいので、公式の262144は約1GBでしょうか。
以下のコマンドで推奨値に合わせる。
# sysctl -w vm.max_map_count=262144
またリブートしても変化しないように、
vm.max_map_count = 262144
としておく。以下で確認。
[elasticsearch@apricot elasticsearch-5.3.0]$ sysctl -a | grep max_map
vm.max_map_count = 262144
/etc/security/limits.conf
1行目はFile Descriptorの設定。
これはオープンできるファイルの上限。elasticsearchユーザに関して、4096から65536にあげておきます。
ここに書いただけでは、このセッションでは有効にならないため、再起動するか、以下で一時的に値をあげておきます。
# ulimit -n 65536
2行目、3行目は、elasticsearchを起動するユーザに対して、メモリをロックする権限を与える設定のようです。
これらがないと、起動時にメモリがロックできない旨が表示されて起動に失敗しました(後述)。
# Added by User
elasticsearch  -  nofile  65536
elasticsearch - memlock unlimited
root - memlock unlimited
ElasticSearchダウンロード,起動
elasticsearchユーザにて実施。
$ curl -L -O https://artifacts.elastic.co/downloads/elasticsearch/elasticsearch-5.3.0.tar.gz
$ tar xvf elasticsearch-5.3.0.tar.gz
外部サーバからブラウザでアクセスできるように、elasticsearch.ymlのnetwork.hostを書き換えます。0.0.0.0でもOK。
また、スワップ無効化のこのファイルに設定する(bootstrap.memory_lock: true)。
この設定で、プロセスのアドレス空間をRAMのサイズ内に抑える。マニュアルやサイトによってはmlockallと書いてあって紛らわしかったです。
network.host: 192.168.11.121
bootstrap.memory_lock: true
JVMのヒープサイズの最大と最小。
デフォルトは2GBで、そのままにしています。
Xms2g
Xmx2g
起動
ここまで設定したら、念のため再起動しておきました。起動後に、
[elasticsearch@apricot elasticsearch-5.3.0]$ cd bin
[elasticsearch@apricot bin]$ ./elasticsearch
[2017-04-04T10:56:30,691][INFO ][o.e.n.Node               ] [] initializing ...
(中略)
[2017-04-04T10:56:43,019][INFO ][o.e.n.Node               ] [XpOt1qN] started
動作確認
[root@apricot ~]# curl -XGET 'localhost:9200/_cat/health?v&pretty'
epoch      timestamp cluster       status node.total node.data shards pri relo init unassign pending_tasks max_task_wait_time active_shards_percent
1491271143 10:59:03  elasticsearch green           1         1      0   0    0    0        0             0                  -                100.0%
[root@apricot ~]#
[root@apricot ~]# curl -XGET 'localhost:9200/_cat/nodes?v&pretty'
ip        heap.percent ram.percent cpu load_1m load_5m load_15m node.role master name
127.0.0.1            2          96   2    0.03    0.07     0.07 mdi       *      XpOt1qN
またこの状態ではずっとコンソールを開いておかないといけないので、いったんCtrl+Cしてデーモンとして起動します。
[elasticsearch@apricot elasticsearch-5.3.0]$ ./bin/elasticsearch -d -p pid
[elasticsearch@apricot elasticsearch-5.3.0]$ cat pid
10376
停止するには
kill `cat pid`
Troubleshoot
起動時にメモリがロックされない
自分もなりましたが、ウェブ上では色々言われています。
ERROR: bootstrap checks failed
memory locking requested for elasticsearch process but memory is not locked
-
公式のアプローチ
export ES_JAVA_OPTS="$ES_JAVA_OPTS -Djava.io.tmpdir=/path/to/temp/dir"
変化なし -
SElinux無効化
SELINUX=disabled
効果なし
自分の場合は、最終的に
http://mrzard.github.io/blog/2015/03/25/elasticsearch-enable-mlockall-in-centos-7/
の
elasticsearch - memlock unlimited
root - memlock unlimited
追記でクリアしました。上の記載では初めから入れています。公式に書いてあるのですが、気付きませんでした。
それでもNGなら
そもそもマシンのメモリが足りていない場合も以下のエラーで失敗するようです。今回の設定では2GBちょうどではNGなので3GBくらいは少なくとも必要になるかと思われます。
ERROR: bootstrap checks failed
memory locking requested for elasticsearch process but memory is not locked
ElasticSearch-Headのインストール
5.xからはプラグインではなく、単体で動くウェブサーバ。
Git
Rootで
# yum install git
elasticsearchで適当なディレクトリを作成し、そこにgitをクローン。
$ mkdir es-head;cd es-head
$ git init
$ git clone https://github.com/mobz/elasticsearch-head.git
依存するモジュールのインストール
再びrootで
# yum install epel-release
# yum install npm
npm: Node.jsのpackage管理ソフト(EPELレポジトリが必要)
nodejsもインストールされる。
# yum install bzip2
インストールしないと、npm install時に以下のようなエラーになる。
npm ERR! argv "/usr/bin/node" "/usr/bin/npm" "install"
npm ERR! node v6.9.4
npm ERR! npm  v3.10.10
npm ERR! code ELIFECYCLE

npm ERR! phantomjs-prebuilt@2.1.14 install: `node install.js`
npm ERR! Exit status 1
起動
[elasticsearch@apricot ~]$ cd git/es-head/elasticsearch-head/
[elasticsearch@apricot elasticsearch-head]$ cat package.json    # package.jsonのあるディレクトリに移動
{
  "name": "elasticsearch-head",
  (中略)
}
[elasticsearch@apricot elasticsearch-head]$ npm install
(中略)
npm WARN optional SKIPPING OPTIONAL DEPENDENCY: fsevents@^1.0.0 (node_modules/chokidar/node_modules/fsevents):
npm WARN notsup SKIPPING OPTIONAL DEPENDENCY: Unsupported platform for fsevents@1.1.1: wanted {"os":"darwin","arch":"any"} (current: {"os":"linux","arch":"x64"})
npm WARN elasticsearch-head@0.0.0 license should be a valid SPDX license expression
[elasticsearch@apricot elasticsearch-head]$ npm run start
> elasticsearch-head@0.0.0 start /home/elasticsearch/git/es-head/elasticsearch-head
> grunt server
Running "connect:server" (connect) task
Waiting forever...
Started connect web server on http://localhost:9100
この状態で他のサーバからブラウザで接続すると、(自分はIEならOKで、Firefox,chromeはデフォルトでクラスタに接続できず、NGでした)
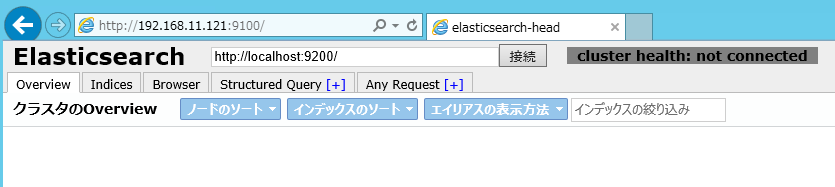
デフォルトではlocalhostにつながっているので、IPアドレスをいれて接続しなおすとノードの名前が表示されます。

予定
今回はここまでですが、次に値を入れて、最終的にKibanaで可視化します。