概要
今回は、ScalaとPlay2 Frameworkを使って、
Amazon Elastic BeanstalkにWebアプリをデプロイするお話。
まず、ScalaとPlay2はインストールされていることを前提とします。
それぞれのVersionは、
・Scala 2.10
・Play 2.1.1
を使用しています。
Amazon Elastic BeanstalkにScala+Play2でWebアプリをアップロードするには
.warファイルを作成する必要があります。(他の方法もあるのかもしれませんが
わかりません。)
Play2フレームワークで作成したWebアプリをwarファイルにするのに、
ここではplay2-war-pluginを使います。
アプリの作成
では、その使用方法です。
まずはじめに、普通にPlayアプリケーションを作成します。
今回は、Helloを表示するだけのシンプルなアプリを作ります。
$ play new hello
上記のコマンドをシェル上で実行すると、アプリ名や言語(ScalaあるいはJava)を
聞かれますが適当に入力します。
例:
       _            _
 _ __ | | __ _ _  _| |
| '_ \| |/ _' | || |_|
|  __/|_|\____|\__ (_)
|_|            |__/

play! 2.1.1 (using Java 1.6.0_45 and Scala 2.10.0), http://www.playframework.org

The new application will be created in /Users/randy/Documents/Homepage/hello

What is the application name? [hello]
>

Which template do you want to use for this new application?

  1             - Create a simple Scala application
  2             - Create a simple Java application

> 1
OK, application hello is created.

Have fun!
次に作成したアプリのディレクトリに移動しておきましょう。
$ cd hello
play2-war-pluginの設定
play2-war-pluginの設定のためにエディタで、
project/plugins.sbtとproject/Build.scalaに修正を加えます。
// Comment to get more information during initialization
logLevel := Level.Warn

// The Typesafe repository
resolvers += "Typesafe repository" at "http://repo.typesafe.com/typesafe/releases/"

// Use the Play sbt plugin for Play projects
addSbtPlugin("play" % "sbt-plugin" % "2.1.1")

addSbtPlugin("com.github.play2war" % "play2-war-plugin" % "0.9")
import sbt._
import Keys._
import play.Project._
import com.github.play2war.plugin._

object ApplicationBuild extends Build {

  val appName         = "hello"
  val appVersion      = "1.0"

  val appDependencies = Seq(
    // Add your project dependencies here,
    jdbc,
    anorm
  )

  val main = play.Project(appName, appVersion, appDependencies)
    .settings(Play2WarPlugin.play2WarSettings: _*)
    .settings(
      // Add your own project settings here
      Play2WarKeys.servletVersion := "3.0"
  )
}
ここまで出来たら、きちんと設定ができているか確認しておきます。
$ play run
ブラウザから 、localhost:9000 にアクセスしていつものPlay2の初期画面が
表示されれば成功です。
一旦、Ctrl+Dでplayを終了しておきます。
HTMLの記述
トップ画面を変更しておきましょう。
トップ画面のビューはapp/views/index.scala.htmlになります。
@(message: String)

@main("Welcome to Play 2.1") {

  <h1>Hello!</h1>

}
変更をくわえたら、再び
$ play run
で、、localhost:9000 にアクセスしてうまく変更されていることを
確認しておきます。
warファイルの作成
では、これをwarファイルにします。play2-war-pluginの設定は終わっていますので
シェル上で
$ play war
とするだけで、targetディレクトリにwarファイルが作成されます。
(warファイル名には、project/Build.scalaで設定したappName、appVersionが
使われます。)
あとはこのwarファイルをAmazon Elastic Beanstalkにアップロードするだけで
アプリが動作します。
Amazon Elastic Beanstalk へアップロード
実際にやってみましょう。
ブラウザで、AWSのホームに接続したら、Elastic Beanstalkを選択します。
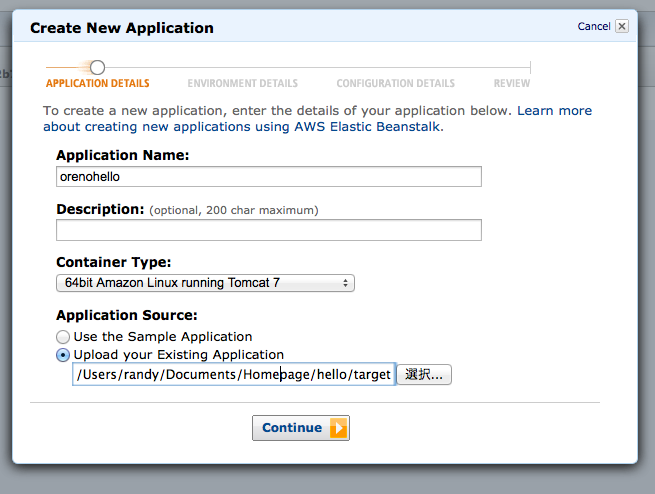
右上のほうにある「Create New Application」をクリック。

Application Nameに(他の人のアプリと被らないような)適当な名前を入力して
Container Typeは、Tomcat7(64bitあるいは32bit)を選びます。
Application Sourceは、「Upload your Existing Application」にチェックをいれ
さきほど作成したwarファイルを選択して、"Continue"をクリック。
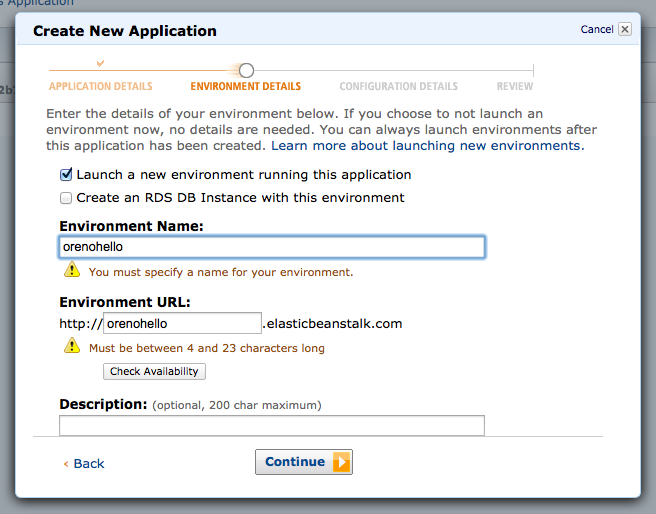
次に進みましたね。

Create an RDS DB Instance with this environmentは今回はDBを使わないので
チェックをはずしておきます。
Environment Nameは(他の人のアプリと被らない)適当な名前を入力します。
"Continue"をクリック。
次に、Instance Typeなどを選ぶウインドウが開きますが、
特に変更するところはないので、"Continue"をクリック。
次のウインドウが開きます。ここが最終確認になりますが、
今回はこのまま"Finish"をクリック。
数分(5〜10分くらい?)待つとアプリケーションが起動します。
(アプリ名) Environments
の下にあるEnvironment Detailsをクリックすると詳細がみれます。
Overviewタブのなかの「URL: 」欄にあるURLをクリックすると
起動したアプリに飛べます。
以上
補足
play2-war-pluginサイトの説明ではproject/Build.scalaの内容が
val main = PlayProject(appName, appVersion, appDependencies, mainLang = JAVA)
  .settings(Play2WarPlugin.play2WarSettings: _*)
  .settings(
    // ... Your own settings here
    Play2WarKeys.servletVersion := "3.0"
)
になっているが、PlayProject(...)は古いバージョンの書き方なので、
この記事では
  val main = play.Project(appName, appVersion, appDependencies)
    .settings(Play2WarPlugin.play2WarSettings: _*)
    .settings(
      // Add your own project settings here
      Play2WarKeys.servletVersion := "3.0"
  )
と、play.Project(...)を使用しています。