MicrosoftのCognitive Servicesの表情認識APIを使ってみた
注意: APIの使用方法がかなり変わってしまったので、いま記事を書き直しています。
ブログ宣伝:http://jotarout.hatenablog.com/
顔は心の窓?
人の表情を知ることで、その人の生理的・内部的状態を推定できるかもしれない。 コンピューターの力を借りて、あらゆる人の表情を認識してみよう。
↑のサイトから登録して、APIキーを得たら、 ソースコードと同じディレクトリにapi_key.txtに保存しておく。
コードはこれ。同じディレクトリにAPIキーと好きな画像を用意しておく。 ひとまずは、表情の横っちょに5つ感情とレベルを表示するUIを引っ付ける、みたいなコードを書きます。
ms_emotion.py
# Calling Emotion APIs is
# restricted to 20 transactions per minute
# and 30,000 transactions per month.
# 20 transactions per 60 seconds
# 1 transaction per 3 seconds

import httplib
import urllib
import base64
import os
import sys
import cv2
import numpy as np
import json
import math

def get_emotion(file_path, headers):
    try:
        conn = httplib.HTTPSConnection('api.projectoxford.ai')
        conn.request("POST", "/emotion/v1.0/recognize?",
                     open(file_path, 'rb'), headers)
        response = conn.getresponse()
        data = response.read()
        conn.close()
        return data
    except Exception as e:
        print("[Errno {0}] {1}".format(e.errno, e.strerror))
        print(e.message)

def display_expression(data,img):
    font = cv2.FONT_HERSHEY_PLAIN
    text = "test cyber"
    font_size = 1
    data = json.loads(data)
    for face in data:
        f_rec  =  face['faceRectangle']
        width  =  f_rec['width']
        height =  f_rec['height']
        left   =  f_rec['left']
        top    =  f_rec['top']
        f_rec  =  face['scores']
        f_rec = sorted(f_rec.items(), key=lambda x:x[1],reverse = True)
        cv2.rectangle(img,(left,top),(left+width,top+height),(130,130,130),2)
        cv2.rectangle(img,(left+width,top),(left+width+150,top+50),(130,130,130),-1)

        for i in range(0,5):
            val = round(f_rec[i][1],3)
            emo = f_rec[i][0]
            cv2.rectangle(img,(left+width,top+10*i),(left+width+int(val*150),top+10*(i+1)),(180,180,180),-1)
            cv2.putText(img, emo+" "+str(val),(left+width,top+10*(i+1)),font, font_size,(255,255,255),1)

if __name__ == '__main__':
    if len(sys.argv) != 2:
        print 'Usage: # python %s /path/to/image' % sys.argv[0]
        quit()

    with open('api_key.txt', 'r') as f:
        key = f.read().rstrip('\n')
    f.close()
    headers = {
        'Content-Type': 'application/octet-stream',
        'Ocp-Apim-Subscription-Key': key,
    }

    data = get_emotion(sys.argv[1], headers)
    img = cv2.imread(sys.argv[1],-1)

    display_expression(data,img)

    cv2.imshow('image',img)
    cv2.waitKey(0)
    cv2.destroyAllWindows()
python ms_emotion.py your_image.png で実行できる。
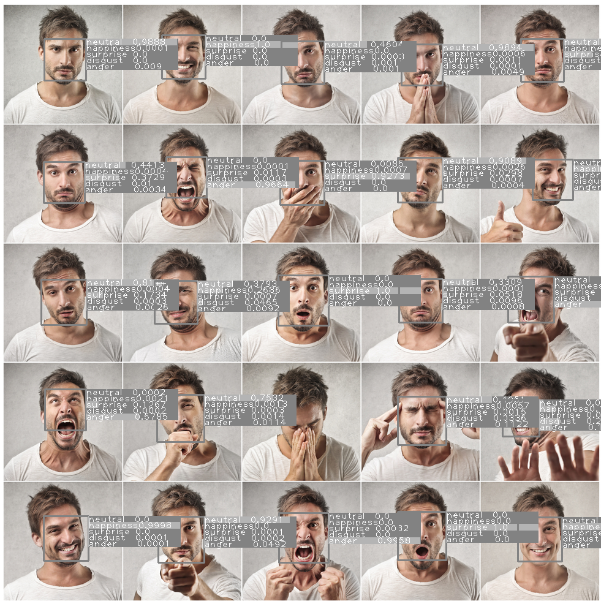
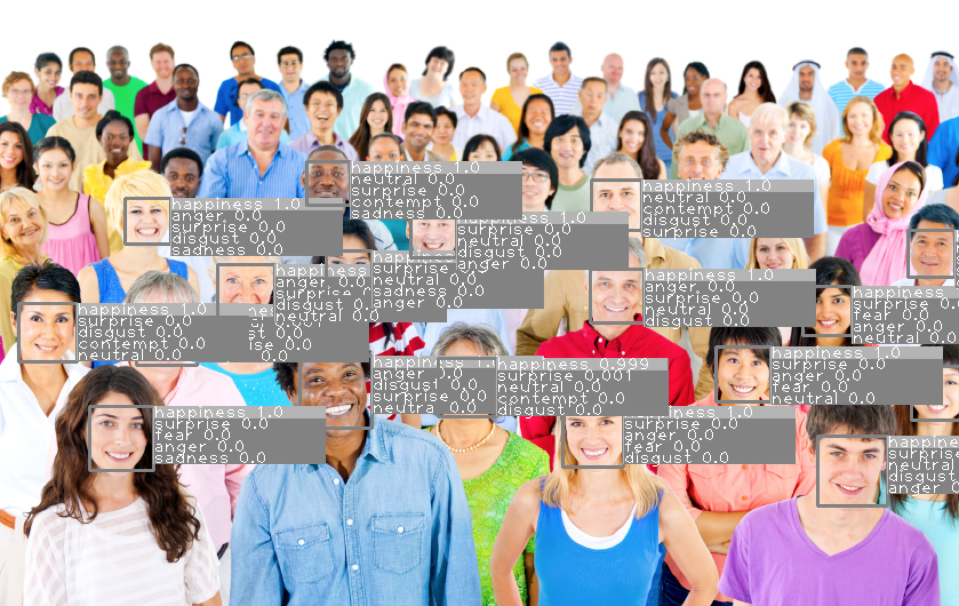
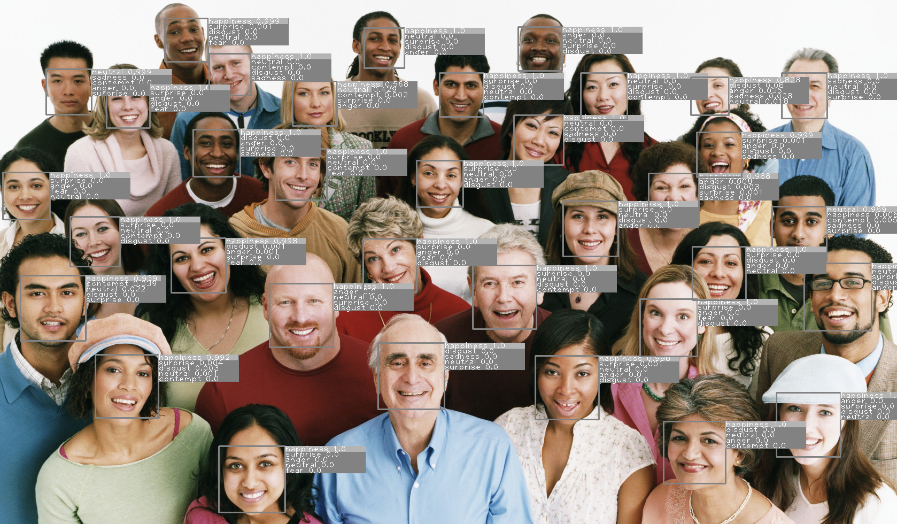
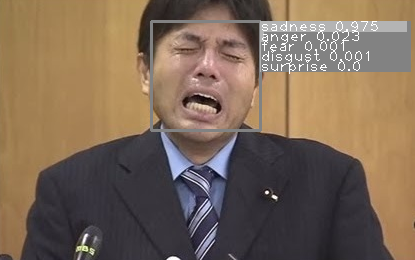
結構精度がいいと思う(小さい顔はあんまり取れない)。 表情は10種類ぐらいカテゴリ分けされるので、色々遊んでみると楽しそう。
動画像解析にも使えそうですね!APIが許してくれる限り・・・。