この記事では Android Studio 2.1.2 を使用しています。
大学の研究室で開催している勉強会の資料共有とアーカイブのためにQiitaに投稿しています。
まずはプロジェクトを作成する
今回はminSDKをAndroid4.1以上に設定して開発を進めます。
初期に生成されるActivityはEmptyActivityを使用します。
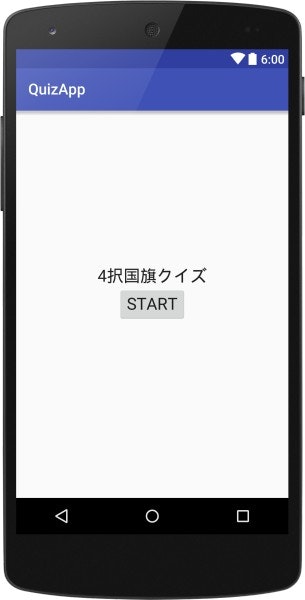
スタート画面を作成する
今回の目的はクイズアプリを作成することなので簡素なスタート画面を作ります。
プロジェクト作成の際に作成されたMainActivityを編集します。
TextViewとButtonのみのシンプルな構成です。
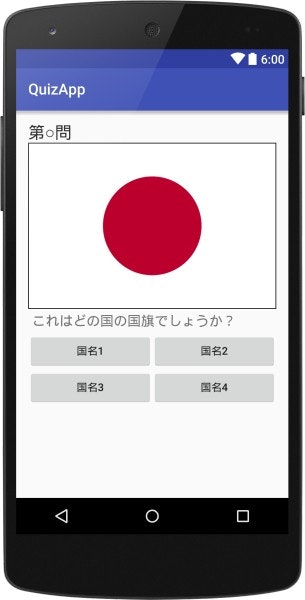
問題用の画面を作成する
appフォルダを右クリックしてNew→Activity→EmptyActivityをクリックします。
Activity Name にはQuizActivityと入力しFinishをクリックします。
このActivityは呼び出されたときに問題文や選択肢を調整するので仮の文字を入れておきます。
ページ下部にサンプルコードを掲載しておきます。
LinearLayout(Vertical)を自動生成されたactivity_quiz.xmlの親ViewであるRelativeLayoutの中に配置しウィジェットを配置していきます。
LinearLayoutはウィジェットを順に並べるものなので画像の大きさが異なっても配置を維持できるため使用します。
ImageViewの使い方
ImageViewを使うためにまず画像ファイルをres/drawableに保存します。
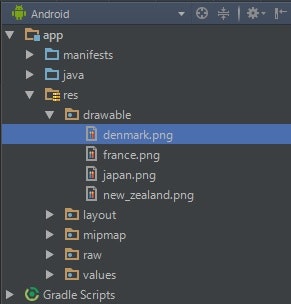
保存する方法はdrawableを右クリックしてShow in Explorerをクリックし表示されたフォルダに画像ファイルをコピーする方法が簡単です。
そしてImageViewをダブルクリックし、srcの右に表示されている...をクリックしてください。
DrawableのProjectの中に保存した画像があるので選択してOKをクリックしてください。
画像に枠を付ける方法
ImageViewのbackgroundに枠の色を指定しpaddingのallを1dpにすることで1dpの幅の枠線を簡易的につけることができます。
<ImageView
    android:layout_width="fill_parent"
    android:layout_height="wrap_content"
    android:id="@+id/flag_image"
    android:src="@drawable/japan"
    android:adjustViewBounds="true"
    android:background="@android:color/black"
    android:padding="1dp" />
ボタンを表のように表示する方法
TableLayoutを使用します。
TableLayoutの中にTableRowを配置し、さらにその中にButtonを配置します。横幅を均等にするためにlayout:widthを0dpにしlayout:weightを1に設定します。こうすることで表示される文字列の長さに関係なく幅が均等に割り付けられます。layout:weightの数値を調整することで幅の比率を変えたりもできます。

問題画面に遷移する
まずはそのまま呼び出してみます。
public class MainActivity extends AppCompatActivity {
    ...

    public void openQuiz(View view){
        Intent intent = new Intent(getApplication(), QuizActivity.class);
        startActivity(intent);
    }
}
openQuizというメソッドをボタンに割り当てます。
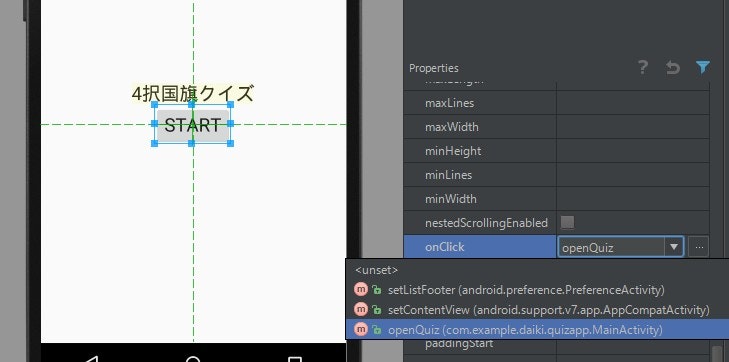
public void foo(View view){
    ...
}
という形のメソッドはonClickに割り当てられます。
実行して動くか確認します。
問題のためのクラスを作成する
今回は各問題に問題となる画像、選択肢、正解が必要になるためクラスにまとめて画面遷移するときに渡します。
MainActivity.javaのあるフォルダを右クリックしNew→Java Classをクリックします。クラス名をQuizに設定しクラスを作成します。
まずこのクラスは後でIntentに渡すためSerializableを実装(implement)します。
次に問題に必要となるクラス変数を定義していきます。
public Quiz implements Serializable{
    int q_num; // 問題番号
    String q_string; // 第○問というString
    int image; // 画像ID
    String[] choices = new String[4]; // 選択肢
    int answer_index; // 正解の選択肢
}
画像はidで管理されているためint型の変数で保持します。
さらにQuiz型の静的なクラス変数を宣言します。この変数に静的な関数initを作成して問題を追加していきます。
それと同時に問題を取り出すための関数も定義します。
public Quiz implements Serializable{
int q_num; // 問題番号
String q_string; // 第○問というString
int image; // 画像ID
String[] choices = new String[4]; // 選択肢
int answer_index; // 正解の選択肢
private static Quiz[] quizzes = new Quiz[1]; // クイズの配列
private Quiz(int q_num, String q_string, int image, String[] choices, int answer_index) {
this.q_num = q_num;
this.q_string = q_string;
this.image = image;
this.choices = choices;
this.answer_index = answer_index;
}
// 問題の登録(ここでは1問のみ)
public static void init() {
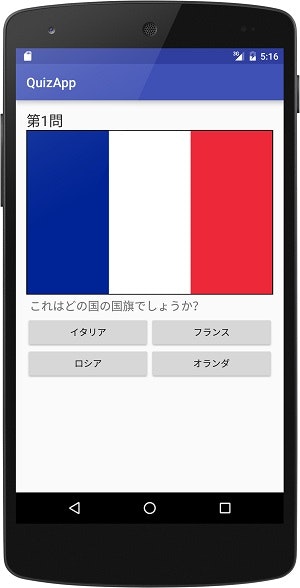
quizzes[0] = new Quiz(0, "第1問", R.drawable.france, new String[]{"イタリア", "フランス", "ロシア", "オランダ"}, 1);
}
// 問題を取得する
public static Quiz getQuiz(int num) {
if (num >= quizzes.length) {
return null;
}
return quizzes[num];
}
}
こうすることで
Quiz.init();
Quiz.get(0);
というように問題を呼び出せるようになります。
第一問を呼び出す
QuizActivityに問題を渡す
それでは先ほど作成した問題を画面遷移するときに渡すようにします。
前回は文字列や整数をputExtraという関数を用いて渡していました。QuizはSerializableを実装しているため前回と同じように渡すことができます。
public class MainActivity extends AppCompatActivity {

    @Override
    protected void onCreate(Bundle savedInstanceState) {
        super.onCreate(savedInstanceState);
        setContentView(R.layout.activity_main);

        Quiz.init();
    }

    public void openQuiz(View view) {
        Intent intent = new Intent(getApplication(), QuizActivity.class);
        intent.putExtra("Quiz", Quiz.getQuiz(0));
        startActivity(intent);
    }
}
QuizActivityで問題を表示する
次にデータを受け取り表示する部分をQuizActivity.javaに追記します。
public class QuizActivity extends AppCompatActivity {
    private TextView tv_num;
    private ImageView imageView;
    private Button[] buttons;

    private Quiz quiz;

    @Override
    protected void onCreate(Bundle savedInstanceState) {
        super.onCreate(savedInstanceState);
        setContentView(R.layout.activity_quiz);

        // 画面上のウィジェットを取得しておく
        tv_num = (TextView) findViewById(R.id.q_string);
        imageView = (ImageView) findViewById(R.id.flag_image);
        buttons = new Button[4];
        buttons[0] = (Button) findViewById(R.id.btn1);
        buttons[1] = (Button) findViewById(R.id.btn2);
        buttons[2] = (Button) findViewById(R.id.btn3);
        buttons[3] = (Button) findViewById(R.id.btn4);

        // データを受け取る
        Intent intent = getIntent();
        if (intent != null) {
            quiz = (Quiz) intent.getSerializableExtra("Quiz");
            show();
        }
    }

    // 表示に反映させる
    void show() {
        if (quiz != null) {
            tv_num.setText(quiz.q_string);
            imageView.setImageResource(quiz.image);
            for (int i = 0; i < buttons.length; i++) {
                buttons[i].setText(quiz.choices[i]);
            }
        }
    }
}
実行してみます。
正誤判定を行う
正解、不正解を表示するためのTextViewをactivity_quiz.xmlに追加します。
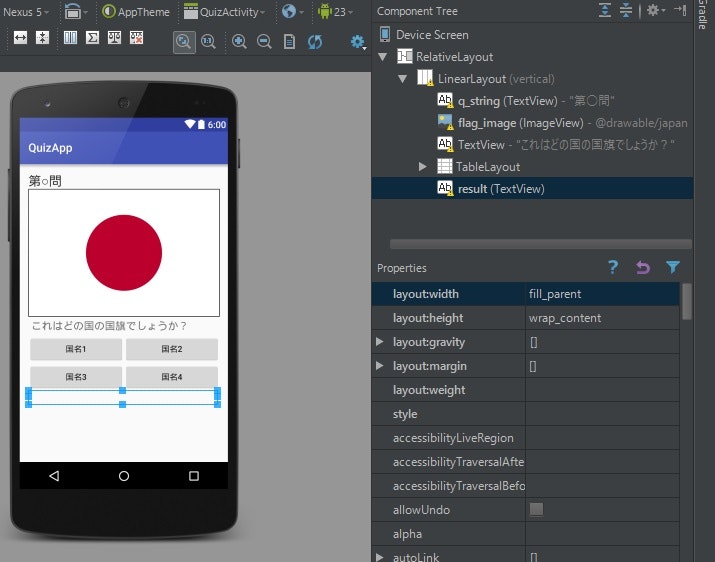
TableLayoutのlayout:heightをwrap_contentにすることでボタンのすぐ下に文字を配置することができます。
TextViewはtextを空にしてidにresultを設定しました。layout:widthをfill_parentにtextAlignmentをcenterにすると画面の中央に合わせることができます。
QuizActivity.javaにTextView型のクラス変数を追加しonCreateで呼び出します。
public class QuizActivity extends AppCompatActivity {
    ...
    private TextView result;

    @Override
    protected void onCreate(Bundle savedInstanceState) {
        ...

        result = (TextView) findViewById(R.id.result);

        ...
    }

    // 表示に反映させる
    void show() {
        if (quiz != null) {
            ...
            result.setText("");
        }
    }

    ...
}
それでは正解かどうかの判断を行うコードを追記します。
public class QuizActivity extends AppCompatActivity {
    ...

    public void answer(View view) {
        for (int i = 0; i < buttons.length; i++) {
            if (view.getId() == buttons[i].getId()) {
                if (i == quiz.answer_index) {
                    result.setText("正解!");
                } else {
                    result.setText("不正解...");
                }
            }
        }
    }
}
このanswerという関数は4つのボタンすべてのonClickに設定します。
次の問題に移る
次に正解の時につぎの問題へ進むコードを追記します。
まずQuiz.javaのinitを変更します。
    ...

    public static void init() {
        quizzes[0] = new Quiz(0, "第1問", R.drawable.france, new String[]{"イタリア", "フランス", "ロシア", "オランダ"}, 1);
        quizzes[1] = new Quiz(1, "第2問", R.drawable.new_zealand, new String[]{"クック諸島", "オーストラリア", "イギリス", "ニュージーランド"}, 3);
        quizzes[2] = new Quiz(2, "最終問題", R.drawable.denmark, new String[]{"デンマーク", "スウェーデン", "ノルウェー", "フィンランド"}, 0);
    }

    ...
正解の時にのみ次の問題へ移れるようにするため次の問題へ移るボタンの表示を切り替えることにします。
まずはボタンを用意します。
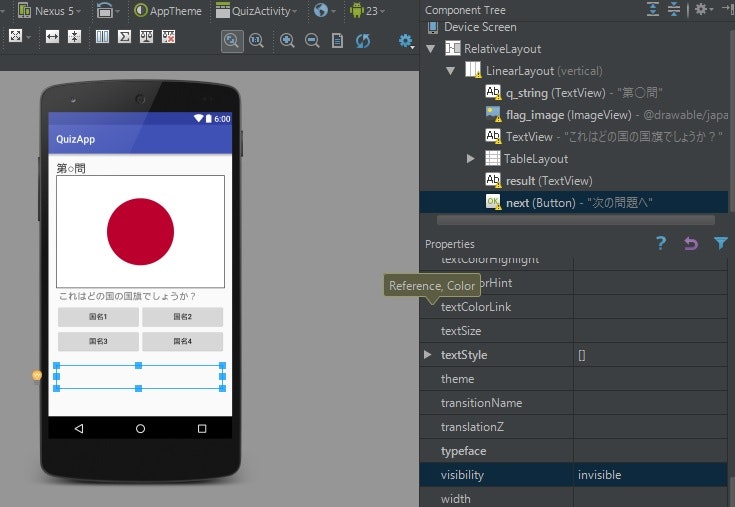
textを"次の問題へ"、idを"next"と設定しvisibilityをinivisibleにすることで見えないようにしています。
正解の時に表示するよう先ほどと同様にQuizActivity.javaに追記していきます。
public class QuizActivity extends AppCompatActivity {
    ...
    private Button next;

    @Override
    protected void onCreate(Bundle savedInstanceState) {
        ...

        next = (Button) findViewById(R.id.next);

        ...
    }

    // 表示に反映させる
    void show() {
        if (quiz != null) {
            ...
            next.setVisibility(View.INVISIBLE);
        }
    }

    public void answer(View view) {
        for (int i = 0; i < buttons.length; i++) {
            if (view.getId() == buttons[i].getId()) {
                if (i == quiz.answer_index) {
                    result.setText("正解!");
                    next.setVisibility(View.VISIBLE);
                } else {
                    result.setText("不正解...");
                }
            }
        }
    }
}
次に次の問題へ移るメソッドをQuizActivity.javaに追記します。
public class QuizActivity extends AppCompatActivity {
    ...

    // 次の問題へ移る
    public void next(View view){
        quiz = Quiz.getQuiz(quiz.q_num + 1);
        if (quiz != null) {
            show();
        } else {
            finish(); // 最後の問題の時は移る先がないので一旦MainActivityに戻す
        }
    }
}
このnextという関数は先ほど作成した"次の問題へ"というボタンのonClickに設定します。
こうすることで正解の時にのみ次の問題へと移れるようになりました。
効果音を流す
Androidでは音を再生する方法が幾つかありますが、今回は効果音を流すため短い音の再生に特化したクラスを使用します。
効果音を集める
その前にまず効果音素材を集めます。今回はMusic is VFRのこちらから正解と不正解の音を使用させていただきました。
音声データを変換する
音声データはWAVEファイル(.wav)かOggファイル(.ogg)が推奨されているためダウンロードしたmp3データをWAVEファイルに変換します。変換にはOnlineVideoConverterを利用しました。
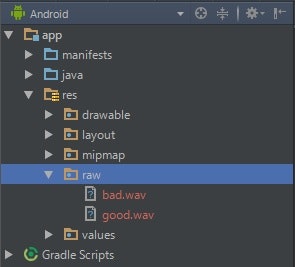
Androidアプリにファイルを含める
変換したWAVEファイルはresフォルダ内にrawフォルダを作成しその中に保存します。
効果音を読み込む
まずはQuizActivity.javaに効果音を再生するためのクラス変数を定義しonCreateでデータをセットします。変数の型はSoundPoolというもので短い音声データをすぐに再生するのに特化したクラスです。
public class QuizActivity extends AppCompatActivity {
    ...

    private SoundPool soundPool;
    private int good_se; // 正解の効果音の識別ID
    private int bad_se; // 不正解の効果音の識別ID

    @Override
    protected void onCreate(Bundle savedInstanceState) {
        ...

        // Android 5.0(Lolipop)より古いかどうかでSoundPoolの使い方は変わってくる
        if (Build.VERSION.SDK_INT < Build.VERSION_CODES.LOLLIPOP) {
            // Android 5.0(Lolipop)より古いとき
            soundPool = new SoundPool(2, AudioManager.STREAM_MUSIC, 0);
        } else {
            // Android 5.0(Lolipop)以降
            AudioAttributes attr = new AudioAttributes.Builder()
                    .setUsage(AudioAttributes.USAGE_MEDIA)
                    .setContentType(AudioAttributes.CONTENT_TYPE_MUSIC)
                    .build();

            soundPool = new SoundPool.Builder()
                    .setAudioAttributes(attr)
                    .setMaxStreams(2)
                    .build();
        }
        good_se = soundPool.load(this, R.raw.good, 1); // 正解の効果音の識別IDを保存
        bad_se = soundPool.load(this, R.raw.bad, 1); // 不正解の効果音の識別IDを保存

        ...
    }

    ...
}
今回は2種類の効果音を再生するため2という数字がちらほら見えるがもっとたくさん使う場合はその数を変更する。
効果音を再生する
効果音を再生するコードを追記します。
public class QuizActivity extends AppCompatActivity {
    ...

    public void answer(View view) {
        for (int i = 0; i < buttons.length; i++) {
            if (view.getId() == buttons[i].getId()) {
                if (i == quiz.answer_index) {
                    result.setText("正解!");
                    next.setVisibility(View.VISIBLE);
                    soundPool.play(good_se, 1F, 1F, 0, 0, 1F);
                } else {
                    result.setText("不正解...");
                    soundPool.play(bad_se, 1F, 1F, 0, 0, 1F);
                }
            }
        }
    }

    ...
}
SoundPoolはplay(音声の識別ID, 左チャンネルの音量, 右チャンネルの音量, 優先度, ループの有無, 再生速度)で音声を再生できる。
チャレンジ
- 全問正解した時に別のActivityに遷移するようにする
- 問題を表示するときに出題の効果音を流す
- 不正解の時にはMainActivityに戻るボタンを表示する
- 一度解答したら選択肢をクリックできないようにする
- MediaPlayerクラスを用いてBGMを流す
サンプルコード
activity_quiz.xml
<?xml version="1.0" encoding="utf-8"?>
<RelativeLayout xmlns:android="http://schemas.android.com/apk/res/android"
    xmlns:tools="http://schemas.android.com/tools"
    android:layout_width="match_parent"
    android:layout_height="match_parent"
    android:paddingBottom="@dimen/activity_vertical_margin"
    android:paddingLeft="@dimen/activity_horizontal_margin"
    android:paddingRight="@dimen/activity_horizontal_margin"
    android:paddingTop="@dimen/activity_vertical_margin"
    tools:context="com.example.daiki.quizapp.QuizActivity">

    <LinearLayout
        android:orientation="vertical"
        android:layout_width="match_parent"
        android:layout_height="match_parent">

        <TextView
            android:layout_width="wrap_content"
            android:layout_height="wrap_content"
            android:textAppearance="?android:attr/textAppearanceLarge"
            android:text="第○問"
            android:id="@+id/q_string" />

        <ImageView
            android:layout_width="fill_parent"
            android:layout_height="wrap_content"
            android:id="@+id/flag_image"
            android:src="@drawable/japan"
            android:adjustViewBounds="true"
            android:background="@android:color/black"
            android:padding="1dp" />

        <TextView
            android:layout_width="wrap_content"
            android:layout_height="wrap_content"
            android:textAppearance="?android:attr/textAppearanceMedium"
            android:text="これはどの国の国旗でしょうか?"
            android:padding="5dp" />

        <TableLayout
            android:layout_width="match_parent"
            android:layout_height="wrap_content">

            <TableRow
                android:layout_width="match_parent"
                android:layout_height="match_parent">

                <Button
                    android:layout_width="0dp"
                    android:layout_height="wrap_content"
                    android:text="国名1"
                    android:id="@+id/btn1"
                    android:layout_weight="1"
                    android:onClick="answer" />

                <Button
                    android:layout_width="0dp"
                    android:layout_height="wrap_content"
                    android:text="国名2"
                    android:id="@+id/btn2"
                    android:layout_weight="1"
                    android:onClick="answer" />
            </TableRow>

            <TableRow
                android:layout_width="match_parent"
                android:layout_height="match_parent">

                <Button
                    android:layout_width="0dp"
                    android:layout_height="wrap_content"
                    android:text="国名3"
                    android:id="@+id/btn3"
                    android:layout_weight="1"
                    android:onClick="answer" />

                <Button
                    android:layout_width="0dp"
                    android:layout_height="wrap_content"
                    android:text="国名4"
                    android:id="@+id/btn4"
                    android:layout_weight="1"
                    android:onClick="answer" />
            </TableRow>
        </TableLayout>

        <TextView
            android:layout_width="fill_parent"
            android:layout_height="wrap_content"
            android:textAppearance="?android:attr/textAppearanceLarge"
            android:id="@+id/result"
            android:textAlignment="center" />

        <Button
            android:layout_width="fill_parent"
            android:layout_height="wrap_content"
            android:text="次の問題へ"
            android:id="@+id/next"
            android:visibility="invisible"
            android:onClick="next" />

    </LinearLayout>

</RelativeLayout>