今回はちょっと目先を変えてRaspberry Pi 2のハードウェア制御をElixir/Erlang OTPでやってみます。実は今までRaspberry Pi 2、もっぱらお手軽Linux機として使っていてLチカやったことないことに気づきました(笑)。
下準備
Raspbian(Jessie)でElixirを走らせる
Raspbian(Jessie)で既にRaspberry Pi 2が動いていて、ビルドに必要なコンパイラなどがインストールされているものとします1。
まずErlang/OTPとElixirをビルドします2。
DOWNLOAD OTP 18.2.1から最新の18.2.1のソースをダウンロードしましょう。Elixirも1.2.13をビルドする予定なのでErlangは18.0以降が必須です。
先に必要なライブラリなどをRaspbianにインストールしておきます。
$ sudo apt-get update
$ sudo apt-get install libncurses5-dev libssl-dev
$ sudo apt-get install libwxgtk2.8-dev libwxgtk2.8-dbg
$ sudo apt-get install xsltproc libxml2-utils
最低限OpenSSL library とlibncursesを入れておけばよいと思います。Xで使うことを想定してwxwidgets関連とドキュメント関連(使わないかなあ)でxsltproc及びxmlライブラリを入れています。fopはPDF出力が欲しい!というわけでなければjava7をインストールするので入れないほうがいいかと。
落としてきたotp_src_18.2.1.tar.gzを展開しできたディレクトリにcd。
$ tar xzf otp_src_18.2.1.tar.gz
$ cd otp_src_18.2.1
以下、configureしてmakeします。詳しいやり方は展開したディレクトリのHOWTO/INSTALL.mdにあります。
$ export ERL_TOP=`pwd`   # ベースディレクトリの指定
$ export LANG=C    # Perlのバグよけ。Raspbian(Jessie)のPerlだと不要
$ ./configure
Ignoring the --cache-file argument since it can cause the system to be erroneously configured
Disabling caching
checking build system type... armv7l-unknown-linux-gnueabihf
checking host system type... armv7l-unknown-linux-gnueabihf
checking for gcc... gcc
...
ではビルドします。かなり時間がかかりますよ4。
$ make
 MAKE   depend
make[1]: Entering directory '/home/tamori/otp_src_18.2.1/erts/emulator'
 MAKE   generate
make[2]: Entering directory '/home/tamori/otp_src_18.2.1/erts/emulator'
...
インストールします。
$ sudo make install
 MAKE   emulator
make[1]: Entering directory '/home/tamori/otp_src_18.2.1/erts'
make[2]: Entering directory '/home/tamori/otp_src_18.2.1/erts/emulator'
 MAKE   opt
make[3]: Entering directory '/home/tamori/otp_src_18.2.1/erts/emulator'
...
無事ビルド及びインストールが成功したら試しにerlを起動してみましょう。
$ erl
Erlang/OTP 18 [erts-7.1] [source] [smp:4:4] [async-threads:10] [hipe] [kernel-poll:false]

Eshell V7.1  (abort with ^G)
1>
が表示されればOK。次はElixirのビルドです。こちらはgitでソースを持ってきます。HEADは開発版なので…
$ git clone https://github.com/elixir-lang/elixir.git
Cloning into 'elixir'...
remote: Counting objects: 88364, done.
...
$ cd elixir
$ git checkout tags/v1.2.1 -b v1.2.1
...
Switched to a new branch 'v1.2.1'
$ make clean test
cd lib/elixir && "/home/tamori/elixir/rebar" clean
==> elixir (clean)
rm -rf ebin
rm -rf lib/*/ebin
...
$ sudo make install
==> elixir (compile)
==> elixir (install)
...
これも無事にビルド・インストールできたら試しにiexを立ち上げてみましょう。
$ iex
Erlang/OTP 18 [erts-7.2.1] [source] [smp:4:4] [async-threads:10] [hipe] [kernel-poll:false]

Interactive Elixir (1.2.1) - press Ctrl+C to exit (type h() ENTER for help)
iex(1)>
お疲れ様でした。
ElixirでRaspberry Piのハードウェアを制御する
まずいくつか探してみて
こちらとこちらを参考になりそうだと考えて調べてみました。
まず前者ですがRaspberry Piのデバイスは例えば本体LEDならば/sys/class/leds/led0/triggerや/sys/class/leds/led0/brightnessといった仮想ファイルに機能がマップされているのでそれを叩くやり方です。シンプルなんですがテキストのechoばっかり並んでもつまらなさそうなので後者のElixir/ALEを使うことにします。
Elixir/ALE
Elixir/ALEはErlang/ALEをベースにしたハードウェア制御用のライブラリです。I/OピンなどがElixir(Erlang)のプロセスとして起動しそいつに向かってメッセージを投げる感じなので「Elixirぽい…」かな…。
LチカなのでGPIOとGNDに抵抗挟んでLEDを繋ぎます。
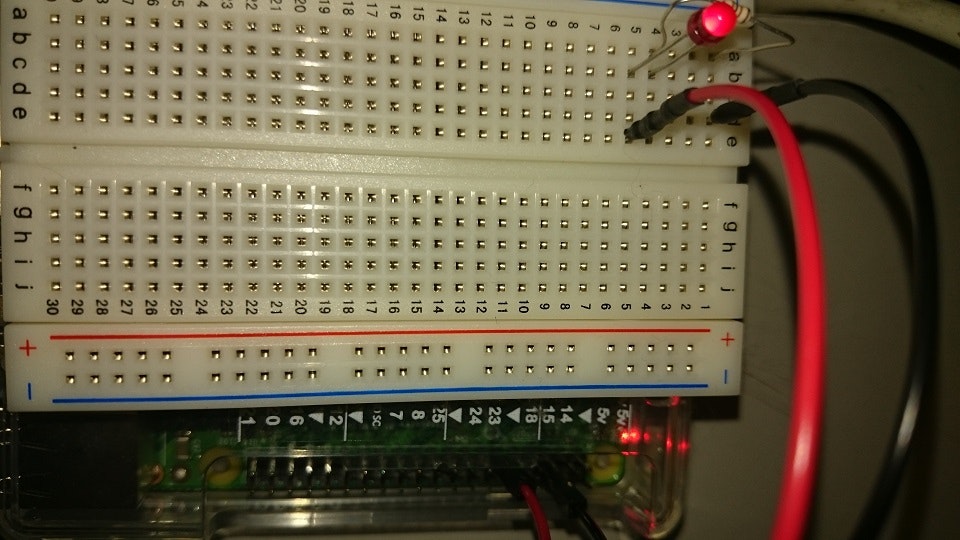
GPIO17(11番ピン 左列上から6番目) ==> 180Ω抵抗 ==> +LED LED- ==> GND(3番ピン 右列上から3番目)に繋ぎました。
ではお試し用のコードを書いて動かしてみましょう。
$ mix new ledtest1
* creating README.md
* creating .gitignore
* creating mix.exs
...
Run "mix help" for more commands.

$ cd ledtest1
mix.exsにElixir/ALEを使うための設定等を追加します。
defmodule Ledtest1.Mixfile do
  use Mix.Project

  def project do
    [app: :ledtest1,
     version: "0.0.1",
     elixir: "~> 1.2",
     build_embedded: Mix.env == :prod,
     start_permanent: Mix.env == :prod,
     deps: deps]
  end

  # Configuration for the OTP application
  #
  # Type "mix help compile.app" for more information
  def application do
    [applications: [:logger],
     mod: {Ledtest1,[]}]
  end

  # Dependencies can be Hex packages:
  #
  #   {:mydep, "~> 0.3.0"}
  #
  # Or git/path repositories:
  #
  #   {:mydep, git: "https://github.com/elixir-lang/mydep.git", tag: "0.1.0"}
  #
  # Type "mix help deps" for more examples and options
  defp deps do
    [
      {:elixir_ale, "~> 0.4.1"}
    ]
  end
end
$ mix deps.get
Could not find Hex, which is needed to build dependency :elixir_ale  # 初回だけHexが見つからないので聞いてくる
Shall I install Hex? [Yn] # Yなのでリターン
...
あとは以下のようにlib/ledtest1.exを書きます。
defmodule Ledtest1 do
  require Logger

  def start(_type, _args) do
    {:ok, pid} = Gpio.start_link(17, :output)
    blink_forever(pid)
  end

  def blink_forever(pid) do
    Gpio.write(pid, 1)
    Logger.debug "Turn LED on"
    :timer.sleep 1000
    Gpio.write(pid, 0)
    Logger.debug "Turn LED off"
    :timer.sleep 1000
    blink_forever(pid)
  end

end
実行にはスーパーユーザー権限がいるので
$ sudo iex -S mix
でいいはずなんですが、先に
$ sudo mix hex.info
する必要がありました(sudoすると /root/.mix/の方にも環境を作ろうとするため)。うまくいくと
$ sudo iex -S mix
Erlang/OTP 18 [erts-7.2.1] [source] [smp:4:4] [async-threads:10] [kernel-poll:false]

==> elixir_ale
cc -c -I/usr/local/lib/erlang/lib/erl_interface-3.8.1/include -O2 -Wall -Wextra -Wno-unused-parameter -o src/ale_main.o src/ale_main.c
cc -c -I/usr/local/lib/erlang/lib/erl_interface-3.8.1/include -O2 -Wall -Wextra -Wno-unused-parameter -o src/gpio_port.o src/gpio_port.c
...
Compiled lib/ledtest1.ex

22:56:32.834 [debug] Turn LED on

22:56:33.835 [debug] Turn LED off

22:56:34.837 [debug] Turn LED on

22:56:35.840 [debug] Turn LED off
...
とLチカが始まります。
もっともPythonで書けば
$ sudo apt-get install python-rpi.gpio
で必要なライブラリをインストールした後
# ! /usr/bin/env python

import RPi.GPIO as GPIO
import time

GPIO.setmode(GPIO.BCM)
GPIO.setup(17, GPIO.OUT)
GPIO.output(17, GPIO.HIGH)

while True:
    GPIO.output(17, GPIO.HIGH)
    time.sleep(1)
    GPIO.output(17, GPIO.LOW)
    time.sleep(1)
でできちゃうんで、Elixir/Erlangならではの使い道やメリットはこれから考えないと。
-
ググるといくらでも例が出てきますのでここはさっくり略。 ↩
-
これがWheezyならcontribにElixirのビルド済バイナリがあるのですが(とはいえ1.0なので古いです)。http://tomohikoseven-andre-tomohikoseven.blogspot.jp/2015/07/elixirraspberrypielixir.html 参照。 ↩
-
こないだ1.2.0が出たと思ったらもう1.2.1がリリースされています。 ↩
-
X Windowなし、コンソール起動の状態でtimeで測ったらreal 67m54.622s user 63m9.200s sys 4m34.490s で1時間超え。X Windowありだとreal 97m22.034s user 91m43.120s sys 4m33.380sでした。 Raspi無印のXありだと5時間かそれ以上かかるでしょう。 ↩