AWS Lambdaを使用したChatBotHackthonに参加して見事に何も受賞できなかったので得られた知見だけでもシェアするために書きます。

作ったbot
画像検索用のBotです。
英語でキーワードを尋ねると検索してWikipediaのタイトル、本文、リンク、画像を返してくれます。データを英語のWikiPediaを使用したため検索は英語しかできません。
下記の画像では"bot_lambda_out"をトリガーにしてLambdaを叩きにいき"Earth"を検索しています。
これはうまくいった例でWikipediaのタイトルと説明文の概要、リンク、画像が出されています。

なぜ作ったか
画像があると分かり易いケースがある点とSlackは自動で画像を展開してくれる点が魅力的だと思ったので作成しました。
画像と言語を関係づけるのに深層学習の技術も使って発展させる予定です。
どうやって作ったか
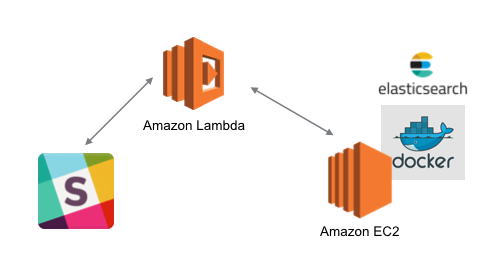
今回は課題がサーバーレスなのでLambdaとEC2を利用して作成しました。
全体アーキテクチャ
サーバーレスの部分でSlackとEC2との連携を行います。
EC2にElasticsearchのコンテナを配備して画像検索を行います。
Serverless
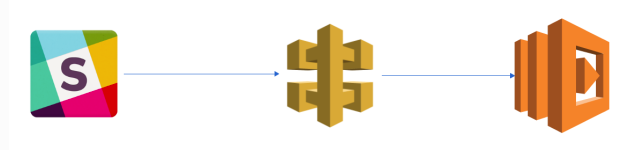
Slack Bot with Lambda function
LambdaとSlackの連携の設定をしていきます。
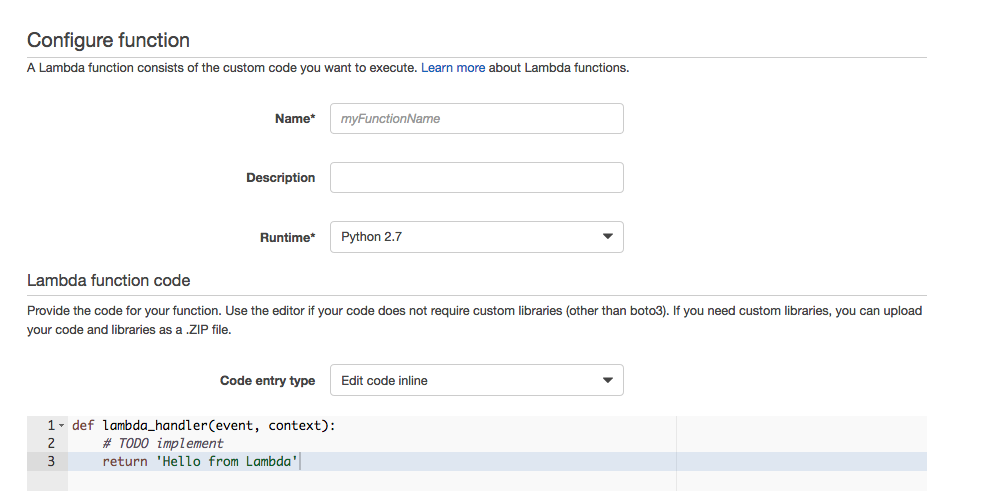
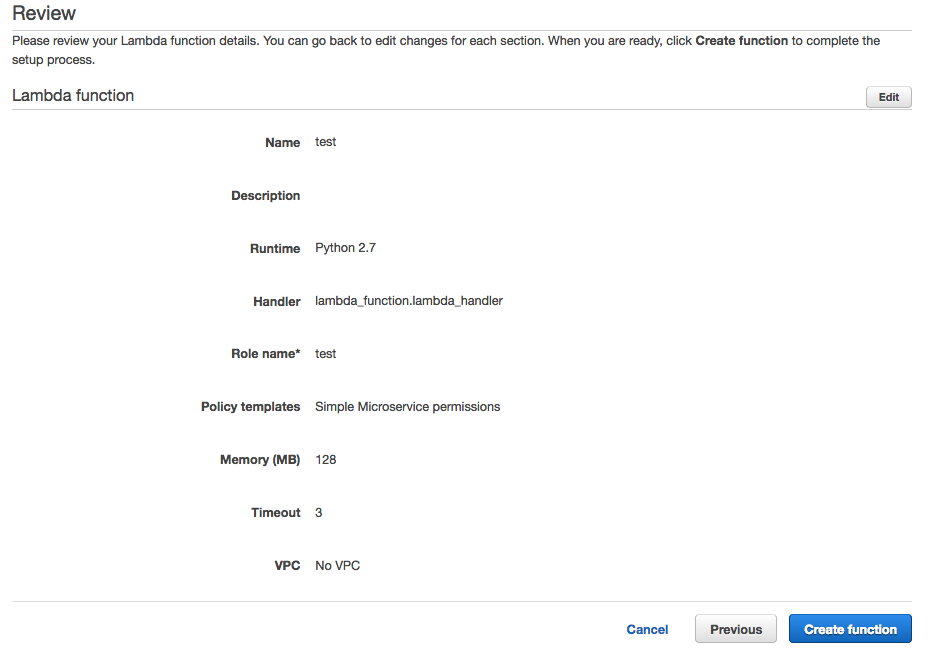
Lambdaの設定
Lambdaを選択してください。

You make the function by the Create a Lambda function

Blue Print(設計図)を選択せずにSkipしてください。
後でApiGatewayは設定するので今は消しておいてください。

functionnameに今回使用する関数名を設定します。
Runtimeは"Python2.7"を選択してください。
Codeの設定
画像検索で使用するelasticsearch endpointはまだ準備していないので空白で設定します。
lambda_function.pyで動作させています。
下記でEC2インスタンスを立てているエンドポイントを指定してElasticsearchを叩くようになっています。
query = "curl -XGET {your elasticsearch endpoint}:9200/_all/_search?pretty -d\'"
トリガーワードに依存しますが”bot_lambda_out”をトリガーワードにしているのでこちらを除いて検索したいワードだけにして検索するようにしています。
command_text = event['text'].replace("bot_lambda_out ", "")
Roleの設定
新しいRoleの作成を行い。"Create new role from templates(s)"を選択します。
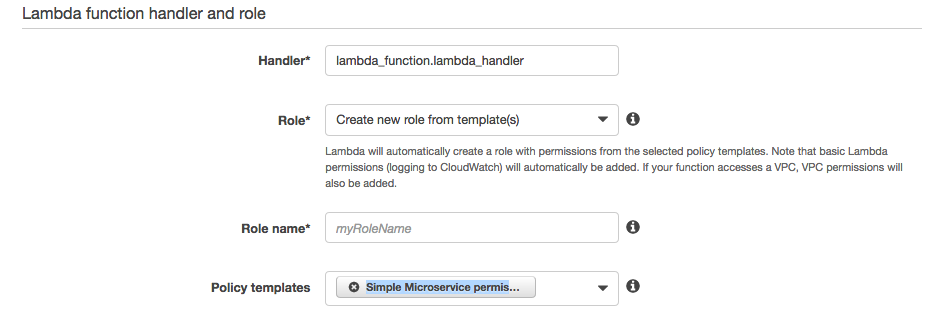
"Create function"を選択します。
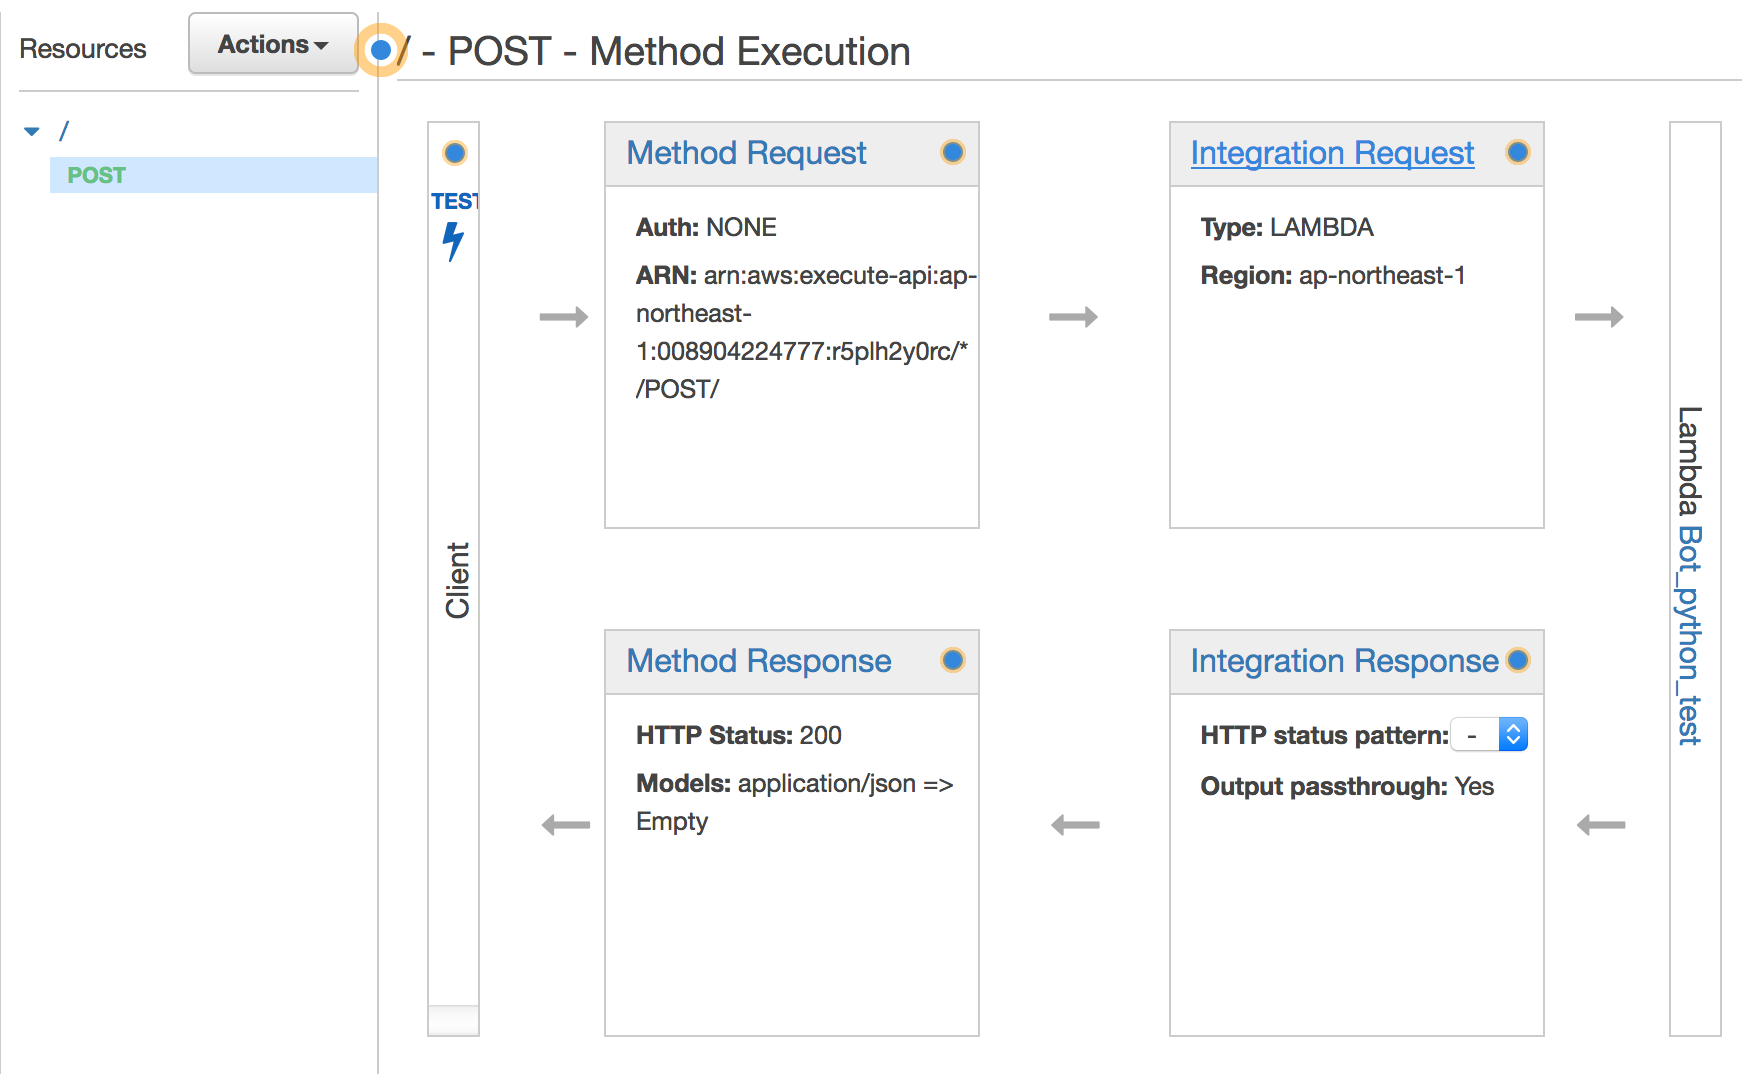
API Gatewayの設定
API Gatewayを選択してください。

"Create API"を選択してください。

"Create Method"とPostを選択してください。

"Integration Request"で適用するBodyマッッピングテンプレートを設定します。
"Add mapping template"で新しいテンプレートを設定します。
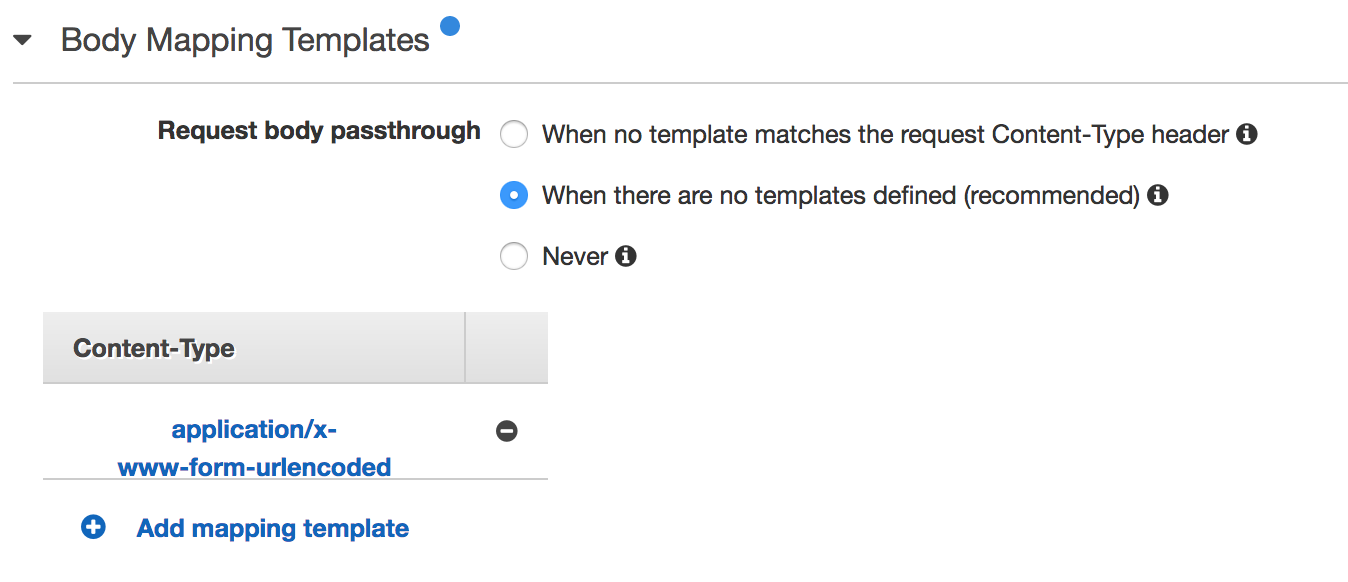
Inputのタイプは"[application/x-www-form-urlencoded]"を選びます。
テンプレートは下記です。
You input the below sentence for the template
## convert HTML POST data or HTTP GET query string to JSON

## get the raw post data from the AWS built-in variable and give it a nicer name
# if ($context.httpMethod == "POST")
 #set($rawAPIData = $input.path('$'))
# elseif ($context.httpMethod == "GET")
 #set($rawAPIData = $input.params().querystring)
 #set($rawAPIData = $rawAPIData.toString())
 #set($rawAPIDataLength = $rawAPIData.length() - 1)
 #set($rawAPIData = $rawAPIData.substring(1, $rawAPIDataLength))
 #set($rawAPIData = $rawAPIData.replace(", ", "&"))
# else
 #set($rawAPIData = "")
# end

## first we get the number of "&" in the string, this tells us if there is more than one key value pair
# set($countAmpersands = $rawAPIData.length() - $rawAPIData.replace("&", "").length())

## if there are no "&" at all then we have only one key value pair.
## we append an ampersand to the string so that we can tokenise it the same way as multiple kv pairs.
## the "empty" kv pair to the right of the ampersand will be ignored anyway.
# if ($countAmpersands == 0)
 #set($rawPostData = $rawAPIData + "&")
# end

## now we tokenise using the ampersand(s)
# set($tokenisedAmpersand = $rawAPIData.split("&"))

## we set up a variable to hold the valid key value pairs
# set($tokenisedEquals = [])

## now we set up a loop to find the valid key value pairs, which must contain only one "="
# foreach( $kvPair in $tokenisedAmpersand )
 #set($countEquals = $kvPair.length() - $kvPair.replace("=", "").length())
 #if ($countEquals == 1)
  #set($kvTokenised = $kvPair.split("="))
  #if ($kvTokenised[0].length() > 0)
   ## we found a valid key value pair. add it to the list.
   #set($devNull = $tokenisedEquals.add($kvPair))
  #end
 #end
# end

## next we set up our loop inside the output structure "{" and "}"
{
# foreach( $kvPair in $tokenisedEquals )
  ## finally we output the JSON for this pair and append a comma if this isn't the last pair
  #set($kvTokenised = $kvPair.split("="))
 "$util.urlDecode($kvTokenised[0])" : #if($kvTokenised[1].length() > 0)"$util.urlDecode($kvTokenised[1])"#{else}""#end#if( $foreach.hasNext ),#end
# end
}
上記の設定で保存します。
Deploy
デプロイすればエンドポイントが設定されてコードが実行されますが今はElasticsearchの設定ができていないので動作しません。

エンドポイントは下記の"Invoke URL"で確認可能です。

Stageをもし作成していない場合は作成してデプロイします。

Slackの設定
今回は画像URLを展開したかったので"Outgoing Webhook"を使用しました。
Slackで"Custom Integratations"に"Outgoing Webhook"を加えてください。
設定した後に下記の設定が必要になります。
1: slack botが反応するチャネル
2: slack botが反応するトリガーワード
3: 今回設定したLambdaのエンドポイント
4: Botの名前
5: Botのアイコン
Slack Outgoing Webhooksの設定ができたら保存します。
検索部分
画像検索部分はWikipediaのデータを使用しました。
アブストラクトデータ
- enwiki-20080312-abstract.xml
画像データ
- enwiki-20080312-imagelinks.sql
処理の流れ
- MySQLに画像データを保存。
- Wikipediaのアブストラクトデータを取得。
- Wikipediaのタイトルでlike検索をかけて画像を取得する。
- 画像とWikipediaのアブストラクトデータを紐付けたjsonファイルを作成
- Elasticsearchコンテナにjsonファイルを保存
- ElasticsearchコンテナをEC2に配備
- LamdaのコードにEC2のipアドレスを設定
- SlackでLambdaが反応して検索結果が返却されるか確認する
時間がかかりそうな部分はCython化しています。
コード
MySQLに画像データを保存
sqlで配布されるため、私はMySQLを使用してデータを処理することにしました。DBならで処理できるなら拘りは特になくても良いと思います。
ただ配布されたSQLだと文法エラーが出たので下記を削除しました。
なぜエラーが出るかは私のSQL力が足りないので誰か教えて欲しい・・・
TYPE=InnoDB;
enwikiと言うdatabaseを作成してsqlを使ってDBを作成しました。
1: create database enwiki
2: use enwiki
2: source enwiki-20080312-imagelinks.sql
Wikipediaのアブストラクトデータを取得
アブストラクトデータ
- enwiki-20080312-abstract.xml
xmlのデータなので、こちらを処理して画像リンクつきのjsonファイルにする必要があります。
wiki_pedia_xml_to_json.pyxで処理をしていますがネストが深い。
後で直します。
for extract_data in doc:
    if extract_data.tag in self.extract_dict_array:
        # replace method for title extract
        if extract_data.text is not None:
            self.index_json.update({ "index" : { "_index" : "wikipedia", "_type" : "contents", "_id" : str(index_count) } })
            replace_text = extract_data.text.replace("Wikipedia: ", "")
            self.json_data.update({extract_data.tag: replace_text})
            if extract_data.tag == "title" and self.image_Flag is True and len(replace_text) > 1:
                self.__get_image(replace_text)
        else:
            self.index_json.update({ "index" : { "_index" : "wikipedia", "_type" : "contents", "_id" : str(index_count)  } })
self.json_data.update({extract_data.tag: extract_data.text})
xml.etree.ElementTreeと言うライブラリを使用して階層的に処理をして必要な項目を取得しています。
今回は画像リンクを取得するために下記の処理で
- Wikipediaのタイトルの項目か
- 画像取得をするかどうかのフラグ
- タイトルが0字
を判定して画像取得処理に入っています。
MySQLをタイトルで検索するための前処理です。
            if extract_data.tag == "title" and self.image_Flag is True and len(replace_text) > 1:
                self.__get_image(replace_text)
Wikipediaのタイトルでlike検索をかけて画像を取得する。
self.__get_imageによる画像取得処理はwiki_pedia_image_link.pyxで処理をしています。特別なことはしておらずMySQLを立ち上げて下記でlike検索を行っています。
SELECT DISTINCT il_to from imagelinks WHERE (il_to LIKE " + "'" + search_word  + "%" + ".jpg')" + "OR" + \
"(il_to LIKE " + "'" + search_word + "%" + ".JPG')" + "order by (il_to = '" + search_word + "') desc"
下記のようなリンクが欲しいのですが実際に取得できるリンクは下記のようになっていません。
http://〇〇.jpg
今回取得したリンクに画像のリンクは含まれているのでget_crawler_image_link.pyxでクローリング処理をして対象のimgリンクのみ取得できるように処理をします。
画像とWikipediaのアブストラクトデータを紐付けたjsonファイルを作成
これらの処理によって画像リンクを含むjsonファイルが作成できます。
AlgeriaのWikipediaのデータです。
{"index": {"_id": "20", "_index": "wikipedia_image", "_type": "contents"}}
   42 {"abstract": "(Arabic)The Pledge", "image": "https://upload.wikimedia.org/wikipedia/commons/d/d4/Algeria%2C_Ottawa.JPG", "title": "Algeria", "url": "http://en.wikipedia.org/wiki/Algeria"}
画像は下記が取れています。
Algeriaの大使館らしいです。
微妙ですが画像も取れています。実は画像が対応が取れていない。そもそも画像がないなども存在していますが、今回は気にせず実装を進めます。
下記のコマンドで実行できますが時間がかかります。
python execute_wiki_pedia_xml_to_json.py -xml enwiki-20080312-abstract.xml -img True
そこでGNU parallelを使用して並列処理で実行します。
先ほどの実行コマンドを記述したjobs.txtを用意します。
python execute_wiki_pedia_xml_to_json.py -xml enwiki-20080312-abstract.xml -img True
job数は40から100で私の環境では調整して実行しました。
parallel --linebuffer -j 40-100 :::: jobs.txt
これで画像リンクを含んだjsonファイルが作成されます。
Elasticsearchコンテナにjsonファイルを保存
先ほど作成したjsonファイルをElasticsearchコンテナに保存します。
jsonファイルのままではサイズが大きいのでgzip形式に圧縮します。
gzip {your git clone folder}/Data/wiki_image/*.json
著者のケースではVagrantで環境を構築してElasticsearchの環境をdockerに構築しているのでVagrantを立ち上げます。
vagrant up
Dockerのインストールプロセスが面倒なのでansibleで導入します。
vagrant_hostというファイルでVagrantのipアドレスを設定しているので今回立ち上げたVagrantと同様のipアドレスを設定します。
[vagrant]
{あなたが設定したVagrantのipアドレス(デフォルトは192.168.33.25に設定しています。)} ansible_ssh_private_key_file=.vagrant/machines/default/virtualbox/private_key ansible_ssh_user=vagrant
Ansibleで環境構築します。
cd {your git clone folder}/ansible_setting
ansible-playbook -i vagrant_host vagrant_lambda_docker.yml
これでDockerを動作できる環境が整ったので下記でvagrantにアクセスしてDockerコンテナをビルドして作成します。
vagrant reload
vagrant ssh
cd /home/vagrant/AWS_Lambda_Chatbot/docker
make test-elasticsearch-english
できたElasticsearchのコンテナイメージをEC2に配備する必要があるためDocker hubに上げておきます。
Docker hub
下記でDockerイメージがDocker hubにプッシュできます。
docker tag {docker elasticsearch image} elasticsearch_english
docker login
docker tag elasticsearch_english:latest {your docker repository name}:{tag name}
docker push {your docker repository name}:{tag name}
Elasticsearchをコンテナ化してEC2に配備
EC2インスタンスの作成方法は下記をご覧ください。
EC2インスタンスも同様に環境構築したいのでAnsibleを使用します。
cd {your git clone folder}/ansible_setting
ansible-playbook -i aws_lambda_chatbot_host aws_lambda_chatbot.yml
sshでEC2インスタンスにします。
ssh -i {your key} ubuntu@{your ip address}
Dockerイメージを取得します。
docker login
docker pull {your docker repository name}:{tag name}
Elasticsearchコンテナを起動して文書データを登録するスクリプトは作成しているのでそちらを利用してElasticsearchコンテナを立ち上げます。
git clone https://github.com/SnowMasaya/AWS_Lambda_ChatBot.git
cd {your git clone folder}/Question_Answer
sh elastic_start_english.sh 1 5 True elasticsearch_english
登録時の引数のオプションは下記になっています。環境によって並列数を上げると登録速度が変わりますが、上記の値で10〜20分程度で筆者の環境では登録が終わりました。
sh elastic_start_english.sh [PIPE_NUMBER] [PARALLEL_NUMBER] [IMAGE_FLAG (True or False)] [ELS_IMAGE_NAME]
LamdaのコードにEC2のipアドレスを設定
ここまで設定するとEC2に画像検索用サーバーが立っているので先ほどの
lambda_function.pyの下記のendpointの部分にipアドレスを設定すれば動作します。
query = "curl -XGET {your elasticsearch endpoint}:9200/_all/_search?pretty -d\'"
SlackでLambdaが反応して検索結果が返却されるか確認する
まとめ
やることが多いですが新たな知見が得られたのでBot開発が捻りそうです。
ここまで頑張ったが何もないのは癪だったので知見を共有することを目的にQiitaに投稿しました。実は動画も作って投稿してよって課題があったので動画作ってます。
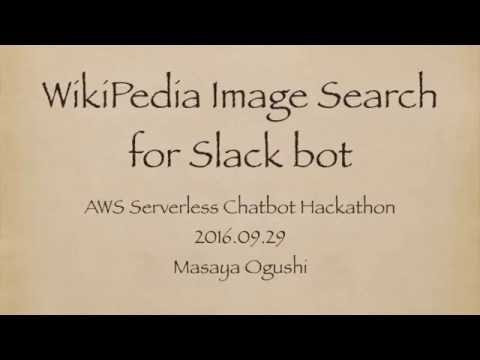
動画
画像検索の精度が低く、もっと精度上げるための工夫をする必要があるなと思いました。
手法として
- 画像をlike検索ではなく精度が上がる検索方法にする。SQL力上げる
- 画像分類でタグを付与してそのタグで検索して紐付ける。
- イメージキャプションを使用して画像に適切な説明文を付与して、説明文を利用してWikipediaとの関連性が適切に取れるようにする。
上記を複合的に使用すれば精度が上がると思いました。
おまけ
コード
参考