サマリ
Bluemixには"Watson Q&A"というデモ用のQ&Aサービスがあり、"ヘルスケア"と"トラベル"の分野について回答してくれるサービスがあります。Githubにこれを使ったサンプルアプリ(ただし英語版)があったので、翻訳サービスを使って日本語化しつつ、元のコードも拝見してお勉強しましたというお話。
元のアプリはAndrew triceさん作成のこちら。
Voice-Driven Native Mobile Apps with IBM Watson & IBM MobileFirst
http://www.tricedesigns.com/2015/07/13/voice-driven-native-mobile-apps-with-ibm-watson/
作った(書き換えた)もの
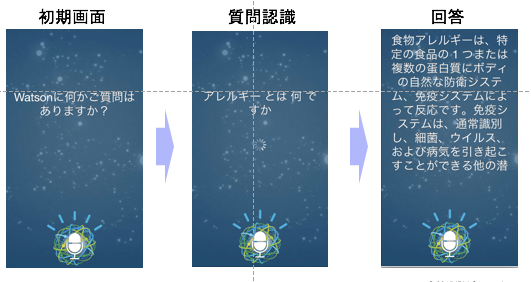
"ヘルスケア"に関する質問を音声認識し、その質問への回答を音声で読み上げるアプリ。イメージで言うと↓な感じ。
動画だとこんな感じ(https://www.youtube.com/watch?v=0zFuuHjsBaE&feature=youtu.be)
ただ、学習させている内容から、”会話"にはちょっと疑問符がつくかも。応答部分を自前で作ると、より会話らしくなりそう。
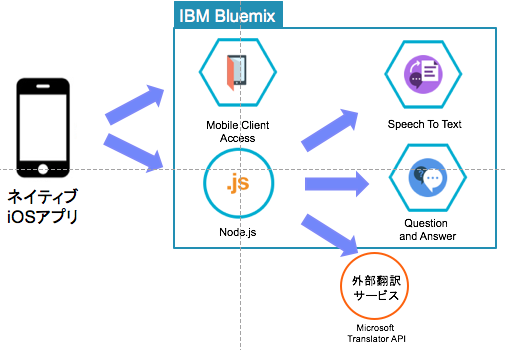
アプリのアーキテクチャーと処理順序
1.iOSアプリ上でマイクを有効にしRecording、WAVファイルで保存
2.WAVをNode.jsにPostし、Node.jsからSpeech to Textで音声認識。同時に、翻訳サービスをつかって認識した文字列を英訳。音声認識した文字列の日本語・英語をモバイルアプリへ応答。
3.iOSアプリで2で認識した日本語を表示。英訳した質問をNode.jsに対してPost
4.Node.jsからQuestion and Answerに対して質問、得た回答をモバイルアプリへ応答
5.モバイルアプリから、得た回答のうち、最もスコアの高いものを取得しPost。Node.jsが翻訳して応答
6.モバイルアプリが応答された日本語を読み上げ
アプリは、Andrewさんの許可を得て、以下にforkしてアップしています。
IBM-Watson-Speech-QA-Japanese-iOS
https://github.com/GodaiAoki/IBM-Watson-Speech-QA-Japanese-iOS
QAアプリのポイント
WAVファイルのPostとハンドリング
今回ので一番勉強になったのは、音声であるwavファイルのPost方法。multipart/form-dataでPostしてます。
モバイルアプリからWAVファイルをPostするコード(objective-c)
-(void) postToServer {

    //update ui in main thread
    dispatch_async(dispatch_get_main_queue(), ^{
        [self.recordButton setEnabled:NO];
    });

    [logger logInfoWithMessages:@"posting WAV to server..."];

    IMFResourceRequest * imfRequest = [IMFResourceRequest requestWithPath:transcribeURL method:@"POST"];
    NSData *data = [NSData dataWithContentsOfURL:audioRecorder.url];
    NSStringEncoding encoding = NSUTF8StringEncoding;

    NSString *boundary = @"------------------------------------------------------";
    NSString *contentType = [NSString stringWithFormat:@"multipart/form-data; boundary=%@",boundary];

    [imfRequest setValue:contentType forHTTPHeaderField: @"Content-Type"];

    NSMutableData *body = [NSMutableData data];

    [body appendData:[[NSString stringWithFormat:@"--%@\r\n", boundary] dataUsingEncoding:encoding]];
    [body appendData:[[NSString stringWithFormat:@"Content-Disposition: form-data; name=\"audio\"; filename=\"%@\"\r\n", @"audio.wav"] dataUsingEncoding:encoding]];
    [body appendData:[[NSString stringWithFormat:@"Content-Type: %@\r\n\r\n", @"audio/wav"] dataUsingEncoding:encoding]];
    [body appendData:data];
    [body appendData:[[NSString stringWithFormat:@"\r\n--%@--\r\n",boundary] dataUsingEncoding:encoding]];


    [imfRequest setHTTPBody:body];
    [imfRequest sendWithCompletionHandler:^(IMFResponse *response, NSError *error) {

        NSDictionary* json = response.responseJson;
        if (json == nil) {
            json = @{@"transcript":@""};
            [logger logErrorWithMessages:@"Unable to retrieve results from server.  %@", [error localizedDescription]];
        }


        //change start
        NSString *resultTranscript = [json objectForKey:@"transcript"];
        //サーバーサイドでresultStringに英訳文字を追加
        NSArray *resultarray =[resultTranscript componentsSeparatedByString:@"!%!"];
        NSString *resultString = resultarray[0];
        //change end

        BOOL animating = YES;


        if ( error != nil ) {
            resultString = [NSString stringWithFormat:@"%@ Try again later.", [error localizedDescription]];
            animating = NO;
        }
        else if (resultString == nil || [resultString length] <= 0 || [resultString isEqualToString:@""]) {

            resultString = @"Sorry, I didn't catch that.  Try again?";
            animating = NO;
        }
        else {
            //change start
            //英訳した文字列を投げる
            [self requestQA:resultarray[1]];
            //change end
        }

        [logger logInfoWithMessages:@"Transcript: %@", resultString];

        //update ui in main thread
        dispatch_async(dispatch_get_main_queue(), ^{
            if( !animating) {
                [self.activityView stopAnimating];
                [self.activityView setHidden:YES];
            }
            [self.queryLabel setText:resultString];
            [self.recordButton setEnabled:YES];
        });
    }];
}
PostされたWavをNode.js側ではfsのcreateReadStreamで読み取り
//fs = require('fs')

// Handle the form POST containing an audio file and return transcript (from mobile)
app.post('/transcribe', function(req, res){

    var file = req.files.audio;
    var readStream = fs.createReadStream(file.path);
    console.log("opened stream for " + file.path);
        var params = {
        audio:readStream,
        model:'ja-JP_BroadbandModel',
        content_type:'audio/l16; rate=16000; channels=1',
        continuous:"true"
    };

    //var params = {
      //  audio:readStream,
        //content_type:'audio/l16; rate=16000; channels=1',
        //continuous:"true"
    //};

    speechToText.recognize(params, function(err, response) {

        readStream.close();

        if (err) {
            return res.status(err.code || 500).json(err);
        } else {
            var result = {};
            if (response.results.length > 0) {
                var finalResults = response.results.filter( isFinalResult );

                if ( finalResults.length > 0 ) {
                   result = finalResults[0].alternatives[0];
                   console.log('result=' + shallowStringify(result));
                   //英訳追加
					var params = {
      					text: result.transcript
      					, from: 'ja'
      					, to: 'en'
    				};
    				msclient.translate(params, function(err, data) {
    					if(err) console.log('err!' +err);
      					console.log('translated=' + data);
						result.transcript = result.transcript +"!%!" +data;
						return res.send( result );
    				});
                }
            }
        }
    });
});
翻訳
翻訳はMicrosoft Translater APIを利用。Node.jsのmstranlator module( https://www.npmjs.com/package/mstranslator )を利用すると楽だった。
npm install mstranslator
MsTranslator = require('mstranslator');


var msclient = new MsTranslator({
      client_id: "Microsoft Tranlater APIに登録したappID"
      , client_secret: "登録時に発行されたクライアントキー"
    }, true);

app.post('/translate', function(req, res){
	console.log('translation start');
	console.log('req=' + shallowStringify(req));
	console.log('req.body.text=' + req.body.text);
	var params = {
    	text: req.body.text
      	, from: 'en'
      	, to: 'ja'
    };
    msclient.translate(params, function(err, data) {
    	if(err) {
    		console.log('err!' +err);
    		res.status(500).send('Bad Query')
    	}
      	console.log('translated=' + data);
		return res.send( data );
    });

});
音声読み上げ
こちらは決まったやり方があるので特に難しくない。
-(void) speak:(NSDictionary*)data {

    BOOL speaking = self.synthesizer.isSpeaking;
    if (speaking)
        [self.synthesizer stopSpeakingAtBoundary:AVSpeechBoundaryImmediate];

    if (!speaking || currentData != data) {

        [[AVAudioSession sharedInstance] setCategory:AVAudioSessionCategoryPlayback error:nil];

        NSString *text = [data objectForKey:@"text"];
        NSArray *sentences = [text componentsSeparatedByString:@"."];

        for (int i=0;i<[sentences count]; i++) {
            AVSpeechUtterance *utterance = [AVSpeechUtterance
                                            speechUtteranceWithString:[sentences objectAtIndex:i]];

            utterance.rate = 0.5;
            utterance.preUtteranceDelay = 0.0;
            utterance.volume = 1.0;

            [self.synthesizer speakUtterance:utterance];
        }
    }
    currentData = data;
}
終わりに
音声受け取り・認識・読み上げあたりの実装方法はわかったので、より会話らしくするために、応答を自前で作ったものを試してみたい。
BluemixのWatson APIを駆使して日本語質問応答システムを作る
http://qiita.com/VegaSato/items
Bluemix Dialog
http://dialog-demo.mybluemix.net/?cm_mc_uid=95527112266014321770359&cm_mc_sid_50200000=1450239397

