#開発環境
| HD | RaspberryPi B+ |
|---|---|
| OS | Debian GNU/Linux 7.8 (wheezy) |
| Python | ver 2.7.3 |
| ※特に問題がなければ最新のRaspberryPi2,3やOSがJessieでも動くと思いますので余り気にしなくて結構です。 |
#使用機器
| 名称 | 使用用途 |
|---|---|
| DHT11 | 温湿度計測用 |
| ジャンパー線 (メス - オス) | GPIO接続用 |
#セットアップ
※ここでは、既にRaspberryPiにOSがインストールされた前程で話を進めます。
##gitをインストールする。
後で出てくるdht11.pyをダウンロードする為にインストールしておきましょう。
sudo apt-get install git
##RPi.GPIOをインストールする。
RPi.GPIOはPythonを使ってRaspberry PiのGPIOピン制御できるモジュールです。RaspberryPiと、LEDやセンサ機器などの電子機器を操作するに必須です。これがないと、GPIOピンがあったとしても5(v)と3.3(v)の電圧を供給できる只の高級な箱になってしまいますので是非導入しましょう。
尚、Jessiのリリースからデフォルトでインストールされているようです。ということでPythonのプログラムの最初でこのパッケージをインポートすればすぐに使えるみたいです。
公式サイト
第26回 Raspberry PiのGPIOを制御する (Python編)
が、ここではせっかくなので、まだJessiに移って居ない方(僕みたいな)向けにインストール方法を記載します。
pipの場合
sudo pip install rpi.gpio

apt-getの場合
sudo apt-get install python-rpi.gpio
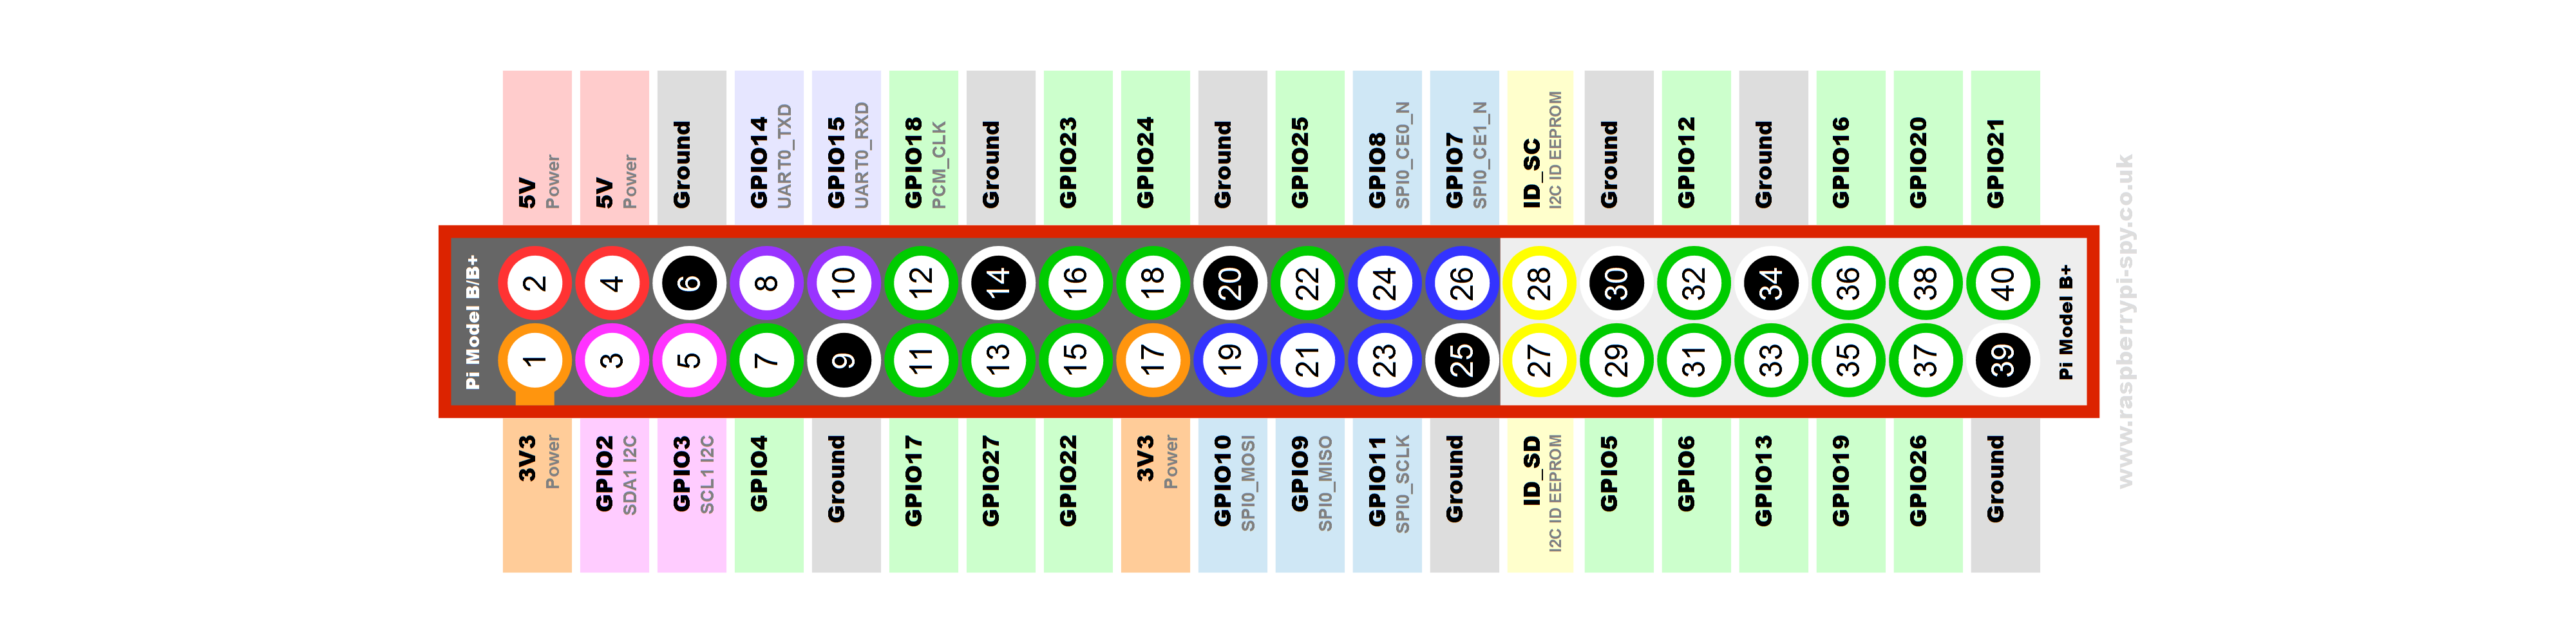
ここで導入出来れば、練習としてRaspberryPiのGPIOピンの対応表をみながら、是非Lチカを行ってください。Lチカはいわゆる'Hello wold'的な動作なので、これが初めの一歩となります。
Raspberry PiでPythonのRPi.GPIOを使ってLチカする
##twythonをインストールする。
sudo apt-get install python-setuptools
sudo easy_install pip
sudo pip install twython
twythonとはPythonで記述されたTwitterのライブラリプログラムです。具体的になにが出来るかと言うと、公式がこんな事を言っています。
Twython is the premier Python library providing an easy (and up-to-date) way to access Twitter data. Actively maintained and featuring support for Python 2.6+ and Python 3. It's been battle tested by companies, educational institutions and individuals alike. Try it today!
Twythonは、Twitterのデータにアクセスするための簡単な(かつ最新の)方法を提供する最高のPythonライブラリです!。特にPythonの2.6+とPython3をメインにサポートしています。またTwythonは企業や教育機関、個人によって積極的にテストされています。是非お試しください!
TwitterBotを作るときは大抵このTwythonが裏側で難しい処理をしてくれているので、我々はTwitter APIKeyさえあれば、TwiiterBotをPythonで簡単に書けてしまいます。便利です。
その裏側と詳細な使用用途を知りたければ、是非公式のソースコードを読む事をおすすめします。
公式:https://github.com/ryanmcgrath/twython
Raspberry PiのCPU温度をつぶやくTwitterBot
twythonの導入とテスト
以上で大まかなセットアップが終わりました。次にハードウェアの回路接続に入ります。
#RaspberryPiとDHT11を接続する。
接続図はこんな感じになります。
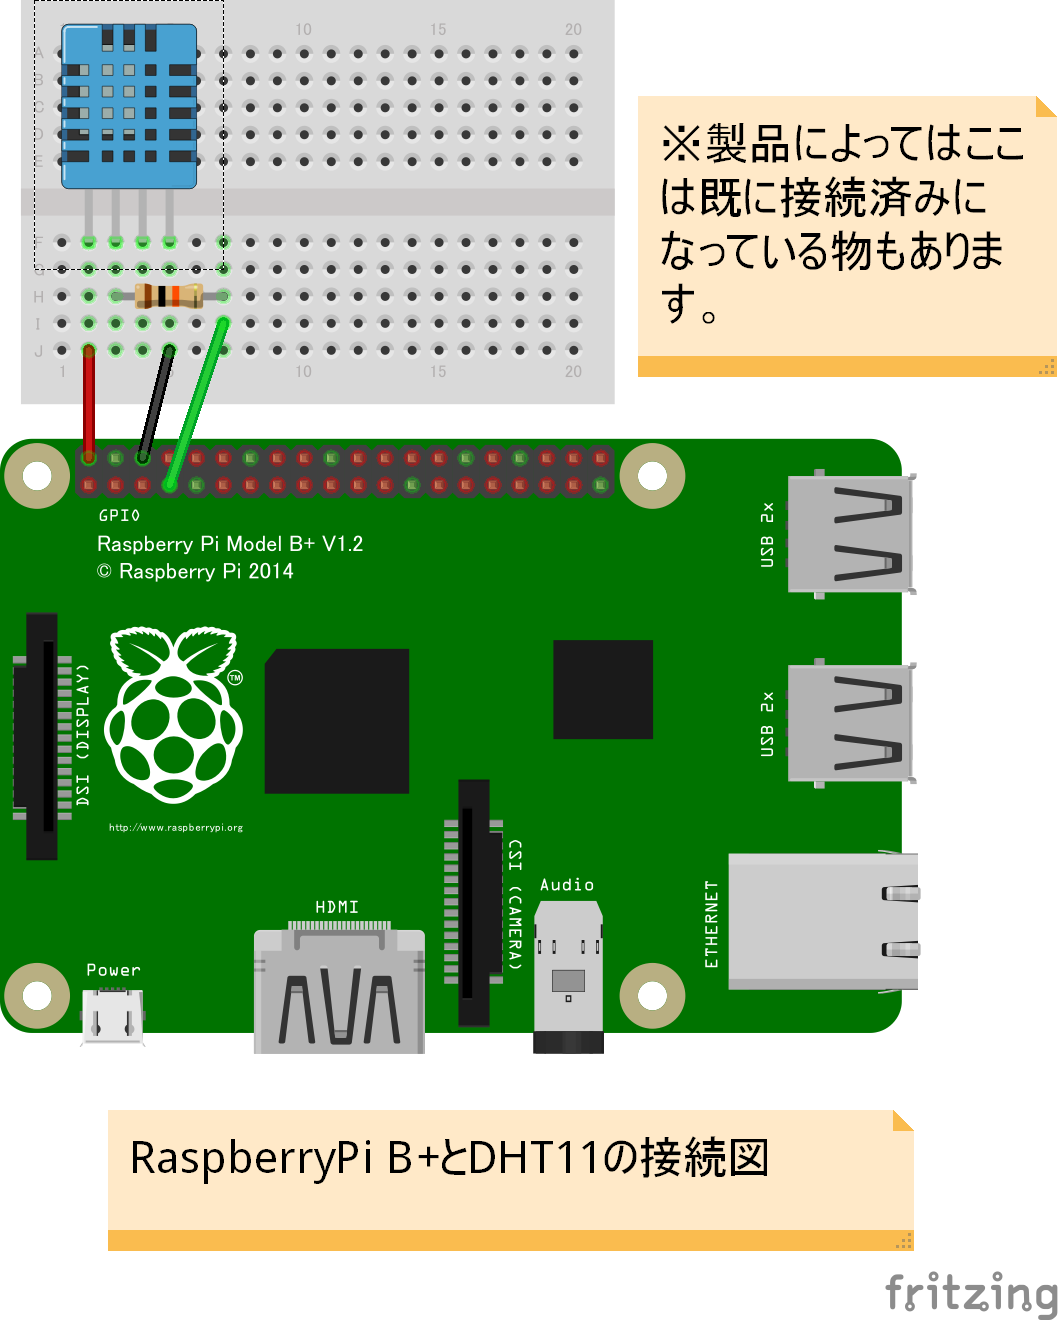
DHT11とGPIOピンの対応表は以下になります。
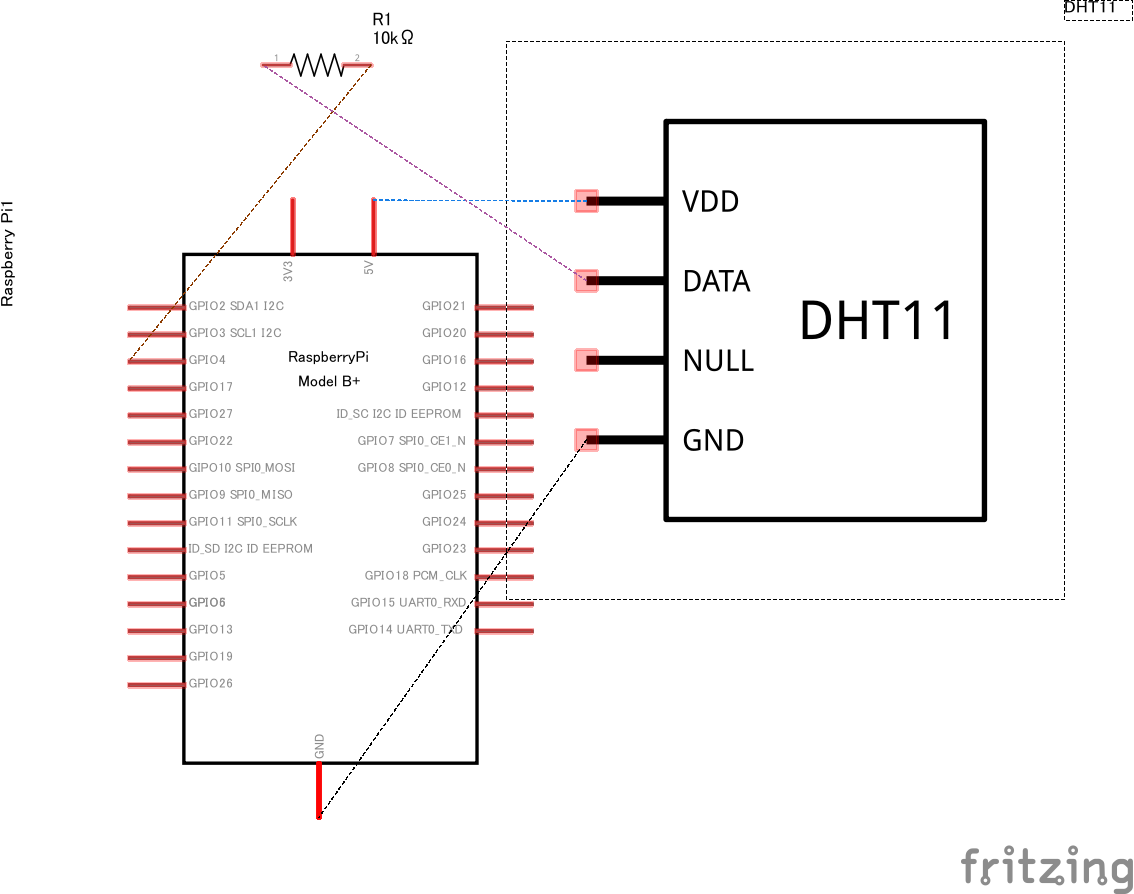
| RaspberryPi B+ | DHT11 |
|---|---|
| VDD | 5.0(v) |
| DATA | GPIO4 |
| GND | GND(PIN:6) |
※DATAはGPIO14,GPIO17でもいいです。ここでは練習としてGPIO4を選択しました。
製品によっては抵抗が既に接続済みになっている製品もありますが(コレとか)基本はこんな感じになります。GPIOピンとの対応表は各RasperryPiによって異なる為、GPIOピンの対応表を見ながら接続してください。
これでハードウェア側の接続を完了しました。
次に接続したDHT11から室温と気温を実際に測定して動作確認をしましょう。
#PythonでDHT11を制御する。
PythonでDHT11を制御するコードが既に作られているので製作者に感謝しながらgit cloneを実効しましょう。
cd
git clone https://github.com/szazo/DHT11_Python.git
git cloneした先のディレクトリに移動し、ファイルを確認しましょう。
その中のdht11.pyとdht11_examle.pyの2つのファイルに注目して下さい。
import time
import RPi


class DHT11Result:
    'DHT11 sensor result returned by DHT11.read() method'

    ERR_NO_ERROR = 0
    ERR_MISSING_DATA = 1
    ERR_CRC = 2

    error_code = ERR_NO_ERROR
    temperature = -1
    humidity = -1

    def __init__(self, error_code, temperature, humidity):
        self.error_code = error_code
        self.temperature = temperature
        self.humidity = humidity

    def is_valid(self):
        return self.error_code == DHT11Result.ERR_NO_ERROR


class DHT11:
    'DHT11 sensor reader class for Raspberry'

    __pin = 0

    def __init__(self, pin):
        self.__pin = pin

    def read(self):
        RPi.GPIO.setup(self.__pin, RPi.GPIO.OUT)

        # send initial high
        self.__send_and_sleep(RPi.GPIO.HIGH, 0.05)

        # pull down to low
        self.__send_and_sleep(RPi.GPIO.LOW, 0.02)

        # change to input using pull up
        RPi.GPIO.setup(self.__pin, RPi.GPIO.IN, RPi.GPIO.PUD_UP)

        # collect data into an array
        data = self.__collect_input()

        # parse lengths of all data pull up periods
        pull_up_lengths = self.__parse_data_pull_up_lengths(data)

        # if bit count mismatch, return error (4 byte data + 1 byte checksum)
        if len(pull_up_lengths) != 40:
            return DHT11Result(DHT11Result.ERR_MISSING_DATA, 0, 0)

        # calculate bits from lengths of the pull up periods
        bits = self.__calculate_bits(pull_up_lengths)

        # we have the bits, calculate bytes
        the_bytes = self.__bits_to_bytes(bits)

        # calculate checksum and check
        checksum = self.__calculate_checksum(the_bytes)
        if the_bytes[4] != checksum:
            return DHT11Result(DHT11Result.ERR_CRC, 0, 0)

        # ok, we have valid data, return it
        return DHT11Result(DHT11Result.ERR_NO_ERROR, the_bytes[2], the_bytes[0])

    def __send_and_sleep(self, output, sleep):
        RPi.GPIO.output(self.__pin, output)
        time.sleep(sleep)

    def __collect_input(self):
        # collect the data while unchanged found
        unchanged_count = 0

        # this is used to determine where is the end of the data
        max_unchanged_count = 100

        last = -1
        data = []
        while True:
            current = RPi.GPIO.input(self.__pin)
            data.append(current)
            if last != current:
                unchanged_count = 0
                last = current
            else:
                unchanged_count += 1
                if unchanged_count > max_unchanged_count:
                    break

        return data

    def __parse_data_pull_up_lengths(self, data):
        STATE_INIT_PULL_DOWN = 1
        STATE_INIT_PULL_UP = 2
        STATE_DATA_FIRST_PULL_DOWN = 3
        STATE_DATA_PULL_UP = 4
        STATE_DATA_PULL_DOWN = 5

        state = STATE_INIT_PULL_DOWN

        lengths = [] # will contain the lengths of data pull up periods
        current_length = 0 # will contain the length of the previous period

        for i in range(len(data)):

            current = data[i]
            current_length += 1

            if state == STATE_INIT_PULL_DOWN:
                if current == RPi.GPIO.LOW:
                    # ok, we got the initial pull down
                    state = STATE_INIT_PULL_UP
                    continue
                else:
                    continue
            if state == STATE_INIT_PULL_UP:
                if current == RPi.GPIO.HIGH:
                    # ok, we got the initial pull up
                    state = STATE_DATA_FIRST_PULL_DOWN
                    continue
                else:
                    continue
            if state == STATE_DATA_FIRST_PULL_DOWN:
                if current == RPi.GPIO.LOW:
                    # we have the initial pull down, the next will be the data pull up
                    state = STATE_DATA_PULL_UP
                    continue
                else:
                    continue
            if state == STATE_DATA_PULL_UP:
                if current == RPi.GPIO.HIGH:
                    # data pulled up, the length of this pull up will determine whether it is 0 or 1
                    current_length = 0
                    state = STATE_DATA_PULL_DOWN
                    continue
                else:
                    continue
            if state == STATE_DATA_PULL_DOWN:
                if current == RPi.GPIO.LOW:
                    # pulled down, we store the length of the previous pull up period
                    lengths.append(current_length)
                    state = STATE_DATA_PULL_UP
                    continue
                else:
                    continue

        return lengths

    def __calculate_bits(self, pull_up_lengths):
        # find shortest and longest period
        shortest_pull_up = 1000
        longest_pull_up = 0

        for i in range(0, len(pull_up_lengths)):
            length = pull_up_lengths[i]
            if length < shortest_pull_up:
                shortest_pull_up = length
            if length > longest_pull_up:
                longest_pull_up = length

        # use the halfway to determine whether the period it is long or short
        halfway = shortest_pull_up + (longest_pull_up - shortest_pull_up) / 2
        bits = []

        for i in range(0, len(pull_up_lengths)):
            bit = False
            if pull_up_lengths[i] > halfway:
                bit = True
            bits.append(bit)

        return bits

    def __bits_to_bytes(self, bits):
        the_bytes = []
        byte = 0

        for i in range(0, len(bits)):
            byte = byte << 1
            if (bits[i]):
                byte = byte | 1
            else:
                byte = byte | 0
            if ((i + 1) % 8 == 0):
                the_bytes.append(byte)
                byte = 0

        return the_bytes

    def __calculate_checksum(self, the_bytes):
        return the_bytes[0] + the_bytes[1] + the_bytes[2] + the_bytes[3] & 255
このソースコードが主にDHT11から得られデジタル信号をPythonで処理してくれるクラスファイルになります。従ってdht11.pyのクラスのインスタンス生成時に作られるオブジェクトを使う事で簡単に湿度と温度の計測値を得られる事が理解できると思います
それでは実際にインスタンスを使った例をみてみましょう。
import RPi.GPIO as GPIO
import dht11
import time
import datetime

# initialize GPIO
GPIO.setwarnings(False)
GPIO.setmode(GPIO.BCM)
GPIO.cleanup()

# read data using pin 14
instance = dht11.DHT11(pin=14)

while True:
    result = instance.read()
    if result.is_valid():
        print("Last valid input: " + str(datetime.datetime.now()))
        print("Temperature: %d C" % result.temperature)
        print("Humidity: %d %%" % result.humidity)

    time.sleep(1)
ここで注意して欲しいのはinstance = dht11.DHT11(pin=14)がデフォルトとなっています。既にGPIO14で接続されているなら、ここでは何もしなくて結構ですが先程の回路設計の際にGPIO4を選択した場合はこの様に修正して下さい。
import RPi.GPIO as GPIO
import dht11
import time
import datetime

# initialize GPIO
GPIO.setwarnings(False)
GPIO.setmode(GPIO.BCM)
GPIO.cleanup()

# read data using pin 14
-instance = dht11.DHT11(pin=14)
+instance = dht11.DHT11(pin=4)

while True:
    result = instance.read()
    if result.is_valid():
        print("Last valid input: " + str(datetime.datetime.now()))
        print("Temperature: %d C" % result.temperature)
        print("Humidity: %d %%" % result.humidity)

    time.sleep(1)
以上でDHT11から温湿度を計測するコードが完成しました。
動作確認として実行してみましょう。
sudo python dht11_example.py
※かならずroot権限かsudoをつけて実行してください!。そうしないとErrorが起きます。
上手くいけばコマンドラインに温度と湿度が表示されていると思います。
以上が確認できればDHT11の動作確認は完了です。お疲れ様です。
#TweetBotを作る為にTwitterAPIに登録する。
TweetBotを作る為のTwitterAPIに登録しましょう。
ここから専用ページに飛び、Create New Appを押して登録して下さい。
https://apps.twitter.com/
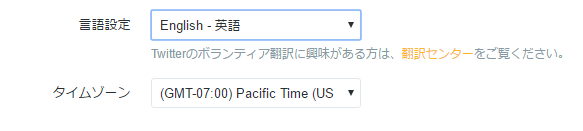
##[注意その1]TwitterAPIの登録には電話番号が必要かつ、言語を[English]にする。
TwitterAPIの登録には電話番号が必要です。じゃないとこんな感じに怒られます。

そこで電話番号を登録してメッセージから受け取った番号を入力し電話認証を行います....が、これでもまだ上手くいきません。
バグなのか使用なのか、Twitter社のエンジニアが仕事していないのか、詳細は不明ですが、Twitterの言語設定を[日本語]から[English]にします。
Twitter API、Apps を利用するのに携帯電話のでの認証が必須になったので、認証を行う方法。
この状態でもう一ど電話認証を行うと無事TwitterAPIの登録ページにいけるので、APIの登録を行います。
##[注意その2]短時間に同じ投稿は続けて出来ない。
スパム防止の為か、TwitterAPIを使って同じ投稿を連続してTweetする事はできないので、タイムスタンプを使い短期に同じようなtweetを投稿できるようにしましょう。今回の様に気温,室温を投稿する際は同じつぶやきになってしまう事があるので、意図的にタイムスタンプをはさんであげる事をお薦めします。
##RaspberryPiからTweetする。
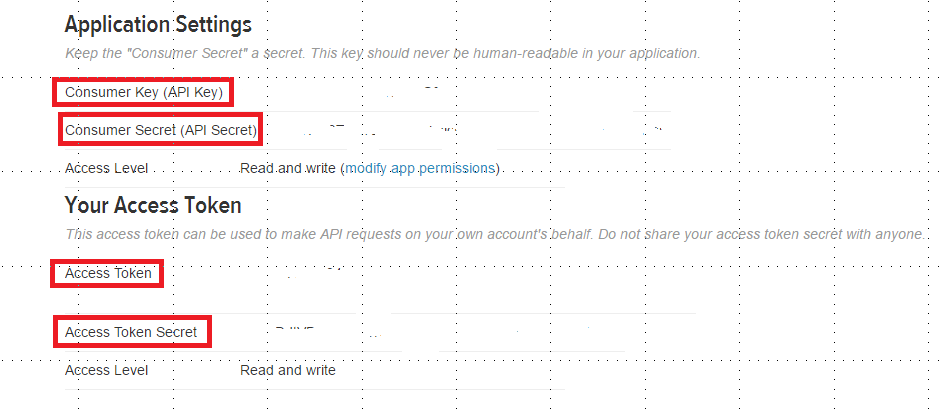
APIに登録したら以下の4つのAPIkeyが必要となります。
- CONSUMER_KEY
- CONSUMER_SECRET
- ACCESS_KEY
- ACCESS_SECRET
これらはTwitterAPIページの以下の4つの項目に続く番号にそれぞれ対応しています。
以上の4つのkeyを確認できたらさっそくTwitterBotを作って動作確認を行いましょう。
#!/usr/bin/env python
#coding:utf-8

import os
from twython import Twython

#Twiiter API
CONSUMER_KEY ='API_key1'
CONSUMER_SECRET ='API_key2'
ACCESS_KEY ='API_key3'
ACCESS_SECRET ='API_key4'
api = Twython(CONSUMER_KEY,CONSUMER_SECRET,ACCESS_KEY,ACCESS_SECRET)

#time stamp
timestamp = 'date +%F_%H:%M:%S'
current_time=os.popen(timestamp).readline().strip()


api.update_status(status='【テスト】現在時刻は'+current_time+'です!')
もしエラーが起きてもタイムスタンプをはさんであるので、連続して投稿が可能ですので、すぐにデバッグが出来ます。投稿がうまくいけば、自分のTLに現在時刻が投稿されるはずです。
以上でTwitterAPIでの動作確認が終わりにします。
#crontabで定期的にdht11_tweet.pyを実行する。
ここまでくれば、後は最初に作ったdht11_example.pyと今さっき作ったtweet.pyを合わせる事で、温度と湿度がTwitterで投稿できる事がなんとなくイメージ出来る思います。
それでは最後に2つのソースコードを使って目的のdht11_tweet.pyを仕上げていきましょう。
# -*- coding: utf-8 -*

import RPi.GPIO as GPIO
import dht11
import time
import datetime
import os
from twython import Twython

# initialize GPIO
GPIO.setwarnings(False)
GPIO.setmode(GPIO.BCM)
GPIO.cleanup()

instance = dht11.DHT11(pin=4)

#Twiiter API
CONSUMER_KEY ='API_key1'
CONSUMER_SECRET ='API_key2'
ACCESS_KEY ='API_key3'
ACCESS_SECRET ='API_key4'
api = Twython(CONSUMER_KEY,CONSUMER_SECRET,ACCESS_KEY,ACCESS_SECRET)

#time stamp
timestamp = 'date +%F_%H:%M:%S'
current_time=os.popen(timestamp).readline().strip()

while True:
    result = instance.read()
    if result.is_valid():
        api.update_status(status = '【温湿情報】'+'現在時刻'+current_time
            +'温度:'+str(result.temperature)+'℃です。'+'湿度:'+str(result.humidity)
            +'%です。')

        break

    time.sleep(1)
何度かdht11_example.pyを実行してればわかると思いますが、DHT11(温湿度センサ)はそこま精度はよくないです。従って実行したら必ず計測値が返ってくるわけではなくデータが読み取れない場合がよく起きます。そうなった場合、instance自体が生成されない為、api.update_statusに組み込まれているresult.temperatureとresult.humidityが呼び出されない為にErrorが生じて投稿が失敗します。その為
while True:
    result = instance.read()
while文でinstanceが生成される=__[ちゃん温度と室温が計測できている状態]__まで繰り返します。加えて投稿はinstance生成が成功した際の最初の1回目でいいので api.update_statusの終わりにbreakを挟みます。
こうすることで確実に気温と湿度を計測しつつ、一回だけTweetする処理が可能となります。
以上でおおまかな気温と湿度を呟くTweetBotが出来ました。
ですがこれでは依然として手動式なので、最後にBotらしくする為crontabに登録して定期的に呟くようにします。
crontabの説明はここでは省略しますが、要はタスクスケジューラのようなものと考えて下さい。
指定した時間ごとにコマンドやスクリプトを実行してくれるプログラムです。
crrontab -eを打ち込んでcrontabを開きます。因みに上書き保存はCtr + oでexitはCtr+xです。この2つのコマンドは、よく使うので覚えておいて下さい。
例えば15分ごとにTweetBotから投稿したい場合は以下の様に書きます。
*/15 * * * * sudo python /home/pi/(....)/dht11_tweet.py
これで正しく動作しない場合は以下のサイトを見ながらデバッグを行って下さい。
crontabがどうしても動かないときに確認すべき3つの点+α
これで15分ごとに気温と湿度を呟くTweetBotが完成しました。
お疲れ様です。
なお、このコードは全てPythonで書かれているので、例えばグラフを表示させたり、指定した気温になったらブザーを鳴らしてみるといった事も可能となってくると思うので是非興味がある方は挑戦してみてください。