若干今更な感じですが、LINE BOT API Trialを使ってみました。作ったのは、以下のようなものです
- 話しかけると、話しかけたワードでgoogle検索した結果の上位数件を返してくれる
- 使ったのは、Ruby、 sinatra、 heroku、 nokogiri
- 開発環境: CentOS6.7、 Ruby 2.3
LINE developers、 Heroku、 Fixie addonの登録
当然ですが、LINE developers及びHerokuへの登録が必要です。それに加えて固定IPが必要なため、Fixie addonを導入しました。Fixie addonは500requestまでは無料で使えますが、それ以上は課金が必要です。このあたりの作業については、先人の方々がすでにまとめて下さっているので、今回は割愛します(参考1)。
アプリケーションの作成
ファイル構成
ファイル構成は以下のような感じです。
- working_folder
- Gemfile
- config.ru
- main.rb
初期設定
gitの初期化を行い、herokuのアプリケーションを新規作成します。また、Fixie addonをアプリケーションに追加します。
working_folderで、以下を実行します。
git init

heroku create your_app_name

heroku addons:create fixie:tricycle
各種設定
LINE側の情報を環境変数に追加
LINE developersで作成したアカウントのBasic informationから、Channel ID、 Channel Secret、 MIDの3つをherokuの環境変数へ追加します(herokuコマンドの実行にはheroku toolbeltが必要です)。
heroku config:add LINE_CHANNEL_ID="your_channel_id"
heroku config:add LINE_CHANNEL_SECRET="your_channel_secret"
heroku config:add LINE_CHANNEL_MID="your_channel_mid"
Callback URLの設定
Basic information下部にある、Callback URLに先ほど作成したherokuアプリケーションのcallback URLを指定します。
https://your_app_name.herokuapp.com:443/linebot/callback
Proxy URLの環境変数登録とIP Whitelistの登録
FixieのAccountに記載してあるProxy URLをherokuの環境変数に追加します。
heroku config:add FIXIE_URL="your_proxy_url"
また、 Outbound IPsを、 LINE developersのServer IP Whitelistに登録します。
実装
Gemfileの編集
Gemfileを以下のように編集し、'bundle install'を実行します。nokogiriでこける場合は頑張って下さい。
source "https://rubygems.org"

gem 'sinatra'
gem 'json'
gem 'rest-client'
gem 'nokogiri'
gem 'sinatra-contrib'
config.ruの編集
config.ruは、以下のように編集します。こちらに処理を書いてもいいのですが、今回はmain.rbのほうに処理を書いていきます。
require './main.rb'

run Main
main.rbの編集
ここからが本番です。main.rbを以下のように編集します。コードに関してはあまり推敲していないので雑です。
require 'bundler/setup'
require 'sinatra/base'
require 'json'
require 'rest-client'
require "open-uri"
require "cgi"
require 'nokogiri'

class Main < Sinatra::Base

  post '/linebot/callback' do
    params = JSON.parse(request.body.read)['result'].first

    post_text(params, search_google_with(params, 3, ''))

    post_text(params, get_end_text)

  end

  private

  def post_text(params, *post_messages)
    line_pipe = {
      'Content-Type': 'application/json; charset=UTF-8',
      'X-Line-ChannelID': ENV['LINE_CHANNEL_ID'],
      'X-Line-ChannelSecret': ENV['LINE_CHANNEL_SECRET'],
      'X-Line-Trusted-User-With-ACL': ENV['LINE_CHANNEL_MID']
    }

    RestClient.proxy = ENV['FIXIE_URL']
    endpoint_uri = 'https://trialbot-api.line.me/v1/events'

    post_messages.flatten.each do |post_message|
      request_content = {
        to: [params['content']['from']],
        toChannel: 1383378250,
        eventType: '138311608800106203',
        content: {contentType:1, toType:1, text: post_message }
      }
      content_json = request_content.to_json

      RestClient.post(endpoint_uri, content_json, line_pipe)
    end
  end

  def search_google_with(params, count, keyword)
    user_agent = 'Mozilla/5.0 (Windows NT 6.1) AppleWebKit/537.36 (KHTML, like Gecko) Chrome/28.0.1500.63 Safari/537.36'
    escaped_keyword = CGI.escape(params['content']['text'])
    url = 'https://www.google.co.jp/search?q=' + "#{escaped_keyword}+#{keyword}"
    charset = nil
    html = open(url, "User-Agent" => user_agent) do |f|
      charset = f.charset
      f.read
    end
    doc = Nokogiri::HTML.parse(html, nil, charset)
    links = doc.xpath('//div[@class="srg"]/div/div/h3/a')
    post_messages = []
    links.each_with_index do |row, id|
      post_messages << row.text + "\n" + row[:href]
      break if id >= count - 1
    end
    post_messages
  end

  def get_end_text
    s = %w(こんなところです どうでしょう いかがですか)
    s.sample
  end
end
search_google_withメソッドは、受け取ったメッセージと第三引数(keyword)でAND検索をgoogleで行い、検索結果の上位count(第二引数)件を文字列の配列として返します。
post_textメソッドは、第二引数に指定した文字列をLINEで投稿します。引数が配列だった場合は、全て分割して投稿します。
上記のサンプルでは、検索結果の上位三件を投稿しています。
herokuへのpush
git commitしてherokuへpushします
git add .
git commit -m "first commit"
git push heroku master
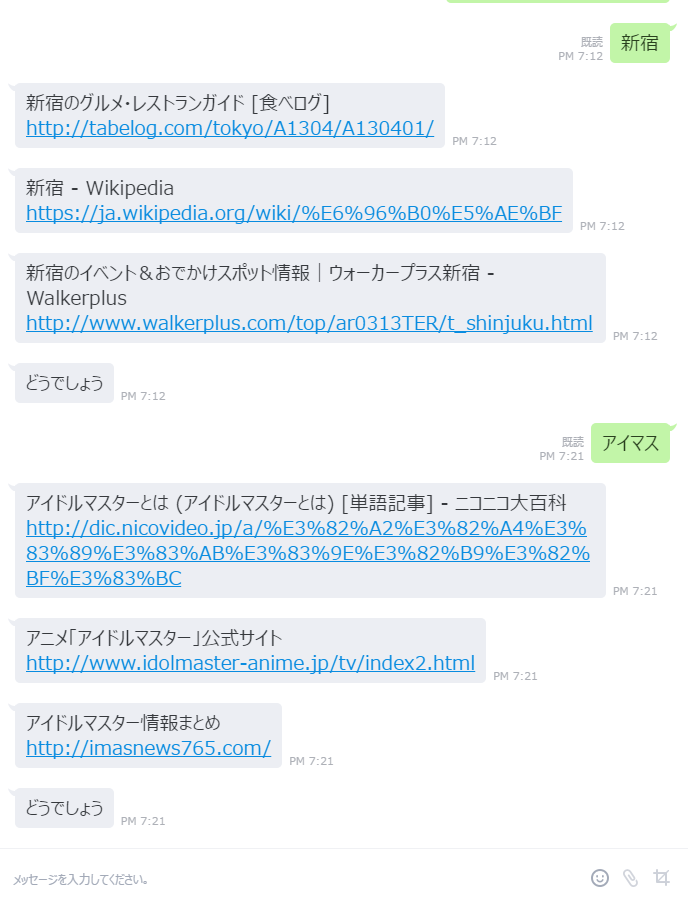
結果
LINE developersに掲載してあるQRコードを登録して、実際に使ってみます。
色々使えそうなので、正式公開が待ち遠しいです!。