webpackで素のWebComponentsを作る
polymerを用いない素のwebcomponentsを試してみたくなったのでwebpackで開発環境を作ってみた。
ディレクトリ構造
test-elm
|-- lib
|-- src
|  |-- test-elm.html
|  `-- test-elm.js
|-- package.json
`-- webpack.config.js
package.json
{
  "name": "test-elm",
  "version": "1.0.0",
  "description": "",
  "main": "lib/test-elm.html",
  "scripts": {
    "setup": "npm install -g webpack babel",
    "link": "npm link webpack babel",
    "watch": "webpack-dev-server -d --display-modules --progress --watch",
    "build": "webpack -p --display-modules --progress"
  },
  "license": "MIT",
  "dependencies": {
    "webcomponents.js": "^0.7.22"
  },
  "devDependencies": {
    "babel-core": "^6.9.1",
    "babel-loader": "^6.2.4",
    "babel-plugin-add-module-exports": "^0.2.1",
    "babel-preset-es2015": "^6.9.0",
    "babel-preset-stage-0": "^6.5.0",
    "html-webpack-plugin": "^2.19.0"
  }
}
実行方法
npm run setup
npm run link
npm update
npm run watch
open localhost:8080
webpack.config.js
var path = require('path');
var HtmlWebpackPlugin = require('html-webpack-plugin');

module.exports = {
  entry: './src/test-elm.js',
  output: {
    filename: './lib/test-elm.js'
  },
  resolve: {
    root: [path.join(__dirname,'node_modules')],
    extensions: [
      '',
      '.js',
      '.html'
    ]
  },
  externals: {
  },
  module: {
    loaders: [
      { test: /\.js$/, loader: 'babel', exclude: /(node_modules|bower_components)/, query: { presets: ['es2015'] } }
    ]
  },
  plugins: [
    new HtmlWebpackPlugin({
      template: './src/test-elm.html',
      filename: "./lib/test-elm.html",
      inject: false
    })
  ]
}
srcからlibへhtmlファイルを移動するのに HTML Webpack Plugin を使った。
src/test-elm.html
<!DOCTYPE html>
<template id="test-elm">
  <style>
  </style>
  <div>
    <content></content>
  </div>
</template>
<script src="test-elm.js"></script>
<content></content>が<p>content</p>に置き換えられる。
src/test-elm.js
let PrototypeElement = Object.create(HTMLElement.prototype);
let ownerDocument = window.document.currentScript.ownerDocument;

PrototypeElement.createdCallback = function createdCallback() {
  console.log("createdCallback");
  console.dir(this);
  let shadowRoot = this.createShadowRoot();
  let template = ownerDocument.querySelector('#test-elm');
  let clone = document.importNode(template.content, true);
  shadowRoot.appendChild(clone);
};

PrototypeElement.attachedCallback = function attachedCallback(){
  console.log("attachedCallback");
};

PrototypeElement.detachedCallback = function detachedCallback(){
  console.log("detachedCallback");
};

PrototypeElement.attributeChangedCallback = function attributeChangedCallback(attr){
  console.log("attributeChangedCallback", attr);
};

//要素にメソッドも定義できる
PrototypeElement.foo = function foo() {
  console.log('foo() called');
};

document.registerElement('test-elm', {
  prototype: PrototypeElement
});
index.html
<!DOCTYPE html>
<html>
<head>
  <meta charset="utf-8">
  <title>webcomponents test</title>
  <script src="/node_modules/webcomponents.js/webcomponents.js"></script>
  <link rel="import" href="/lib/test-elm.html" />
</head>
<body>
  <test-elm id="hoge">
    <p>content</p>
  </test-elm>
</body>
</html>
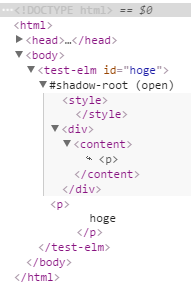
結果
Shadow DOMが構成されている。
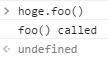
コンソールで hoge.foo() と実行できる。
感想
lib/test-elm.htmlのscript要素の中にバベったjsを直接書き込みたかったがスマートな方法が見つけられなかった。