ソースコードは下のここにあります
RebarでErlang/OPTアプリケーションのリリースを作成したい場合は前の投稿を参照してください.この文書はerlang.mkでErlang/OPTアプリケーションのリリースを作成します.例としてはCowboyでPostリクエストを処理するプログラムを書きます.イメージとしては文書の最後の部分を参照してください.ソースコードはcowboyのexampleをベースにしたものです.
erlang.mkをダウンロード
まずディレクトリcowboy_postを作成して,erlang.mkファイルをダウンドードします.
$ mkdir cowboy_post
$ cd cowboy_post
$ curl -O https://raw.githubusercontent.com/ninenines/erlang.mk/master/erlang.mk
プロジェクトを作成
必要なファイルを作成するためにBootstrapします.Makefileも下のコマンドで作成されます.
$ make -f erlang.mk bootstrap bootstrap-rel
$ tree -L 2
.
├── Makefile
├── erlang.mk
├── rel
│   ├── sys.config
│   └── vm.args
├── relx.config
└── src
    ├── cowboy_post.app.src
    ├── cowboy_post_app.erl
    └── cowboy_post_sup.erl

2 directories, 8 files
Makefileなど各ファイルを追加
cowobyが必要のため,Makefileに依存パッケージ(DEPS)に cowboyを追加します.
注意:Makefileにcowboyのリンクを付け加えないと古いcowboyをとってきますので,古い書き方(init/3)だと下のtoppage_handlerのinit/2が通らないです.
$ cat Makefile
PROJECT = cowboy_post
DEPS = cowboy
dep_cowboy = git https://github.com/ninenines/cowboy master
include erlang.mk
src/cowboy_post.app.srcファイルにもcowboyを追加します.
$ cat src/cowboy_post.app.src
{application, cowboy_post, [
	{description, ""},
	{vsn, "0.1.0"},
	{id, "git"},
	{modules, []},
	{registered, []},
	{applications, [
		kernel,
		stdlib,
        cowboy
	]},
	{mod, {cowboy_post_app, []}},
	{env, []}
]}.
そして,一旦makeします
$ make
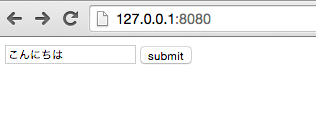
次はpriv/static/index.htmlファイルを用意します.
$ mkdir -p priv/static
$ cd priv/static
$ touch index.html
index.htmlファイルの中身は下のコードで,submitを押すと/processページで処理します
<html>
<head>
<meta http-equiv="Content-Type" content="text/html; charset=UTF-8">
</head>
<body>
    <form method="post" action="/process">
        <input type="text"  name="echo">
        <input type="submit" value="submit">
    </form>
</body>
</html>
src/cowboy_post_app.erlを下のように追加します.priv_fileに関する説明はこちらにあります
$ cat cowboy_post_app.erl
-module(cowboy_post_app).
-behaviour(application).

-export([start/2]).
-export([stop/1]).

start(_Type, _Args) ->
    Dispatch =  cowboy_router:compile([
        {'_', [
                {"/", cowboy_static, {priv_file, cowboy_post, "static/index.html" }},
                {"/process", toppage_handler, []}
              ]
        }
    ]),
    {ok, _} = cowboy:start_http(http, 100, [{port, 8080}], [
        {env, [{dispatch, Dispatch}]}
    ]),
	cowboy_post_sup:start_link().

stop(_State) ->
	ok.
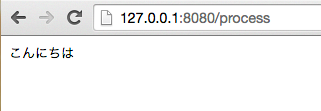
上のstart関数のtoppage_handlerはハンドラのことで,ウェブページでsubmitすると,/processというルールを処理するのはtoppage_handler.なので,toppage_handler.erlファイルを追加します.
$ touch src/toppage_handler.erl
toppage_handler.erlファイルの中身
$ cat
%% Feel free to use, reuse and abuse the code in this file.

%% @doc POST toppage_handler.
-module(toppage_handler).

-export([init/2]).

init(Req, Opts) ->
	Method = cowboy_req:method(Req),
	HasBody = cowboy_req:has_body(Req),
	Req2 = maybe_echo(Method, HasBody, Req),
	{ok, Req2, Opts}.

maybe_echo(<<"POST">>, true, Req) ->
	{ok, PostVals, Req2} = cowboy_req:body_qs(Req),
	Echo = proplists:get_value(<<"echo">>, PostVals),
	echo(Echo, Req2);
maybe_echo(<<"POST">>, false, Req) ->
	cowboy_req:reply(400, [], <<"Missing body.">>, Req);
maybe_echo(_, _, Req) ->
	%% Method not allowed.
	cowboy_req:reply(405, Req).

echo(undefined, Req) ->
	cowboy_req:reply(400, [], <<"Missing echo parameter.">>, Req);
echo(Echo, Req) ->
	cowboy_req:reply(200, [
		{<<"content-type">>, <<"text/plain; charset=utf-8">>}
	], Echo, Req).
上のコードに注目すべき一つのところは
Echo = proplists:get_value(<<"echo">>, PostVals),
ここの<<"echo">>はどこから来ているかというとindex.htmlファイルのname="echo" のinputタグから来ています.つまりproplists:get_value/2を使って,name属性echoのinputタグに入力した内容を取り出す.なぜ<<"echo">>なんでしょう? Cowboyはbinary stringを使用しているからです.githubのページにも書いてあるように
Cowboy aims to provide a complete HTTP stack in a small code base. It is optimized for low latency and low memory usage, in part because it uses binary strings.
src/cowboy_post_sup.erlファイルは特に修正は必要がないです.
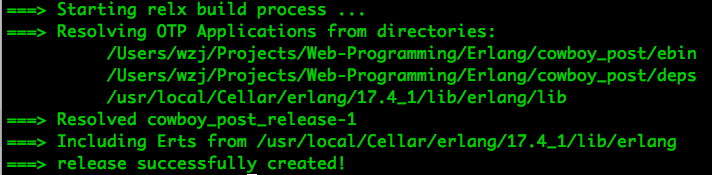
再度makeしてから,アプリケーションを立ち上げます.
$ _rel/cowboy_post_release/bin/cowboy_post_release console
コマンドの中のconsoleの代わりにstart/stopも使えます.
$ make
$ _rel/cowboy_post_release/bin/cowboy_post_release console
Eshell V6.3  (abort with ^G)
(cowboy_post@127.0.0.1)1>
これで127.0.0.1:8080をアクセスできるようになっています.
ここまでくるとcowboy_postディレクトリ下の構造は下のようになっています.
$ tree -L 2
.
├── Makefile
├── _rel
│   └── cowboy_post_release
├── deps
│   ├── cowboy
│   ├── cowlib
│   └── ranch
├── ebin
│   ├── cowboy_post.app
│   ├── cowboy_post_app.beam
│   ├── cowboy_post_sup.beam
│   └── toppage_handler.beam
├── erlang.mk
├── priv
│   └── static
├── rel
│   ├── sys.config
│   └── vm.args
├── relx
├── relx.config
└── src
    ├── cowboy_post.app.src
    ├── cowboy_post_app.erl
    ├── cowboy_post_sup.erl
    └── toppage_handler.erl
AngularJSを使う
AngularJSを使うためにまずangular.jsをダウンロード
$ mkdir -p priv/static/js
$ cd priv/static/js
$ wget https://ajax.googleapis.com/ajax/libs/angularjs/1.4.2/angular.js
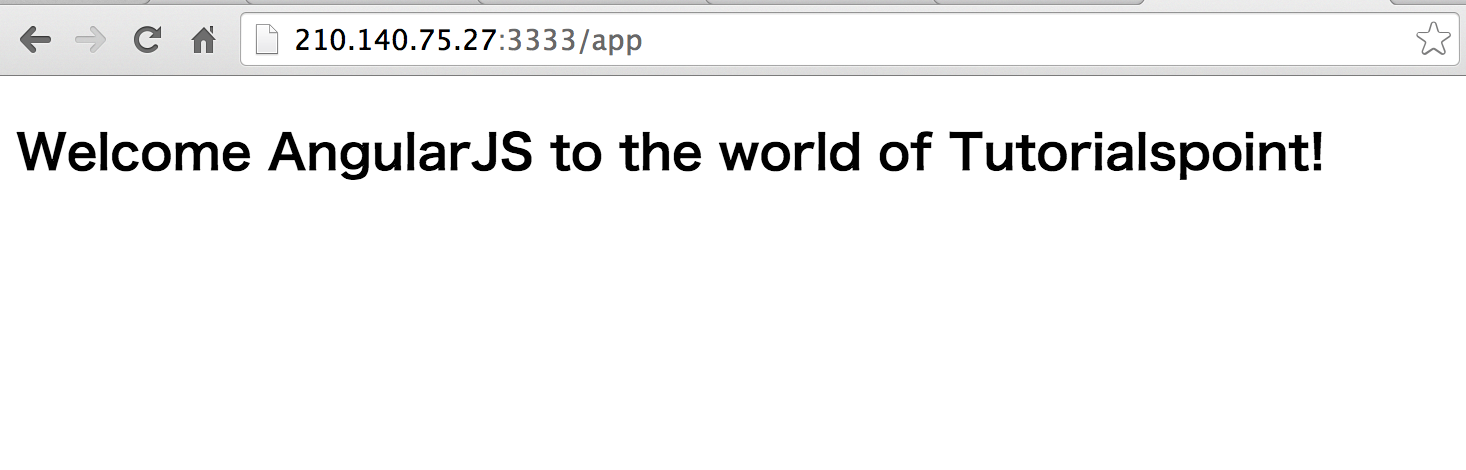
priv/static/angular.htmlファイルを追加します。中身は下のように追加します。
 <!doctype html>
 <html>
    <head>
    <script src="/js/angular.js"></script>
    </head>
    <body ng-app="myapp">
       <div ng-controller="HelloController" >
          <h2>Welcome {{helloTo.title}} to the world of Tutorialspoint!</h2>
       </div>
       <script>
          angular.module("myapp", [])
          .controller("HelloController", function($scope) {
             $scope.helloTo = {};
             $scope.helloTo.title = "AngularJS";
          });
       </script>
    </body>
 </html>
htmlファイルに<script src="/js/angular.js"></script>を書き込んでもそのまま使えないです。
src/cowboy_post_app.erlファイルに下の二行を追加します。
{"/app", cowboy_static, {priv_file, cowboy_post, "static/angular.html" }},
{"/js/[...]", cowboy_static, {priv_dir, cowboy_post, "static/js"}},
今はcowboy_post_app.erlファイルは下のようになっています。
-module(cowboy_post_app).
 -behaviour(application).

 -export([start/2]).
 -export([stop/1]).

 start(_Type, _Args) ->
     Dispatch =  cowboy_router:compile([
         {'_', [
                 {"/", cowboy_static, {priv_file, cowboy_post, "static/index.html" }},
                 {"/app", cowboy_static, {priv_file, cowboy_post, "static/angular.html" }},
                 {"/js/[...]", cowboy_static, {priv_dir, cowboy_post, "static/js"}},
                 {"/echo", echo_handler, []}
               ]
         }
     ]),
     {ok, _} = cowboy:start_http(http, 100, [{port, 3333}], [
         {env, [{dispatch, Dispatch}]}
     ]),
     cowboy_post_sup:start_link().

 stop(_State) ->
     ok.
上のコードの中の/js/[...]部分に関してはこのリンクを参照します。
privディレクトリ下の構造は
├── priv
│   └── static
│       ├── angular.html
│       ├── index.html
│       └── js
│           └── angular.js
アプリをコンパイルして、リスタートする
$ make
$ _rel/cowboy_post_release/bin/cowboy_post_release restart