2015.07.26 投稿
やることが多いのでコードベースで淡々とその方法を書きます。今回の要件は以下を想定
- TinyMCE ビジュアルエディタに「テキストボックスを吐き出す」ボタンを追加
- ボタンを押すとダイアログが開く
- ダイアログはこんな感じ

バージョン
- WordPress 4.2.3
functions.php の編集
TinyMCE にオリジナルのボタンを追加するにあたっては、(WordPressではなく)TinyMCE のプラグインを作成する必要があるようです。ちなみにプラグインは js で作ります。
プラグインを WordPress に対応させるにあたってまずは、add_filter 'mce_buttons' でボタンを追加。add_filter 'mce_external_plugins' でプラグインとなる js を登録することになります。
<?php

function register_button($buttons)
{
	$buttons[] = 'input_text';
	return $buttons;
}
add_filter('mce_buttons', 'register_button');

function mce_plugin($plugin_array)
{
	$plugin_array['custom_button_script'] = get_template_directory_uri() . '/editor_plugin.js';
	return $plugin_array;
}
add_filter('mce_external_plugins', 'mce_plugin');

?>
editor_plugin.js の編集
プラグインの追加と登録をする js の編集をするよ
(function($, document, window){

	var path = $('#templateDirectory').val();

	tinymce.create(
		'tinymce.plugins.MyButtons',
		{
			init: function(ed, url)
			{
				ed.addButton(
					'input_text',
					{
						title: 'input text',
						image: path + '/path/to/image.png',
						cmd: 'input_text_cmd'
					}
				);

				ed.addCommand( 'input_text_cmd', function()
				{
					ed.windowManager.open(
					{
						url: path + '/path/to/view.html',
						width: 480,
						height: 270,
						title: 'テキストボックス名とラベル名をご入力ください'
					},
					{
						custom_param: 1
					});
				});
			},
			createControl: function(n,cm)
			{
				return null;
			}
		}
	);
	tinymce.PluginManager.add(
		'custom_button_script',
		tinymce.plugins.MyButtons
	);
})(jQuery, document, window);
この js での注目する点は、「addButton」「addCommand」の2つです。複数のボタンを同時に作る場合は先に挙げた functions.php の register_button で追加したいボタンを定義し、addButtonとaddCommand を追加したい分だけ羅列していきます。
またこの js の先頭で
var path = $('#templateDirectory').val();
とありますが、js からテーマディレクトリのパスを取得するためのコードです。そのために functions.php ではそのためのコードを用意しています。
function addHidden()
{
	$path = get_bloginfo( 'template_directory' );
	echo '<input type="hidden" id="templateDirectory" value='."{$path}".' />';
}
add_action('admin_menu', 'addHidden');
これで js からのパスの心配はなくなります。
ダイアログ画面の作成
View はこんな感じで。
<!DOCTYPE html>
<html lang="ja">
<head>
<meta charset="UTF-8">
<title>Input Component Name</title>
<link href="https://maxcdn.bootstrapcdn.com/bootstrap/3.3.5/css/bootstrap.min.css" rel="stylesheet">
<link href="../css/styles.css" rel="stylesheet">
<script src="https://code.jquery.com/jquery-1.11.3.min.js"></script>
<script src="https://cdnjs.cloudflare.com/ajax/libs/underscore.js/1.8.3/underscore-min.js"></script>
<script src="https://maxcdn.bootstrapcdn.com/bootstrap/3.3.5/js/bootstrap.min.js"></script>
<script src="../javascripts/common.js"></script>
</head>
<body id="innerBody">
<p>テキストボックス名・ラベル名をご入力ください。両項目とも必須となります。また、テキストボックス名は半角英数とアンダースコアのみを利用できます。</p>
<table id="tb_input">
<tr>
<td>テキストボックス名</td>
<td><input type="text" id="ComponentName" class="form-control" /></td>
</tr>
<tr>
<td>ラベル名</td>
<td><input type="text" id="LavelName" class="form-control" /></td>
</tr>
</table>
<p id="ui"><input type="button" id="cancel" class="btn btn-danger" value="Cancel" onclick="return false;" /> <input type="button" class="btn btn-primary" id="submit" value="OK" onclick="return false;" /></p>
<div id="errText"></div>
</body>
</html>
スタイルはこんな感じで
@import "bootstrap-compass";
@import "bootstrap-variables";
@import "bootstrap";

# innerBody {
	padding: 10px;
	#tb_input {
		td {
			padding: 10px;
		}
	}
	#errText {
		color: #FF0000;
		font-size: 0.8em;
	}
	#ui {
		text-align: center;
	}
}
最後に js はこんな感じです。
(function($, window, document, _){
$(document).on('click','#submit',function(){
$('#errText').empty();
var nameValue = _.escape($('#ComponentName').val());
var labelName = _.escape($('#LavelName').val());
if(!(nameValue && labelName))
{
$('#errText').empty().text('テキストボックス名及びラベル名は必須です');
return false;
}
if(!(/^[a-zA-Z_][a-zA-Z0-9_]*$/.test(nameValue)))
{
$('#errText').empty().text('テキストボックス名に利用できる文字は半角英数字です。また先頭文字には数字を使うことができません');
return false;
}
//var args = top.tinymce.activeEditor.windowManager.getParams();
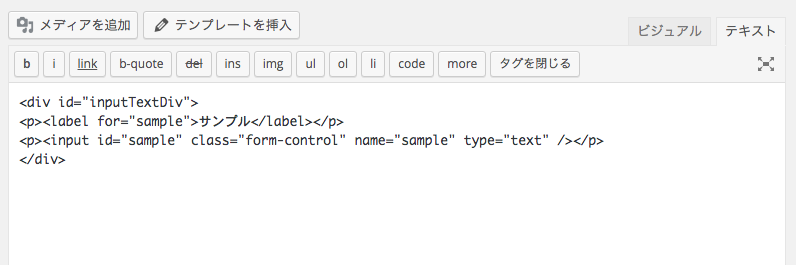
var inputTag = '<div id="inputTextDiv"><p><label for="'+ nameValue +'">'+labelName+'</label></p><p><input type="text" name="' + nameValue + '" id="' + nameValue + '" class="form-control"></p></div>';
top.tinymce.activeEditor.selection.setContent(inputTag);
top.tinymce.activeEditor.windowManager.close();
return false;
});
$(document).on('click','#cancel',function(){
$('#ComponentName').val('');
$('#LavelName').val('');
$('#errText').empty();
top.tinymce.activeEditor.windowManager.close();
return false;
});
})(jQuery, window, document, _);
注目すべきコードはこちら
top.tinymce.activeEditor.selection.setContent(inputTag);
top.tinymce.activeEditor.windowManager.close();
top.tinymce.activeEditor.selection.setContent() でアクティブになっているエディタの現在のカーソル位置に引数で渡した文字列が挿入されます。
top.tinymce.activeEditor.windowManager.close() でカスタムダイアログを閉じます。
最後に
ビジュアルエディタには以下のアイコンを用意

こんな感じで表示されます

このアイコンは、editor_plugin.js の addButton() のパラメータでパスを指定してます。
ed.addButton(
	'input_text',
	{
		title: 'input text',
		image: path + '/inc/assets/images/input.png',
		cmd: 'input_text_cmd'
	}
);
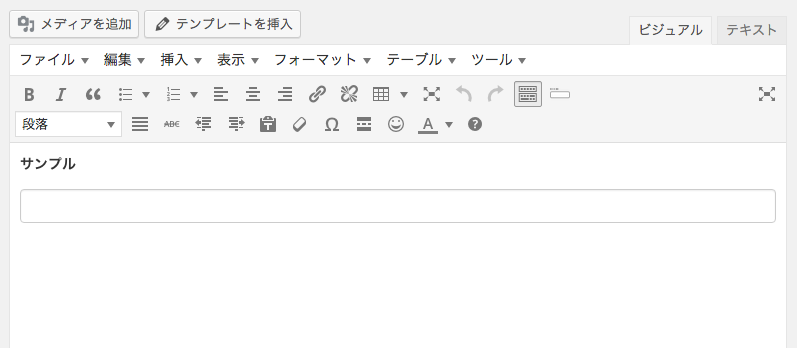
実際にテキストボックスを追加してみます。まずはビジュアルエディタ側。
HTMLはこんな感じになります。
以上でカスタマイズの流れとなります。カスタムダイアログに関する情報が少なめだったので、TinyMCEの本家サイトでコードを漁りました。
慣れればカスタムのボタンをガンガン追加して、AddQuickTagなどのプラグインが無くてもよりインタラクティブなUIを提供できるようになります。
おまけ
ビジュアルエディタにオリジナルのCSSを適用させるには、functions.phpに以下のコードを書きテーマファイル直下に editor-style.css を置いてください。
add_editor_style('editor-style.css');
bootstrap の内容をごっそりコピーしてあげれば、ビジュアルエディタの中身がごっそり bootstrap の CSS に置き換わります。
以上です。おつかれさまでした