はじめに
ESP-WROOM-02というWiFi付センサーハブは激安だ。通販や秋葉原の店頭で500円位で手に入る。使いやすいブレークアウトボードに搭載されたものでも1000円以内で手に入る。
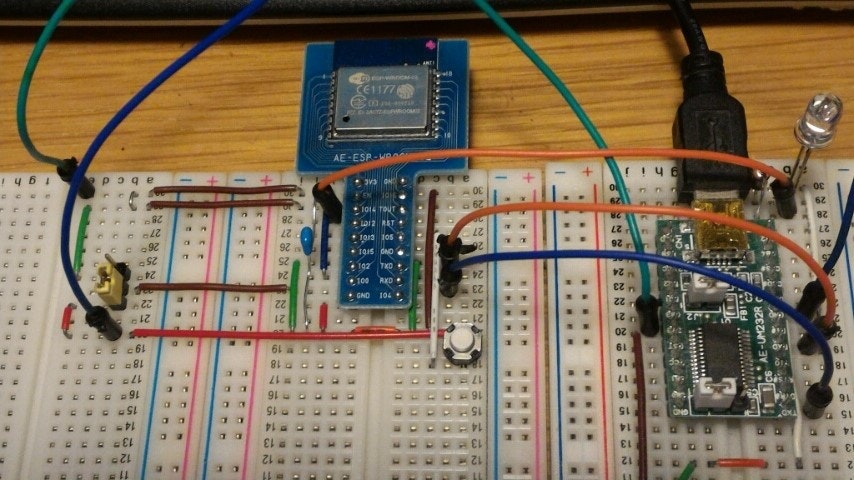
以下の写真は、ブレークアウトボードに搭載されているタイプで、秋月電子で650円で売っている。安い!
このセンサーハブを使えば、激安センサーシステムを作成することが可能なはず。安く手軽にIoTが出来るとなればこれはブレーク間違いない。
そこで、WROOM-02をIBM Bluemixにつなげてセンサーデータの送信とコマンドの受信(PublishとSubscribe)をしてみようと思った。
センサーデータの送信(Publish)は、Check! IoT ができるようになるまで ~ ESP-WROOM-02 を IoT Foundation で Bluemix につなぐ!を参考にトラブルに見舞われながらも数時間で何とかなったが、コマンドの受信(Subscribe)ははまって成功まで数日かかった。
本投稿ではコマンドの受信(Subscribe)をできるまでのポイントを解説します。
前提
本投稿ではすでにWROOM-02がシリアル通信できるようになっており、ArduinoIDEでWROOM-02にプログラムを焼け、Bluemixに接続しPublishができている事を想定している。なので、以下(または各種サイト)を参考にしてその前提を整えてください。
- Check! IoT ができるようになるまで ~ まずはシリアル通信を使えるようになる
- Check! IoT ができるようになるまで ~ ESP-WROOM-02 にプログラムを焼く
- Check! IoT ができるようになるまで ~ ESP-WROOM-02 を IoT Foundation で Bluemix につなぐ!
いきなり完成品
まずは完成したものを出してしまおう。どこがポイントかというのはそのあとで。
コード
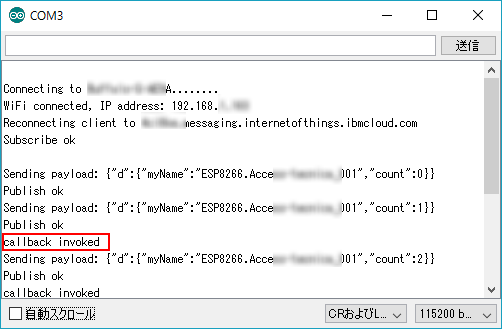
サンプルのコードは以下の感じ。Bluemixからコマンドを受信(Subscribe)するとシリアルモニタに「callback invoked」と表示する。
/**
 * This source code refer to the recipe of IBM developerWorks, https://developer.ibm.com/recipes/tutorials/connect-an-esp8266-with-the-arduino-sdk-to-the-ibm-iot-foundation/ .
 */
# include <ESP8266WiFi.h>
# include <PubSubClient.h>

//-------- Customise these values -----------
const char* ssid = "<SSID>";
const char* password = "<暗号化キー>";

# define ORG "<組織ID>"      // 組織ID
# define DEVICE_TYPE "<デバイス・タイプ>"  // デバイス・タイプ
# define DEVICE_ID "<デバイスID>"      // デバイスID
# define TOKEN "<認証トークン>"              // 認証トークン
//-------- Customise the above values --------

char server[] = ORG ".messaging.internetofthings.ibmcloud.com";
char topic[] = "iot-2/evt/status/fmt/json";
char authMethod[] = "use-token-auth";
char token[] = TOKEN;
char clientId[] = "d:" ORG ":" DEVICE_TYPE ":" DEVICE_ID;

WiFiClient wifiClient;
PubSubClient client(wifiClient);

void callback(char* topic, byte* payload, unsigned int length) {
 Serial.println("callback invoked");
}

void setup() {
 Serial.begin(115200);
 Serial.println();

 Serial.print("Connecting to ");
 Serial.print(ssid);
 WiFi.begin(ssid, password);

 while (WiFi.status() != WL_CONNECTED) {
 delay(500);
 Serial.print(".");
 }
 Serial.println("");

 Serial.print("WiFi connected, IP address: ");
 Serial.println(WiFi.localIP());

 client.setServer(server, 1883);
 client.setCallback(callback);
}

int counter = 0;

void loop() {

 if (!!!client.connected()) {
 Serial.print("Reconnecting client to ");
 Serial.println(server);
 while (!!!client.connect(clientId, authMethod, token)) {
 Serial.print(".");
 delay(500);
 }
 if (client.subscribe("iot-2/cmd/cid/fmt/json")) {
 Serial.println("Subscribe ok");
 } else {
 Serial.println("Subscribe failed");
 }
 Serial.println();
 }

 String payload = "{\"d\":{\"myName\":\"";
 payload += DEVICE_TYPE;
 payload += ".";
 payload += DEVICE_ID;
 payload += "\",\"count\":";
 payload += counter;
 payload += "}}";

 Serial.print("Sending payload: ");
 Serial.println(payload);

 if (client.publish(topic, (char*) payload.c_str())) {
 Serial.println("Publish ok");
 } else {
 Serial.println("Publish failed");
 }
 client.loop();
 if (1000 < counter) {
  counter = 0;
 }
 else {
  ++counter;
 }
 delay(10000);
}
Bluemix側の設定
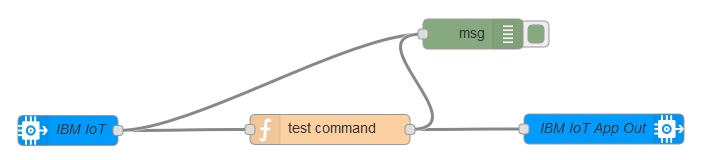
Bluemix側のNode-REDのフローはこんな感じ。
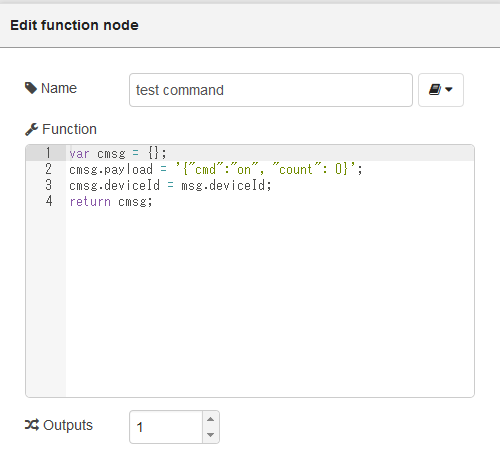
Functionの「test command」の中身の例。
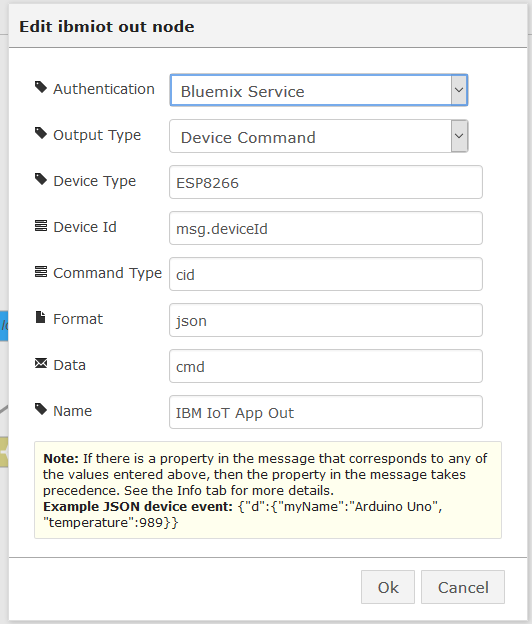
「IBM IoT App Out」の中身の例。
ポイントの解説
コード側
client.loop()の実行を忘れてはならない。
loop関数の中で、client.loop();を実行するようにする。
私はこれがわからなくて2日間悩んだ。なので一番のポイントとして挙げておこう。
client.loop();は、Bluemixからの受信を処理する命令らしい。
void loop() {
<...略...>

 client.loop();

<...略...>
}
受信時に実行される関数の用意
Subscribeを受信したときの処理を関数として書いておく。
void callback(char* topic, byte* payload, unsigned int length) {
 Serial.println("callback invoked");
}
受信時に実行される関数の登録
Subscribeを受信したときに実行する関数の名前をclient.setCallback(callback);のように設定する。
void setup() {
 <...略...>
 client.setServer(server, 1883);
 client.setCallback(callback);
}
Subscribe開始の命令の実行
接続処理の直後で、client.subscribe("iot-2/cmd/cid/fmt/json")のようにsubscribeを行う。
Bluemixから受信する場合、iot-2/cmd/<任意の文字列>/fmt/jsonという形式のトピックを指定する。
任意の文字列は、Node-REDの「IBM IoT App Out」の中身の Command Typeと合わせる必要がある。
 <...略...>
 while (!!!client.connect(clientId, authMethod, token)) {
 Serial.print(".");
 delay(500);
 }
//接続成功後
 if (client.subscribe("iot-2/cmd/cid/fmt/json")) {
 Serial.println("Subscribe ok");
 } else {
 Serial.println("Subscribe failed");
 }
 Serial.println();
 }
Bluemix側
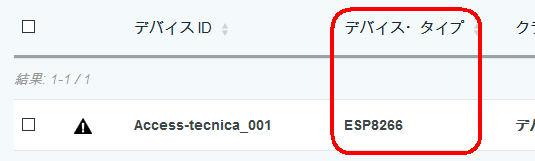
DeviceTypeの名前に気を付ける
Node-REDの「IBM IoT App Out」の中身のDevice Typeと、登録機器の「デバイス・タイプ」を合わせる。Bluemix側のポイントはこれだけ。

実行例
正しくできていれば、シリアルモニターに「callback invoked」と表示されるはず。
他に参考にした投稿
以下も参考にするとよいと思う。Bluemix側の設定はここを参考にした。