#はじめに
PrimeFaces showcaseを見て、サーバーPushを実装できることを知りました(showcaseにてお試しできます)。これを自環境に再現しようとしたところ思いのほか苦戦しましたので、方法を載せておきます。
JavaEE学習中の身ですが、初投稿いたします。
##環境
NetBeans 8.0.2
JavaSDK 1.8.0.25
PrimeFaces 5.0
GlassFish 4.1
##Maven プロジェクト作成
新規プロジェクト作成でMaven > Webアプリケーションを選択。
プロジェクト名を決めて終了ボタンをクリック。
##JSF PrimeFaces設定
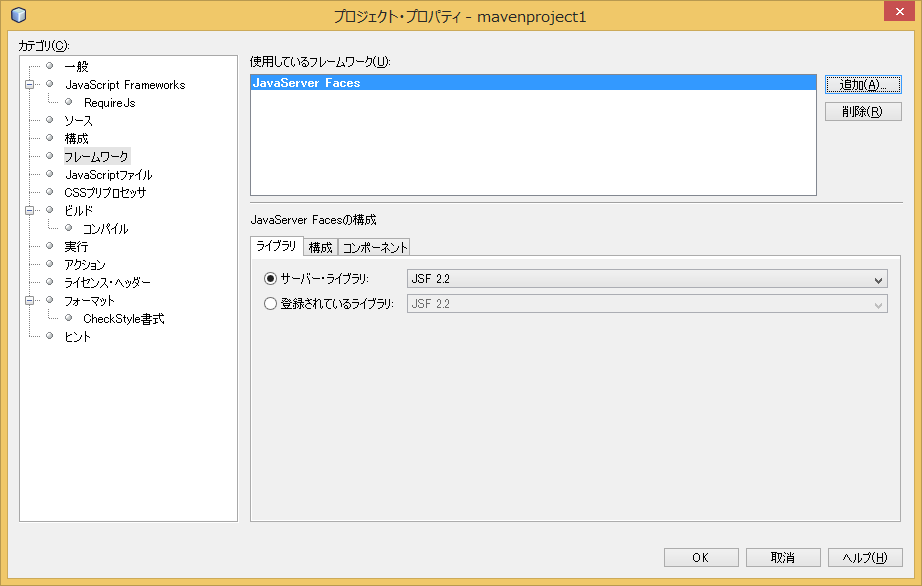
プロジェクトのプロパティ画面を開き、フレームワークを選択します。追加ボタンでJavaServerFacesをクリック
続いてコンポーネントタブをクリックし、Primefacesをチェック。
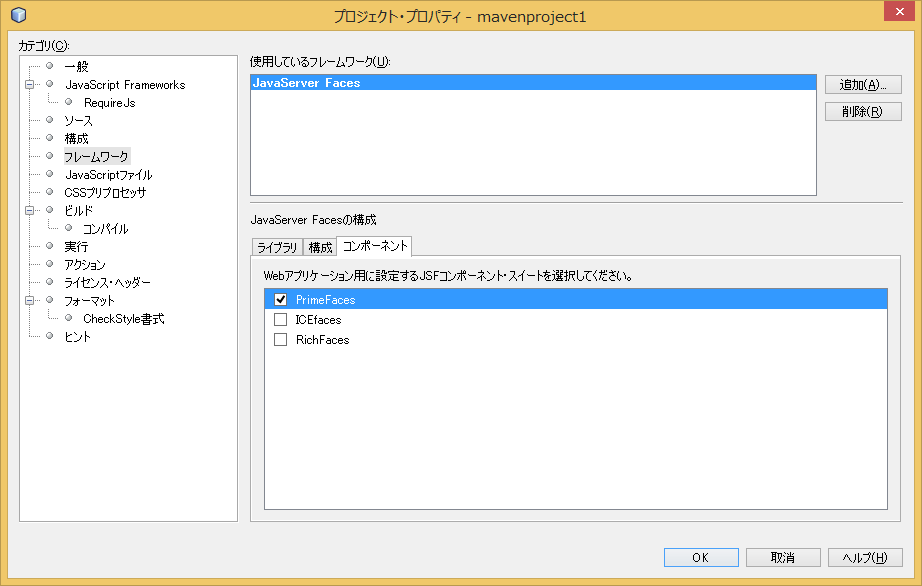
OKボタンで終了します。
##pom.xmlファイルの編集
dependenciesディレクションに以下を追記します。
    <dependencies>

        省略

        <dependency>
            <groupId>org.atmosphere</groupId>
            <artifactId>atmosphere-runtime</artifactId>
            <version>2.1.12</version>
        </dependency>
    </dependencies>
saveするとビルドが実効され、atmosphereランタイムが自動でダウンロードされます。依存性のアイコンをクリックすると追加されたjarファイルが表示されます。
##web.xmlファイルの編集
Webページ > WEB-INF配下にあるweb.xmlファイルを開きます。
servletエントリとservlet-mappingエントリを追加します。
    <servlet>
        <servlet-name>Push Servlet</servlet-name>
        <servlet-class>org.primefaces.push.PushServlet
        </servlet-class>
        <load-on-startup>0</load-on-startup>
        <async-supported>true</async-supported>
    </servlet>
    <servlet-mapping>
        <servlet-name>Push Servlet</servlet-name>
        <url-pattern>/primepush/*</url-pattern>
    </servlet-mapping>
load-on-startupはダウンロードしたshowcaseにならって追加しました。これが無い場合、最初のPushからページが受信するまで時間が掛かってしまいます。
##コードの作成
プログラムコードはBackingBean,PushEndpoint,JSFページを作成します。
BackingBeanです。
package com.mycompany.mavenprojectpfpush;

import java.io.Serializable;
import javax.enterprise.context.ApplicationScoped;
import javax.inject.Named;
import org.primefaces.push.EventBus;
import org.primefaces.push.EventBusFactory;

@Named
@ApplicationScoped

public class GlobalCounterView implements Serializable{

    private volatile int count;

    public int getCount() {
        return count;
    }

    public void setCount(int count) {
        this.count = count;
    }

    public void increment() {
        count++;

        EventBus eventBus =
           EventBusFactory.getDefault().eventBus();
        eventBus.publish("/counter", String.valueOf(count));
    }

}
表示用countのアクセサとcountをincrementするメソッドのみです。
incrementではFactoryからeventBusを取得してチャネル名の"/counter"を引数にpublishメソッドをコールしています。
PushEndpointです。
package com.mycompany.mavenprojectpfpush;

import org.primefaces.push.annotation.OnMessage;
import org.primefaces.push.annotation.PushEndpoint;
import org.primefaces.push.impl.JSONEncoder;

@PushEndpoint("/counter")
public class CounterResource {

    @OnMessage(encoders = {JSONEncoder.class})
    public String onMessage(String count) {
        return count;
    }

}
2つのアノテーションとOnMessageのハンドラだけです。シンプルですね。
最後にJSFページになります。
<?xml version='1.0' encoding='UTF-8' ?>
<!DOCTYPE html PUBLIC "-//W3C//DTD XHTML 1.0 Transitional//EN" "http://www.w3.org/TR/xhtml1/DTD/xhtml1-transitional.dtd">
<html xmlns="http://www.w3.org/1999/xhtml"
      xmlns:h="http://java.sun.com/jsf/html"
      xmlns:p="http://primefaces.org/ui">

    <h:head>
        <title>push</title>
    </h:head>
    <h:body>
        <h:form id="form">
            <h:outputText id="out"
                   value="#{globalCounterView.count}"/>

            <p:commandButton value="Click"
              actionListener="#{globalCounterView.increment}" />
        </h:form>

       <p:socket channel="/counter" >
            <p:ajax event="message" update=":form:out" />
        </p:socket>

    </h:body>
</html>
websocket通信にsocketタグを使用します。ajaxタグでpush受信をmessageイベントとしてハンドルし、outputTextタグ表示を更新しています。
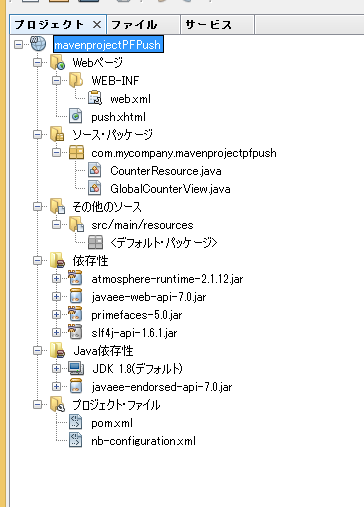
プロジェクトウィンド上のファイル配置は以下の様になります。
##動作確認
push.xhtmlを実行するとブラウザが開かれます。URLをコピーしてもう1つブラウザを開いて貼り付け、ボタンをクリックすると両方のブラウザの画面の数字がカウントアップしていけば成功です。
#最後に
Websocketは2年ぐらい前に別のフレームワークで試しましたが、その時とくらべて各段にシンプルに出来て驚きました。Primefacesやatmosphereは学習中ですが、実務でも使えそうな感触です。