はじめに
UIViewControllerを使った画面遷移は、遷移のルートが複雑になればなるほど混沌に陥る可能性が高くなります。一つの理由はUIViewControllerの表示・非表示の方法が複数あり、これらをどのような設計方針で実装するべきかが分かりにくいことが挙げられます。
UIViewControllerの表示・非表示の方法は、例えば以下ののようなものがあります。
| Class | 表示 | 非表示 |
|---|---|---|
| UIViewController | present(_:animated:completion:) | dismiss(animated:completion:) |
| UINavigationController | pushViewController(_:animated:) | popViewController(animated:) |
| UIViewController + UIView | addChildViewController(:) + addSubview(:) | removeFromParentViewController() + removeFromSuperview() |
問題
画面をひとつ作成する場合、他の画面と密に結合するよりは、他に依存することなく単独で動作するほうがより良いデザインであるはずです。ここで考えたいのは、他に依存することなく(画面遷移元と密結合することなく)どのように画面を終了するのか、ということです。
例えば画面内のボタンを押下して画面を終了する場合、present(_:animated:completion:) で遷移したUIViewControllerはどこで dismiss(animated:completion:) を呼べば良いのでしょうか。
class ViewController: UIViewController {

    // ボタンが押下された
    @IBAction func pushedButton(_ sender: Any) {
        dismiss(animated: true, completion: nil)  // <-- ここを分岐する?
    }

}
と書いてしまうと、pushViewController(:animated:)で呼び出した場合は、if文で分岐しますか?
分岐するためには呼び出し元がpresent(:animated:completion:)で呼び出したか、pushViewController(_:animated:) で呼び出したかを記録する必要もありますね。
delegate
このような問題を避けるために、delegateを使って呼び出し元に画面終了のための制御を与える設計が多く採用されているのではないでしょうか。しかしながらdelegateによる実装は画面遷移の表示、非表示のコードがが分離してしまい構造が複雑になるデメリットもあります。
クロージャ
delegateではなくクロージャを使って呼び出し元に画面終了の手段を与えることで、可読性の高いコードが実現できるのではないでしょうか。
下記のコードでは、FirstViewController画面からViewController画面を呼び出します。FirstViewControllerには2つのボタンを配置しました。1つ目はpresent(:animated:completion:)を呼び出します。2つ目はpushViewController(:animated:)を呼び出します。
ViewControllerではpushedButtonがボタン押下で呼び出されると画面を終了します。またナビゲーションを使用している場合は、ナビゲーションバーの戻るボタン "<" を押下するとdeinitが呼び出され、この中で完了クロージャが呼び出されます。
import UIKit

class ViewController: UIViewController {

    // ストリーボードからインスタンを生成
    static func getInstance() -> ViewController?
    {
        let storyboardInstance = UIStoryboard(name: "Main", bundle: nil)
        let vc = storyboardInstance.instantiateViewController(withIdentifier: String(describing: self))
        return vc as? ViewController
    }

    // 完了クロージャ
    var completion: ((_ viewController: UIViewController, _ animated: Bool) -> Void)? = nil

    @IBAction func pushedButton(_ sender: Any) {
        dismissCore(animated: true)
    }

    // ボタンなどで画面を終了する場合
    func dismissCore(animated: Bool)
    {
        completion?(self, animated)
        completion = nil
        print("\(String(describing: type(of: self))) で \(#function) が呼び出されました")
    }

    // ナビゲーションバーの戻るボタン "<" で画面を終了する場合
    deinit
    {
        completion?(self, true)
        completion = nil
        print("\(String(describing: type(of: self))) で \(#function) が呼び出されました")
    }
}
import UIKit

class FirstViewController: UIViewController {

    // present(_:animated:completion:)を呼び出す
    @IBAction func pushedPresent(_ sender: Any) {

        if let vc = ViewController.getInstance()  // インスタンス生成
        {
            // 終了クロージャの設定
            vc.completion = { viewController, animated in

                // 画面終了(インスタンスの消滅)
                viewController.dismiss(animated: animated, completion: nil)

                print("\(String(describing: type(of: self))) で \(#function) が呼び出されました")

            }

            // 画面表示
            self.present(vc, animated: true)
        }

    }

    // pushViewController(_:animated:)を呼び出す
    @IBAction func pushedPushViewController(_ sender: Any) {

        if let vc = ViewController.getInstance()  // インスタンス生成
        {
            // 終了クロージャの設定
            vc.completion = { viewController, animated in

                // 画面終了(インスタンスの消滅)
                viewController.navigationController?.popViewController(animated: true)

                print("\(String(describing: type(of: self))) で \(#function) が呼び出されました")

            }

            // 画面表示
            self.navigationController?.pushViewController(vc, animated: true)
        }

    }
}
注目したいのは、
            // 終了クロージャの設定
            vc.completion = { viewController, animated in

                // 非表示(インスタンスの消滅)
                viewController.dismiss(animated: animated, completion: nil)

            }

            // 表示
            self.present(vc, animated: true)
の部分です。表示と非表示の記述を対にして記述することが可能になります。
ここの部分がdelegateに比べて可読性が高いと思う部分になります。
この表示・非表示に関わるコードをカスタマイズすることで、様々な種類の画面遷移に対応できると思います。
継承
最後に画面遷移のキモの部分をsuper classに格上げします。これでCoreViewControllerを継承するだけで全てのUIViewControllerがこの機能を持てることになりました。本来はプロトコルで実装したいところですが、完了クロージャの変数を持っているために(プロトコルは変数を保持できない)継承関係にて分離しました。
import UIKit

class CoreViewController: UIViewController {

    // 完了クロージャ
    var completion: ((_ viewController: UIViewController, _ animated: Bool) -> Void)? = nil

    func dismissCore(animated: Bool)
    {
        completion?(self, animated)
        completion = nil
        print("\(String(describing: type(of: self))) で \(#function) が呼び出されました")
    }

    deinit
    {
        completion?(self, true)
        completion = nil
        print("\(String(describing: type(of: self))) で \(#function) が呼び出されました")
    }
}
子クラスはこちらです。
import UIKit

class ViewController: CoreViewController {

    // ストリーボードからインスタンスを生成
    static func getInstance() -> ViewController?
    {
        let storyboardInstance = UIStoryboard(name: "Main", bundle: nil)
        let vc = storyboardInstance.instantiateViewController(withIdentifier: String(describing: self))
        return vc as? ViewController
    }

    @IBAction func pushedButton(_ sender: Any) {
        dismissCore(animated: true)
    }
}
補足
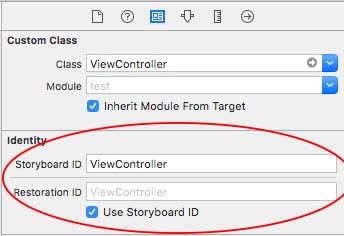
下記コードを実行するには、ストリーボードの設定を少々追加する必要があります。
static func getInstance() -> ViewController?
    {
        let storyboardInstance = UIStoryboard(name: "Main", bundle: nil)
        let vc = storyboardInstance.instantiateViewController(withIdentifier: String(describing: self))
        return vc as? ViewController
    }
スクリーンショットを参考にしてください。
ソースコード
なおソースコードをGitHubに上げております。
以上です。