はじめに
node + expressで以下のようなことをしてみます
- mongoDBに保存しているname/passでユーザ認証
- 認証OKならJWT形式のtokenを発行して返却
- JWTトークンを使って認証要のAPIにアクセス
これらをform認証でなく、CUrl等を利用してできるようにします。
このサイトにしたがって実施してみます
必要なもの
- node
- npm
- POSTman(api検証用のchrome extention)
- mongoDB
サーバに実装するもの
- secureとsecure外のURL
- nameとpasswordによるユーザ認証
- 認証後にtokenを返却
- ユーザは取得したtokenを保存、全リクエストに付与
- tokenを検証、OKであればJSONで情報を返却
mongoDBのインストール(mac)
# install
brew install mongodb

# mongoDBを自動起動
ln -sfv /usr/local/opt/mongodb/*.plist ~/Library/LaunchAgents
launchctl load ~/Library/LaunchAgents/homebrew.mxcl.mongodb.plist
projectの作成
mkdir server.oauth
cd server.oauth
mkdir -p app/models
touch app/models/user.js
touch config.js
touch package.json
touch server.js
- app/
----- models/
---------- user.js
- config.js
- package.json
- server.js
package.json
{
  "name": "server.oauth",
  "main": "server.js"
}
依存ライブラリのinstall
npm install express body-parser morgan mongoose jsonwebtoken --save
- express is ポピュラーなNode Framework
- mongoose is MongoDB用のO/Rmapper
- morgan is ログをコンソールに出力する為に利用
- body-parser is postされたパラメータのparser
- jsonwebtoken is JWTの作成・検証用library
User Model(app/models/user.js)
// get mongoose.Schema
var mongoose = require('mongoose');
var Schema = mongoose.Schema;

// make user model and export
module.exports = mongoose.model('User', new Schema({
  name: String,
  password: String,
  admin: Boolean
}));
Config File(config.js)
module.exports = {
  'secret': 'oauthServerSampleSecret',
  'database': 'mongodb://localhost/server_oauth'
}
- secret : JWTの作成と検証に使用する文字列、任意に変更する
- database : mongoDBの接続URI
Main file(server.js)
- ひとまず初期設定と起動する最低限のみ記述
// =======================
// get instance we need
// =======================
var express         = require('express');
var app                = express();
var bodyParser    = require('body-parser');
var morgan          = require('morgan');
var mongoose      = require('mongoose');
var jwt                   = require('jsonwebtoken');

var config              = require('./config');
var User                = require('./app/models/user');

// =======================
// configuration
// =======================
// server setting
var port = process.env.PORT || 8080;

// connect databse
mongoose.connect(config.database);

// application variables
app.set('superSecret', config.secret);

// config for body-parser
app.use(bodyParser.urlencoded({ extended: false}));
app.use(bodyParser.json());

// log request
app.use(morgan('dev'));

// =======================
// routes
// =======================
app.get('/', function(req, res) {
  res.send('Hello! The API is at http://localhost:' + port + '/api');
});


// =======================
// start the server
// =======================
app.listen(port);
console.log('started http://localhost:' + port + '/');
おためし起動
node server.js
- 起動したらブラウザを開き、http://localhost:8080/ にアクセス
- 成功すればHello...の文字が表示される
- 停止するにはコマンドラインで
control+c
ソース変更を反映するには再起動が必要。
めんどくさい場合、npm install -g nodemonをして
nodemon server.jsとしておくと変更を検知して自動再起動してくれる
テストユーザ作成用URLの作成(server.js)
// for create test user to db
app.get('/setup', function(req, res) {
  var demo = new User({
    name: 'demouser',
    password: 'password',   // TODO: encrypt password
    admin: true
  });

  demo.save(function(err) {
    if (err) throw err;

    console.log('User saved successfully');
    res.json({ success: true});
  });

});
- ブラウザから http://localhost:8080/setup にアクセス
- success: trueと表示されればDBに登録OK
mongoDBに登録されているか確認
mongo
use server_oauth
db.users.find()
mongodbの操作はここを参照
database一覧を見るにはshow dbs
table一覧を見るにはshow collections
APIを作成する(server.js)
- API用のURLを作成
- API用のURLは
express.Routerを使ってグルーピングして定義する
- API用のURLは
- ユーザの一覧を取得するAPIを作成
// API ROUTES ================

var apiRoutes = express.Router();

// GET(http://localhost:8080/api/)
apiRoutes.get('/', function(req, res) {
  res.json({ message: 'Welcome to API routing'});
});

// GET(http://localhost:8080/api/users)
apiRoutes.get('/users', function(req, res) {
  User.find({}, function(err, users) {
    if (err) throw err;
    res.json(users);
  });
});

// apply the routes to our application(prefix /api)
app.use('/api', apiRoutes);
- ブラウザより http://localhost:8080/api にアクセス
- 同じく http://localhost:8080/api/users にアクセス
- ユーザの情報がjsonで取得できる
- POSTmanを起動して上記のURLを発行しても確認できる
Authenticating and Creating a Token
- POST http://localhost:8080/api/authenticate を作成
- nameとpasswordを受け取ってユーザ認証のvalidate
- validならJWT tokenを作成してjsonで返却
// POST(http://localhost:8080/api/authenticate)
apiRoutes.post('/authenticate', function(req, res) {

  // find db by posted name
  User.findOne({
    name: req.body.name
  }, function(err, user) {
    if (err) throw err;

    // validation
    if (!user) {
      res.json({
        success: false,
        message: 'Authentication failed. User not found.'
      });
      return;
    }

    if (user.password != req.body.password) {
      res.json({
        success: false,
        message: 'Authentication failed. Wrong password.'
      });
      return;
    }

    // when valid -> create token
    var token = jwt.sign(user, app.get('superSecret'), {
      expiresIn: '24h'
    });

    res.json({
      success: true,
      message: 'Authentication successfully finished.',
      token: token
    });

  });

});
Authenticateのテスト
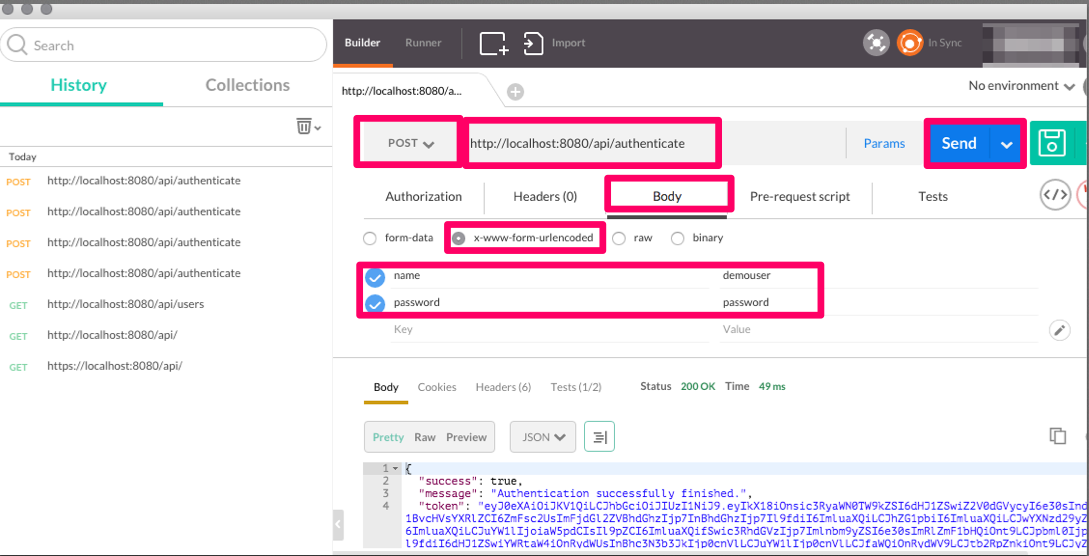
- POSTmanを使って試す
- methodをPOSTにする
- Bodyタブを開き、x-www-form-urlencodedを選択
- Key, valueを以下のようにセット
- Key: name Value: demouser
- Key: password Value: password
- うまくいけばtokenが返却されていることがわかる
認証が必要なページをprotectし、tokenが合致すれば通す
- 認証Filterは
express.Router().useで作成する - Filterを定義した以降に定義したURLはFilter通過後に動作する
- コードの書く順序 が大事
// API ROUTES

var apiRoutes = express.Router();

// non secure api --------

// POST(http://localhost:8080/api/authenticate)
...


// Authentification Filter
apiRoutes.use(function(req, res, next) {

  // get token from body:token or query:token of Http Header:x-access-token
  var token = req.body.token || req.query.token || req.headers['x-access-token'];

  // validate token
  if (!token) {
    return res.status(403).send({
      success: false,
      message: 'No token provided.'
    });
  }

  jwt.verify(token, app.get('superSecret'), function(err, decoded) {
    if (err) {
      return res.json({
        success: false,
        message: 'Invalid token'
      });
    }

    // if token valid -> save token to request for use in other routes
    req.decoded = decoded;
    next();

  });

});

// secure api --------

// GET(http://localhost:8080/api/)
...

// GET(http://localhost:8080/api/users)
...

// apply the routes to our application(prefix /api)
app.use('/api', apiRoutes);
tokenを使ってAPIが使えることを検証
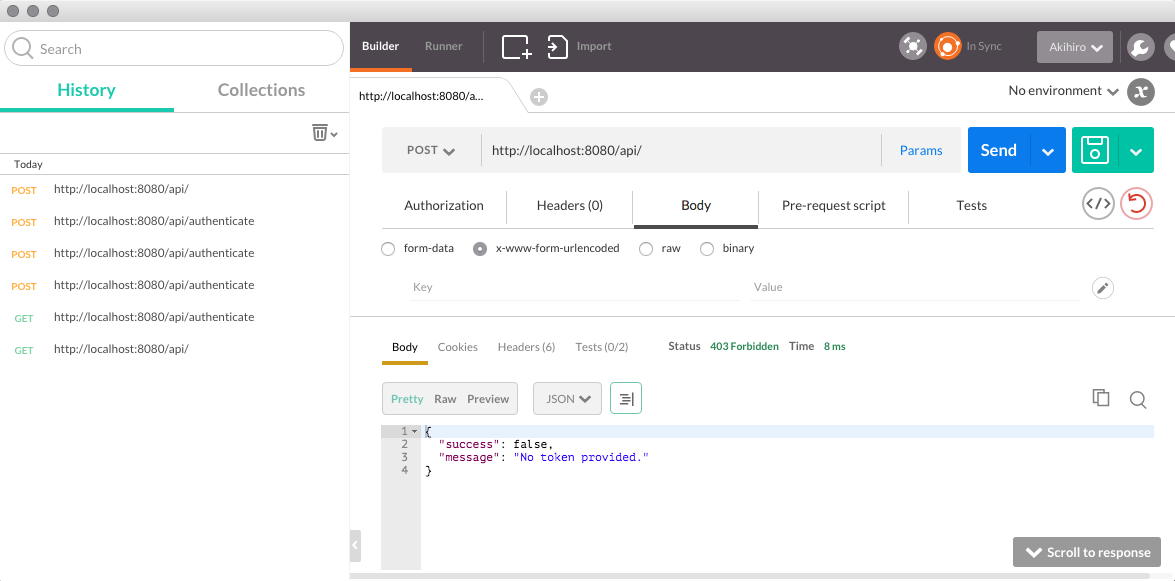
- tokenを使わず、apiをコールするとエラーになる
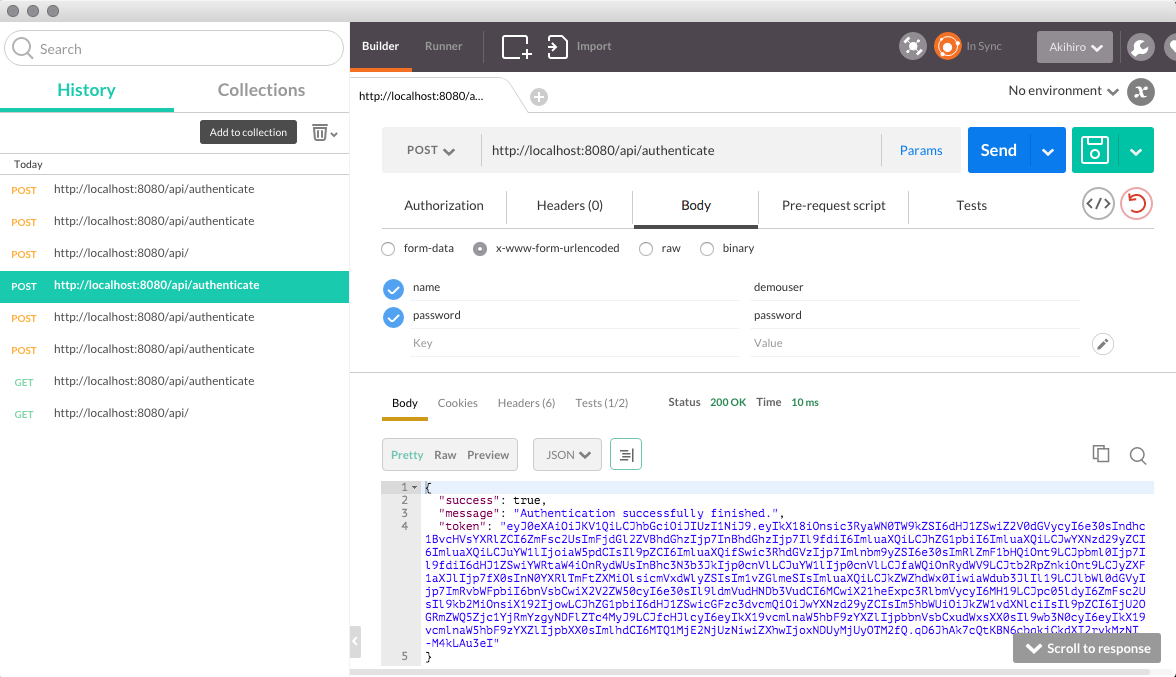
- POSTmanを使って、正しいname/passwordをPOST
- 取得できたtokenをコピー
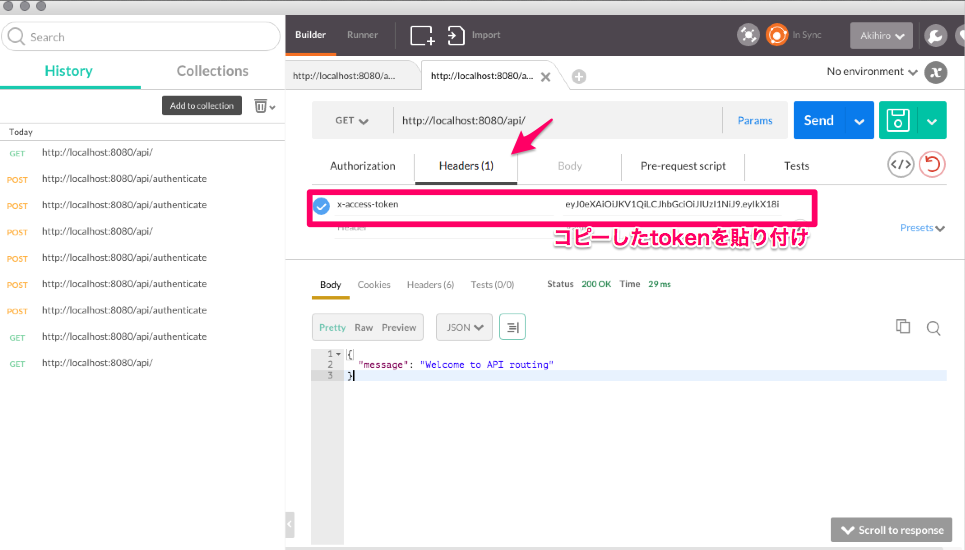
- POSTmanでtokenを含めた形でAPIをcall


