システム環境設定
Dock
サイズ -> 小さめに
Dockを自動的に隠す-> ON
セキュリティとプライバシー
FileVault -> ON
fire wall -> ON
キーボード
装飾キー -> caps lock を controlにする
トラックパッド
とにかく全部ON
finder
環境設定 -> 詳細 -> すべてのファイル名拡張子を表示にチェック
表示 -> リストを選択
表示 -> タブバーを表示
表示 -> バスバーを表示
表示 -> ツールバーをカスタマイズ -> 「新規フォルダ」と「パス」をドラッグ
App Store
xcodeをインストール
他はbrewを使ってインストールする
Terminalから
control + spaceでspotlightを表示
terminal.appを探して開く
xcodeのライセンスに同意
以下をやらないとhome brewインストールできない
$ sudo xcodebuild -license
出てきた内容に合わせてライセンスに同意
xcode コマンドラインツールインストール
xcode-select —install
別画面が開くので画面にしたがってインストール
home brewインストール
ruby -e "$(curl -fsSL https://raw.githubusercontent.com/Homebrew/install/master/install)”
一気にインストール
Brewfileを使ってbrew bundleで一気に...と思ったら
なんとbrew bundleがなくなってた
のでシェルを作って対応
適当なディレクトリにbrew.shを作成
# !/bin/sh

# Add Repository
brew tap homebrew/versions || true
brew tap phinze/homebrew-cask || true
brew tap homebrew/binary || true

# Brew Update
brew update || true

# Brew Cask
brew install brew-cask || true

# Packages
brew install --disable-etcdir zsh || true
brew install vim || true
brew install jq || true
brew install curl || true
brew install wget || true
brew install dnsmasq || true
brew install composer || true
brew install git || true

# Cask Packages
# 高機能なターミナル
brew cask install iterm2 || true
# quick look(finderでファイル選択してspace押した時)の改良
brew cask install qlstephen || true
brew cask install qlmarkdown || true
brew cask install quicklook-json || true
brew cask install quicklook-csv || true
brew cask install betterzipql || true
brew cask install qlcolorcode || true
# 高機能ランチャー、神
brew cask install alfred || true
# おなじみ
brew cask install dropbox || true
brew cask install skype || true
# git履歴をツリー表示できる
brew cask install sourcetree || true
# メインブラウザはchrome
brew cask install google-chrome || true
# マークダウンでメモをとってそのままQiitaにアップできちゃう
brew cask install kobito || true
# 仮想マシンでLinuxを動かすので。
brew cask install virtualbox || true
brew cask install vagrant || true
# テキストエディタはsublime
brew cask install sublime-text3 || true
# とはいえeclipseも現役
brew cask install eclipse-jee || true
# ssh クライアント。ファイル転送につかう
brew cask install cyberduck || true
# 圧縮解凍ツール
brew cask install the-unarchiver || true
# 画像系
brew cask install imageoptim || true
brew cask install colors || true
# WEBサイトの情報を根こそぎGET
brew cask install sitesucker || true
# ことえりいまいち
brew cask install google-japanese-ime || true
# java 今入れるとjre8 jre7が欲しい場合はjava7にする
brew cask install java || true
brew install maven
作成したbrew.shを実行
結構時間がかかるのと、何度かパスワードを求められるので注意
chmod u+x ./brew.sh
./brew.sh
bash
.bashrc
touch ~/.bashrc
.bash_profile
touch ~/.bash_profile
vim ~/.bash_profile
if [ -f ~/.bashrc ]; then
    . ~/.bashrc
fi
ruby
rbenvを入れてrubyをインストール
brew install rbenv ruby-build
rbenv install -l
rbenv install 2.2.1
rbenv global 2.2.1
rbenv rehash
.bash_profileにもセット
vim ~/.bash_profile
# rbenv init
eval "$(rbenv init -)"
source ~/.bash_profile
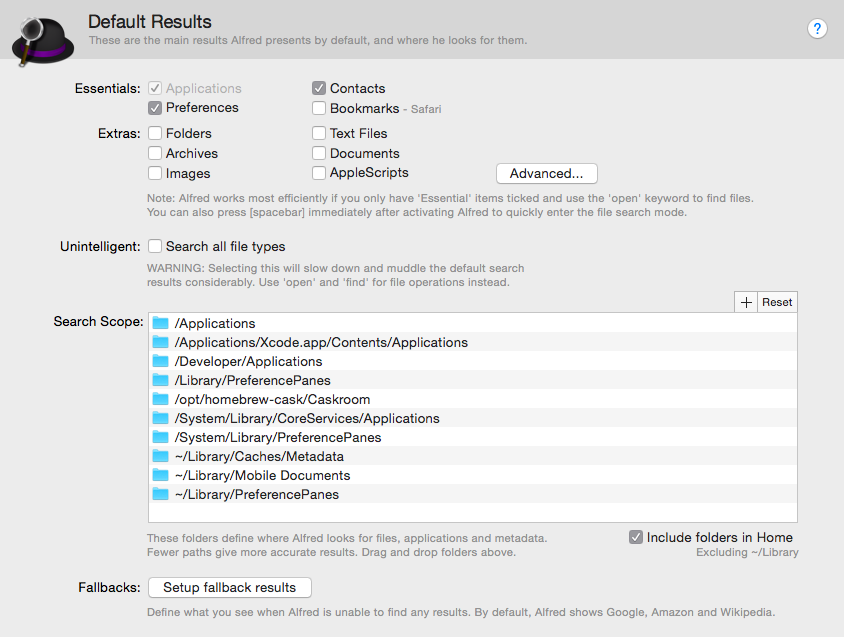
alfred設定
とにかくalfredで何でも開けるようにしておく
spotlightからalfred 2を検索して表示
alfredのhot keyはデフォルトでoption + space
他アプリと競合していない場合、このままでよいと思う
Features -> Default Result -> Search Scopeの+ボタン
-> /opt/homebrew-cask/Caskroom を追加
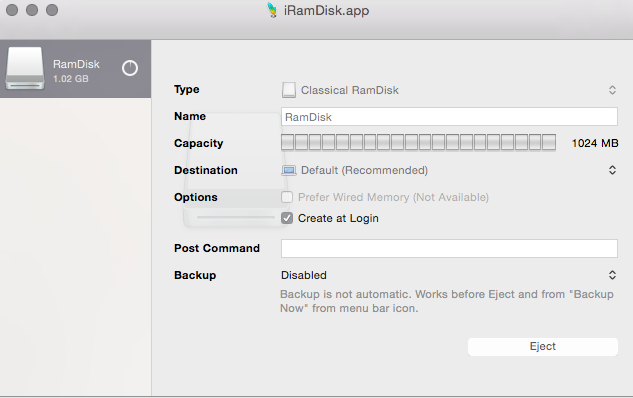
iRamDisk
app storeから落としてくる。有料。
RamDiskを作ってくれる。
設定はこんな感じ
ユーザキャッシュをRamDiskに詰め込むようにする
sudo mv ~/Library/Caches ~/Library/Caches.bk
sudo ln -s /Volumes/RamDisk ~/Library/Caches
再起動するとRamDiskに溜まっていくのがわかる
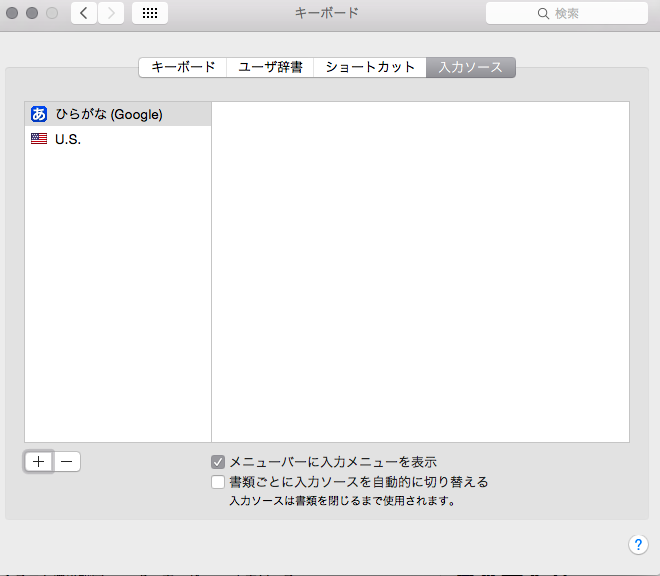
日本語入力
システム環境設定 -> キーボード -> 入力ソース
+ボタンと-ボタンを駆使して下の絵のようにする
日本語入力/英語入力の切り替えはcommand + space
node.js
node.jsはバージョン管理をしやすくするため
nodebrew経由でインストール
brew install nodebrew
node.jsの最新版をインストール
nodebrew install latest
nodebrewにインストールされたnode.jsリストを確認
nodebrew list
> v0.12.0
インストールしたnode.jsを有効化する
nodebrew use v0.12.0
node.jsにPATHを通す
echo 'export PATH=$PATH:/Users/ユーザー名/.nodebrew/current/bin' >> ~/.bashrc
source ~/.bashrc
node.js動作確認
node -v
> v0.12.0


