概要
特定のIPアドレスだけを接続許可するような環境でcertbotを利用する場合
certbotサーバからのHTTPリクエストが遮断されてしまうので
通常のcertbot認証が失敗し証明書を発行・更新することができない
そんな場合にDNSのTXTレコードにトークンを埋め込むという方法で
certbot認証を通すことができる
ちなみに公式ガイドにも記載されている内容
必要なもの
以下の条件を満たす場合、IPアドレス制限下でもcertbotで証明書発行を受けることができる
- certbotをインストール・実行できること
- 対象のドメインに対してサブドメインの追加とTXTレコードの追加ができること
なお今回はDNSはroute53を利用する。
証明書の自動更新を実行する方法はaws cliを使ってroute53の自動更新をする例で記載する。
初回証明書発行
certbotインストール
sudo yum install certbot python-certbot-apache
DNSモードでcertを実行し初回証明書を発行
sudo certbot certonly --preferred-challenges dns-01 --authenticator manual --domain yourdomain.co.jp
上記コマンドを発行すると以下のように聞かれる
Saving debug log to /var/log/letsencrypt/letsencrypt.log
Starting new HTTPS connection (1): acme-v01.api.letsencrypt.org
Obtaining a new certificate
Performing the following challenges:
dns-01 challenge for yourdomain.co.jp

-------------------------------------------------------------------------------
NOTE: The IP of this machine will be publicly logged as having requested this
certificate. If you're running certbot in manual mode on a machine that is not
your server, please ensure you're okay with that.

Are you OK with your IP being logged?
-------------------------------------------------------------------------------
(Y)es/(N)o: Y ←Yを入力
-------------------------------------------------------------------------------
Please deploy a DNS TXT record under the name
_acme-challenge.yourdomain.co.jp with the following value:


fpfSXH2O9HRJ......................   ←このトークンをコピーしておく


Once this is deployed,
-------------------------------------------------------------------------------
Press Enter to Continue
トークンが表示されたらコピーし、コンソールはEnterを押さないでこのまま置いておく。
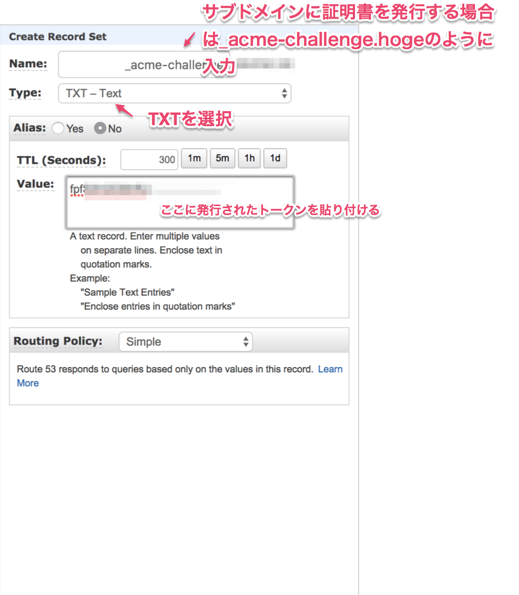
続いてroute53に以下のようなTXTレコードを追加する
route53でなくbindの場合
dnsにbindを使っている場合は以下のようなTXTレコードを追加する
_acme-challenge.yourdomain.co.jp. 300 IN TXT "fpfSXH2O9HRJ......................"
補足
bind9.3.1以降ではアンダースコアを含めるとデフォルトでエラー(bad owner name)になる
この場合は以下のように check-names をignoreに設定する必要がある
zone "yourdomain.co.jp" {
        type master;
        file "yourdomain.co.jp.zone";
        check-names ignore;
};
補足の補足
そもそも _acme-challenge のアンダースコアはOKなのか?ということについて
RFC952とRFC1033を見ると
- ホスト名にアンダースコアは許容しない
- ドメイン名にアンダースコアはOK
となっているようで _acme-challenge.yourdmain.co.jp というサブドメインは問題ないみたい
蛇足
お名前.comでドメインを取得している場合、ドメインNAVIから上記_acme...を入力したら
アンダースコアがチェックエラーになった
お名前.comでドメインを取得している場合は別でroute53とかのDNSを使って登録しないとダメっぽい
dig コマンドでTXTレコードを見ることができるようになればOK
dig -t txt _acme-challenge.yourdomain.co.jp


; <<>> DiG 9.8.3-P1 <<>> _acme-challenge.yourdomain.co.jp any @8.8.8.8
;; global options: +cmd
;; Got answer:
;; ->>HEADER<<- opcode: QUERY, status: NOERROR, id: 51300
;; flags: qr rd ra; QUERY: 1, ANSWER: 1, AUTHORITY: 0, ADDITIONAL: 1

;; OPT PSEUDOSECTION:
; EDNS: version: 0, flags:; udp: 512
;; QUESTION SECTION:
;_acme-challenge.yourdomain.co.jp. IN TXT

;; ANSWER SECTION:
_acme-challenge.yourdomain.co.jp. 9 IN TXT    "fpfSXH2O9HRJ......................"

;; Query time: 346 msec
;; SERVER: 8.8.8.8#53(8.8.8.8)
;; WHEN: Thu Jul 20 13:15:53 2017
;; MSG SIZE  rcvd: 107
コンソールに戻り、Enterを押すと認証開始になり、
うまくいけば以下のように表示される
Waiting for verification...
Cleaning up challenges

IMPORTANT NOTES:
 - Congratulations! Your certificate and chain have been saved at
   /etc/letsencrypt/live/yourdomain.co.jp/fullchain.pem. Your
   cert will expire on 2017-xx-xx. To obtain a new or tweaked version
   of this certificate in the future, simply run certbot again. To
   non-interactively renew *all* of your certificates, run "certbot
   renew"
 - If you like Certbot, please consider supporting our work by:

   Donating to ISRG / Let's Encrypt:   https://letsencrypt.org/donate
   Donating to EFF:                    https://eff.org/donate-le
これで /etc/letsencrypt/live/yourdomain.co.jp/ 配下に証明書の鍵が配置されるので
webサーバに設定する等で利用できる
証明書の自動更新設定
rootユーザで実行を推奨
pip インストール
curl https://bootstrap.pypa.io/get-pip.py | python
自動更新用のモジュールをインストール
pip install certbot-external-auth boto
wget https://gist.githubusercontent.com/rmarchei/98489c05f0898abe612eec916508f2bf/raw/a7f51af111c98544c0cee8739ebd0b88c39b3afa/route53.py
chmod +x route53.py
mv route53.py /usr/local/bin/
awsアクセス用のロール作成
AWSコンソールからIAMロールを作成しアクセスキーを取得しておく
この時、IAMポリシーに AmazonRoute53DomainsFullAccess をつける
awscliの設定
pip install awscli
aws configure
AWS Access Key ID [None]: xxxxxxxxxxxxxxx
AWS Secret Access Key [None]: xxxxxxxxxxxxxxx
Default region name [None]: us-west-2
Default output format [None]: json
証明書更新を試す
ここまでの設定ができていれば以下のコマンドで証明書更新ができる。
--renew-by-default optionをつけて実行すると証明書の期限関係なく更新する。
今回更新できるかを試す為、あえてセットしている
certbot certonly \
  --domain yourdomain.co.jp \
  --email youraddress@yourdomain.co.jp \
  --agree-tos \
  --preferred-challenges dns \
  --renew-by-default \
  --text \
  --configurator certbot-external-auth:out \
  --certbot-external-auth:out-public-ip-logging-ok \
  --certbot-external-auth:out-handler /usr/local/bin/route53.py
エラーが出ていなければ /etc/letsencrypt/live/yourdomain.co.jp/ 配下の鍵ファイルが更新されているはず。
cronに登録しておく
証明書更新シェルを作成
vi certbot-update.sh
--renew-by-default の代わりに --keep-until-expiring をつけると
現証明書の有効期限が近づくまでは更新しなくなる
#!/bin/bash

certbot certonly \
  --domain yourdomain.co.jp \
  --email youraddress@yourdomain.co.jp \
  --agree-tos \
  --preferred-challenges dns \
  --keep-until-expiring \
  --expand \
  --text \
  --configurator certbot-external-auth:out \
  --certbot-external-auth:out-public-ip-logging-ok \
  --certbot-external-auth:out-handler /usr/local/bin/route53.py 2> /dev/null
chmod 755 certbot-update.sh
あとは作成したシェルをcronに登録しておけばOK
# every am 3:00
0 3 * * * /root/certbot-update.sh
