注意:(2014/12/23)Android SDKでJUnit4がサポートされるようになりました。このエントリーの一部は古くなっています。
Android SDKでのサポートについてはこちらをどうぞ。
続・AndroidでJUnit4を使う方法(Android SDKで正式サポートされました!)
執筆時点(2014/04/07)の環境、バージョン等
- AndroidStudio 0.5.4
- JUnit 4.11
- Android-JUnit4 0.3
eclipseの場合
build.gradleの編集(JUnit4, Android-JUnit4のjar追加、TestRunnerの指定)
build.gradle に以下を追加する。
android {
	defaultConfig {
		testInstrumentationRunner "com.uphyca.testing.JUnit4InstrumentationTestRunner"
	}

	dependencies {
		// 行末のバージョン指定(4.+ 等)は適宜変更
    	androidTestCompile ("junit:junit:4.+")
    	androidTestCompile ("com.uphyca:android-junit4:+")
	}

	// LICENS.txtがどうのこうのというエラーが出たら、他のjarと競合しているので下記の記述を追加。
	// パスはAndroidStudioの「Project」ペインでjarの中身を見て適宜変更。
	// (AndroidStudioのバグらしい)
    packagingOptions {
        // for AndroidStudio's bug. duplication error of file below.
        pickFirst 'META-INF/LICENSE.txt'
        pickFirst 'LICENSE.txt'
    }

}
追加後は、Tools > Android > Sync Project with Gradle Files (またはツールバーのSync Project with Gradle Filesアイコン )を実行する。これによりMaven Centralからjarがダウンロードされる。
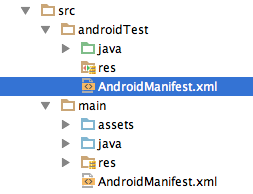
AndroidManifest.xmlの編集
アプリのAndroidManifest.xmlでなくテストコードのAndroidManifest.xmlなので注意。

<manifest>
	<!-- 下記以外は省略しています -->
	<instrumentation
        android:name="com.uphyca.testing.JUnit4InstrumentationTestRunner"
        android:targetPackage="your.app.package" />
</manifest>
build.gradleのdefaultConfigで上書きされるのでandroid:name="com.uphyca.testing.JUnit4InstrumentationTestRunner"は書かなくても動く模様。
Testクラスを作成する
例.AndroidUtilクラスのTestクラス
import com.uphyca.testing.AndroidTestCase;
import org.junit.Test;

import static org.junit.Assert.*;
import static org.hamcrest.CoreMatchers.*;

// テスト内容に応じて com.uphyca.testing 内の
// AndroiTestCase, ActivityTestCase 等を extends する
public class AndroidUtilTest extends AndroidTestCase {

	@Test	// @Testアノテーションでテストメソッドを指定。
	public void ほげメソッドがXXXを返すテスト() {
		// メソッド名をtestで始める必要なし。

	}
}
com.uphyca.testing内のTestCaseクラスを使用する以外は、通常のJUnit4の使用方法と同じ。
JUnit3系のTestクラスをJUnit4用に書き換える例
JUnit3.8用(抜粋)
import android.test.AndroidTestCase;


// android.test.AndroidTestCase を extends
public class AndroidUtilTest extends AndroidTestCase {

	// メソッド名をtestで始める。
	public void test_checkメソッドがIllegalArgumentExceptionを送出する() {
        try {
            AndroidUtil.check(null);
        } catch (IllegalArgumentException e) {
            assertTrue(true);
        }
	}
}
JUnit4用(抜粋)
import com.uphyca.testing.AndroidTestCase;
import org.junit.Test;

import static org.junit.Assert.*;
import static org.hamcrest.CoreMatchers.*;

// com.uphyca.testing.AndroidTestCase を extends
public class AndroidUtilTest extends AndroidTestCase {

    @Test(expected = IllegalArgumentException.class)
    public void checkの引数がnullの時IllegalArgumentExceptionが送出される() {
        AndroidUtil.check(null);
    }
}
AndroidStudioで実行する設定
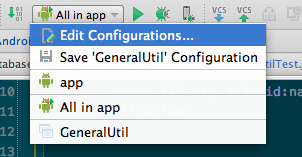
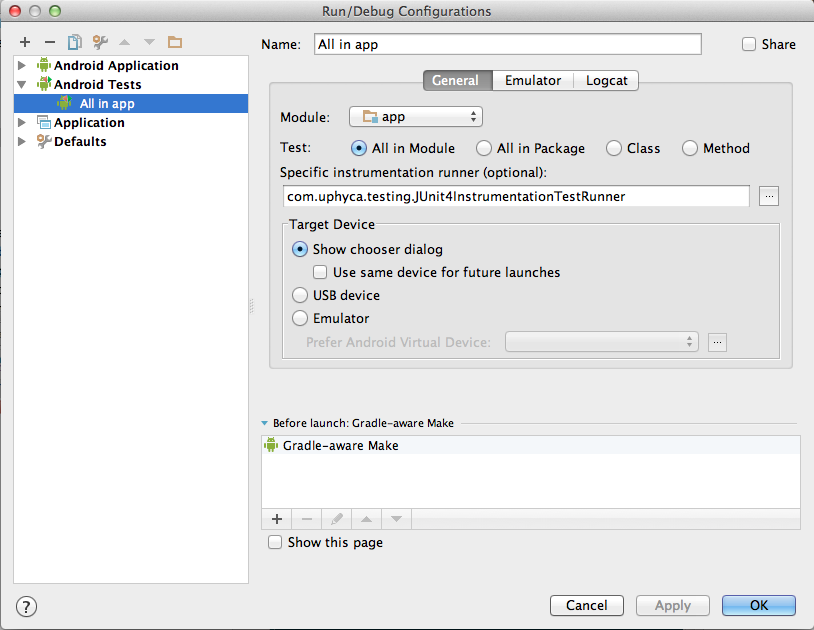
Run > Edit Configurations... (またはツールバー)の specific instrumentation runner(optional): に com.uphyca.testing.JUnit4InstrumentationTestRunner を指定する。
AndroidStudioでテスト実行
ツールバーの Run アイコン等から実行。

