参考: Custom Transitions Using View Controllers - WWDC2013 session 218
サンプル: github/335g/CustomTransitionSamples
iOS Advent Calendar 2013 13日目担当の@335gです。
個人的事情で11月ぐらいからようやく触り始めたiOS7。色々新しい事は増えてるみたいですが、WWDCの時から気になってたのが今回のテーマ「Custom Transitions」です。ベータ版のカレンダーをいじりながらどうやるんだろうなんて妄想したものです。
はじめに
まずはざっくり説明します。その後、いじっててはまった落とし穴的ビックリ!ポイントをシェアします。これからチャレンジする方がこの落とし穴にはまらず進めるようになれば幸いです。触り始めて少ししか経ってないので間違いがあるかもしれません。アドバイス等あれば本記事修正しますのでコメントかTwitter宛にmention下さい。よろしくお願いします。
Custom Transitions
Custom Transitionsには4種類あります。
- Presentations & Dismissals
- UITabBarController
- UINavigationController
- UICollectionViewController layout-to-layout transitions
まだ1と3しかいじれてないので、2と4は割愛。基本的には1や3と一緒ですよね、きっと。
(1) Animation
アニメーションをカスタムするだけなら簡単です。あらかじめdelegate設定しておいてpresentやらpushします。例えば、present(or dismiss)であればiOS7から追加されたtransitioningDelegateを使います。
UIViewController *vc;
vc.modalPresentationStyle = UIModalPresentationCustom;
vc.transitioningDelegate = self;
[self presentViewController:vc animated:YES completion:nil];
UINavigaitonControllerの場合はUINavigationControllerDelegateを設定してpushします。
UIViewController *vc;
self.navigationController.delegate = self;
[self.navigationController pushViewController:vc animated:YES];
transitioningDelegateにはUIViewControllerTransitioningDelegateプロトコルを採用しているオブジェクトを指定します。delegateメソッドとしてこれらを実装します。
- (id <UIViewControllerAnimatedTransitioning>)animationControllerForPresentedController:(UIViewController *)presented
                                                                   presentingController:(UIViewController *)presenting
                                                                       sourceController:(UIViewController *)source;
- (id <UIViewControllerAnimatedTransitioning>)animationControllerForDismissedController:(UIViewController *)dismissed;
UINavigationControllerDelegateではこれらを実装します。
- (id <UIViewControllerAnimatedTransitioning>)navigationController:(UINavigationController *)navigationController
                                   animationControllerForOperation:(UINavigationControllerOperation)operation
                                                fromViewController:(UIViewController *)fromVC
                                                  toViewController:(UIViewController *)toVC;
どちらの場合もUIViewControllerAnimatedTransitioningプロトコルを採用しているAnimatorオブジェクトを返します。このAnimatorオブジェクトは画面遷移時のアニメーションを定義しているオブジェクトです。UIViewControllerAnimatedTransitioningプロトコルのメソッド(required)としてはこれらがあります。
// アニメーション時間
- (NSTimeInterval)transitionDuration:(id <UIViewControllerContextTransitioning>)transitionContext;

// アニメーション処理
- (void)animateTransition:(id <UIViewControllerContextTransitioning>)transitionContext;
ここまで実装すればOKです。文章に起こすと面倒な感じがしますし色々なプロトコルが出てくるので理解しづらいですが、ちょっといじってみれば難しくない事がわかると思います。
(2) Interactive Transitions
Interactiveに遷移するためにはこれらに加えて以下が必要です。
まず、present(or dismiss)の場合はtransitioningDelegateオブジェクトに以下を実装します。
- (id <UIViewControllerInteractiveTransitioning>)interactionControllerForPresentation:(id<UIViewControllerAnimatedTransitioning>)animator;
- (id <UIViewControllerInteractiveTransitioning>)interactionControllerForDismissal:(id<UIViewControllerAnimatedTransitioning>)animator;
UINavigationControllerDelegateの場合は以下を実装します。
- (id <UIViewControllerInteractiveTransitioning>)navigationController:(UINavigationController *)navigationController
                          interactionControllerForAnimationController:(id <UIViewControllerAnimatedTransitioning>)animationController;
先ほどはUIViewControllerAnimatedTransitioningプロトコルオブジェクトを返すメソッドを実装しましたが、今回はUIViewControllerInteractiveTransitioningプロトコルオブジェクトを返します。独自にUIViewControllerInteractiveTransitioningプロトコルを満たすオブジェクトを用意しても良いのでしょうが、UIPercentDrivenInteractiveTransitionを使うのが楽でしょう。
// 0.0〜1.0の値を代入する事で今どの状態なのかを指定する
- (void)updateInteractiveTransition:(CGFloat)percentComplete
// 終了orキャンセル時にはこれを
- (void)finishInteractiveTransition;
- (void)cancelInteractiveTransition;
基本的には以上です。
(3) 個人的ビックリ!ポイント
- UINavigationController.viewにUIScreenEdgePanGestureRecognizerが勝手に追加されている
- UINavigationItemのアニメーション
- interactive transition したら 解放しましょう
- view.transform (landscape)
- topLayoutGuide
1. UINavigationController.viewにUIScreenEdgePanGestureRecognizerが勝手に追加されている
UINavigationControllerを使う場合 何も設定してなくても UIRectEdgeLeftから右にpanしていくとpopできるようになっています。

例えばviewController.viewを下にドラッグしていきpopさせたいような場合、UIRectEdgeLeftから右にpanするとviewが下に動いていくというなんとも残念な感じになります。使わない場合はenabled=NOにしておく方が良いと思います。
2. UINavigationItemのアニメーション
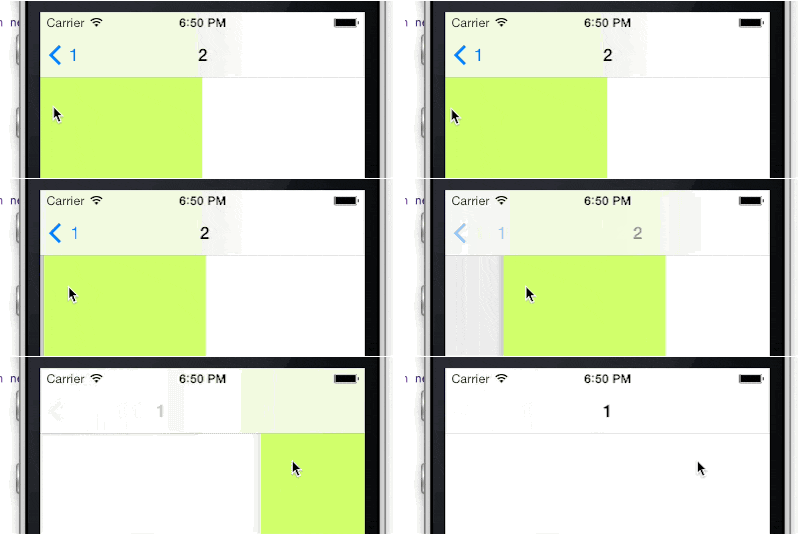
上記一連の流れを読むとわかると思うのですが、UINavigationBarに関しては何もしていません。画面遷移の際のUINavigationItemのアニメーション制御はiOSおまかせになります(opacity fadeIn fadeOut)。viewと連動して制御したい場合、自前でnavigationBarを作るしかなさそうです。
| Default | Custom | |
|---|---|---|
| Push |  |
 |
| Pop |  |
 |
3. interactive transition したら 解放しましょう
調査不足。サンプルではUIPercentDrivenInteractiveTransitionオブジェクトを保持しており、スワイプのUIGestureRecognizerStateChangedの度にupdateInteractiveTransition:を読んでやり状態更新しています。しかし、interactive transitionでpresentした後dismissした際、UIPercentDrivenInteractiveTransitionオブジェクトを保持し続けていると再びpresentできなくなります。おそらくpercentCompleteが1.0の状態では開始できないのかと思います。 interactive transition終わった後はnil解放しましょう。終わったタイミングで破棄するのは自然といえば自然ですし。
4. view.transform (landscape)
デバイスの回転はview.transformが変化することで表現されます。pushされたviewControllerがviewDidAppearしたタイミングでNSStringFromCGAffineTransform(view.transform)を確認すると、以下のようになっています。
| Default | Custom | |
|---|---|---|
| presenting | [1, 0, 0, 1, 0, 0] | [0, 1, -1, 0, 0, 0] |
| presented | [0, 1, -1, 0, 0, 0] | [0, 1, -1, 0, 0, 0] |
interactive transitionしてる最中はpresentingもpresentedも両方表示されているので、両viewControllerとも回転状態にあるのは自然といえば自然です。ただし、これが原因なのかわかりませんが、 presentedの座標系が(x軸が上下でy軸が左右に)変わっています。何が言いたいかというと、presentedViewController.viewをアニメーションするわけですが、思わぬ方向に動いてしまうわけです。(*透明度によるpresentサンプルではこれを確認するため、わざと座標いじらず透明度のみ変化させています)
5. topLayoutGuide
UIViewControllerAnimatedTransitioningプロトコルの- (void)animateTransition:でアニメーション部分を実装しますが、その際 containerView に viewController.view を addSubview する必要があります。しかし、addSubviewする前にviewの座標を上下に(portraitの時はy座標を、landscapeの時はx座標を)ずらして指定すると topLayoutGuide.lengthが0 になってしまうようです。
- (void)anitmateTransition:(id<UIViewControllerContextTransitioning>)transitionContext {

.
.
.

UIVIewController *fromVC = [transitionContext viewControllerForKey:UITransitionContextFromViewControllerKey];

// 座標変更部
CGFloat deltaX, deltaY;
switch (fromVC.interfaceOrientation) {
    case UIInterfaceOrientationPortrait:
        deltaX = fromVC.view.bounds.size.width;
        deltaY = 0.0; // <--- これを少しでもずらしてからaddSubviewすると topLayoutGuideが0.0に
        break;
    case UIInterfaceOrientationLandscapeRight:
        deltaX = 0.0; // <--- これを少しでもずらしてからaddSubviewすると topLayoutGuideが0.0に
        deltaY = fromVC.view.bounds.size.width;
        break;
    case UIInterfaceOrientationLandscapeLeft:
        deltaX = 0.0; // <--- これを少しでもずらしてからaddSubviewすると topLayoutGuideが0.0に
        deltaY = - fromVC.view.bounds.size.width;
        break;
    case UIInterfaceOrientationPortraitUpsideDown:
        deltaX = - fromVC.view.bounds.size.width;
        deltaY = 0.0; // <--- これを少しでもずらしてからaddSubviewすると topLayoutGuideが0.0に
        break;
}
toVC.view.center = CGPointMake(toCenter.x + deltaX, toCenter.y + deltaY);


[containerView addSubview:toVC.view];

.
.
.

}
ちなみにaddSubviewした後であれば問題無いようです。
最後に
本記事を読むと、custom transitionは非常に扱いづらそうに思われるかもしれません。しかし、custom transition は viewController毎の関連性をわかりやすくするための必須技術だと思います。早めに地雷ポイントをつぶし、差別化を図るための武器に変えたいものです。「こんなのがあったよ〜」等あったら共有したいので教えてください。よろしくお願いします。
追記
2014.2.22
『5.topLayoutGuide』に関しては、addSubview:とinsertSubview:aboveSubview:で挙動変わりそうです。時間ができたらまたまとめます。