Facebook AccountKitをFirebase Authと連携する
Why use AccountKit and Firebase Auth?
結論
Facebook AccountKitとFirebase Authを利用することで、__汎用的__かつ__スケーラブル__なモバイルアプリを、__最小の実装工数__で構築できる。
AccountKitについて
AccountKitは、Facebookが提供している電話番号認証を簡単に実装できるサービスです。
電話番号認証は、現在モバイルの中で最も多くのユーザーをカバーできるログイン方法です。
少し手間がかかりますがこの認証形式は世界中で利用されています。事実WhatsAppでは初期からこの方法が利用されており、世界で多くのユーザーを獲得しています。
つまり、AccountKitを実装することはモバイルアプリにおいて非常に有利であると言えます。
| 認証方法 | メリット | デメリット |
|---|---|---|
| Facebook login | ボタンを2回押すだけで認証が可能 | Facebookを利用していなければ利用できない。世界中で若年層のFacebookユーザーが年々減少している。 |
| Google login | ボタンを2回押すだけで認証が可能 | Googleを利用していなければ利用できない。 iPhoneユーザーはGoolgeアカウントでの認証はしない。 |
| Twitter login | ボタンを2回押すだけで認証が可能 | Twitterを利用していなければ利用できない。ダミーアカウントを量産される。提供しようとしているサービスのユーザーのセグメント |
| LINE login | ボタンを2回押すだけで認証が可能 | LINEを利用していなければ利用できない。アジア圏でしか利用されていない。 |
| ※ 主観が入っておりますが、だいたい認識してもらえるかと思います。 |
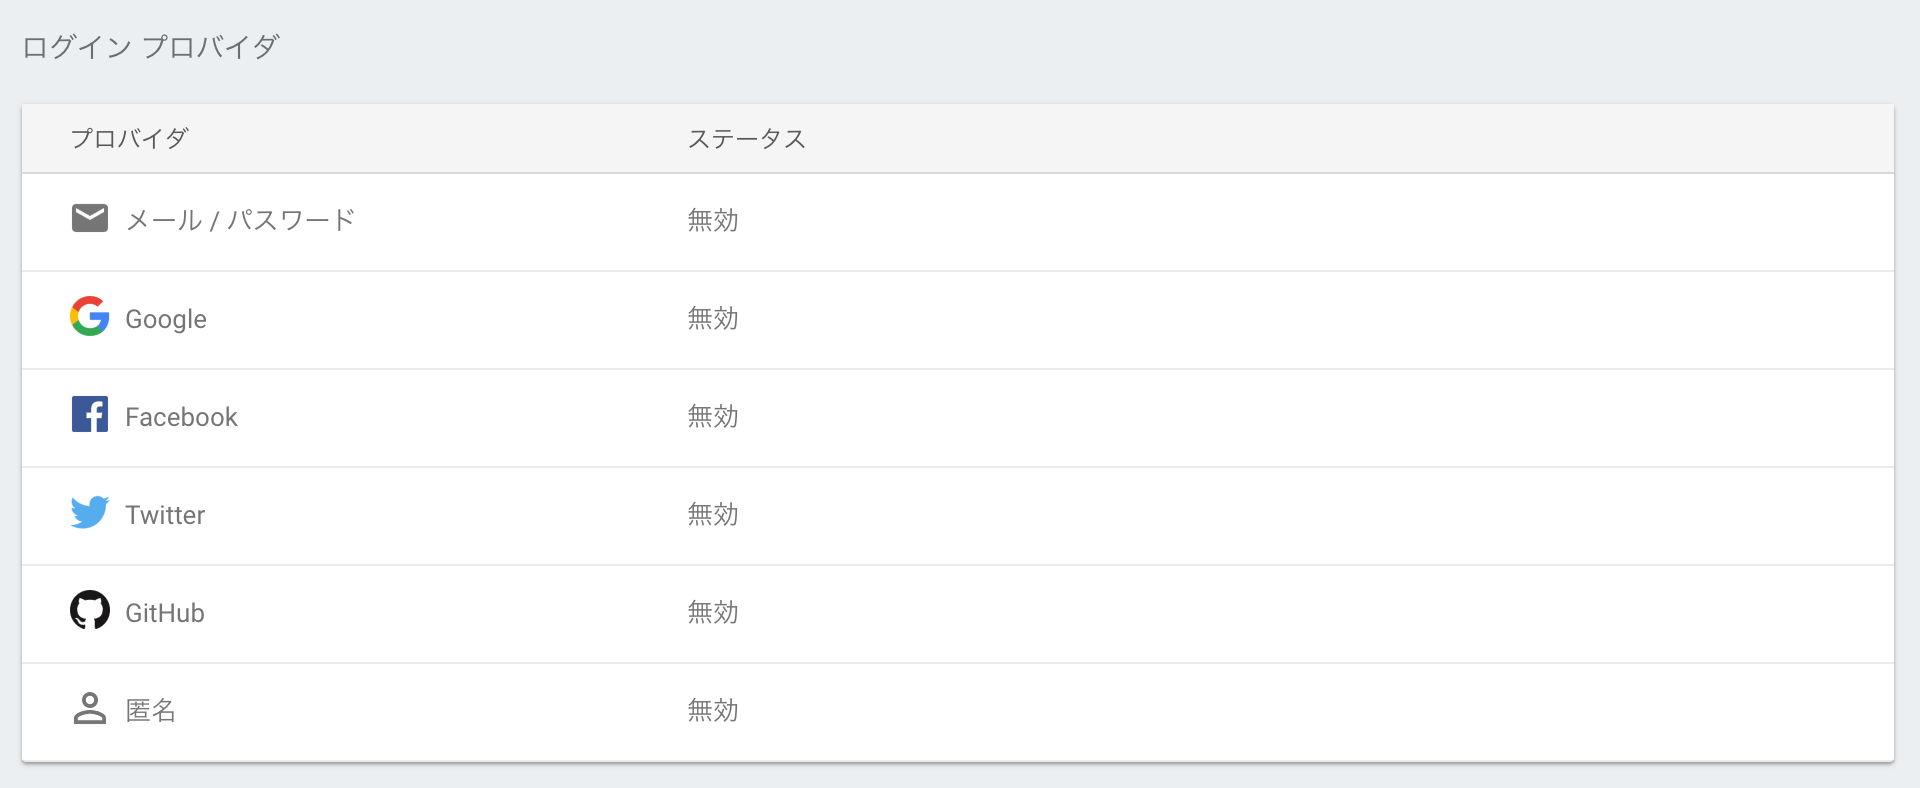
Firebase Authについて
Firebase Authは、Goolgeが提供するFirebaseの中の一つのサービスです。
多くのサービスプロバイダーの認証をサポートしており、その中でも注目すべきは、Custom Loginです。
すでにサービスを提供している場合でも、既存のUser IDと連携できるよう設計されており、サーバー数行のコードを追加するだけで、Firebaseの機能を利用することが可能となっています。
Cloud Functionsについて
2017月3月にCloud Functionsと呼ばれる新機能がリリースされたことでさらにモバイルプラットフォームの可能性は広がりました。
Cloud Functionsは、AWSのLambdaのような機能を提供しています。Firebaseのサービスのイベントをトリガーに動作し、様々なタスクをこなすことができます。
Cloud Functionsのイベントトリガー
- Realtime Database Triggers
- Firebase Authentication Triggers
- Firebase Analytics Triggers
- Cloud Storage Triggers
- Cloud Pub/Sub Triggers
- HTTP Triggers
How to use AccountKit and Firebase Auth?
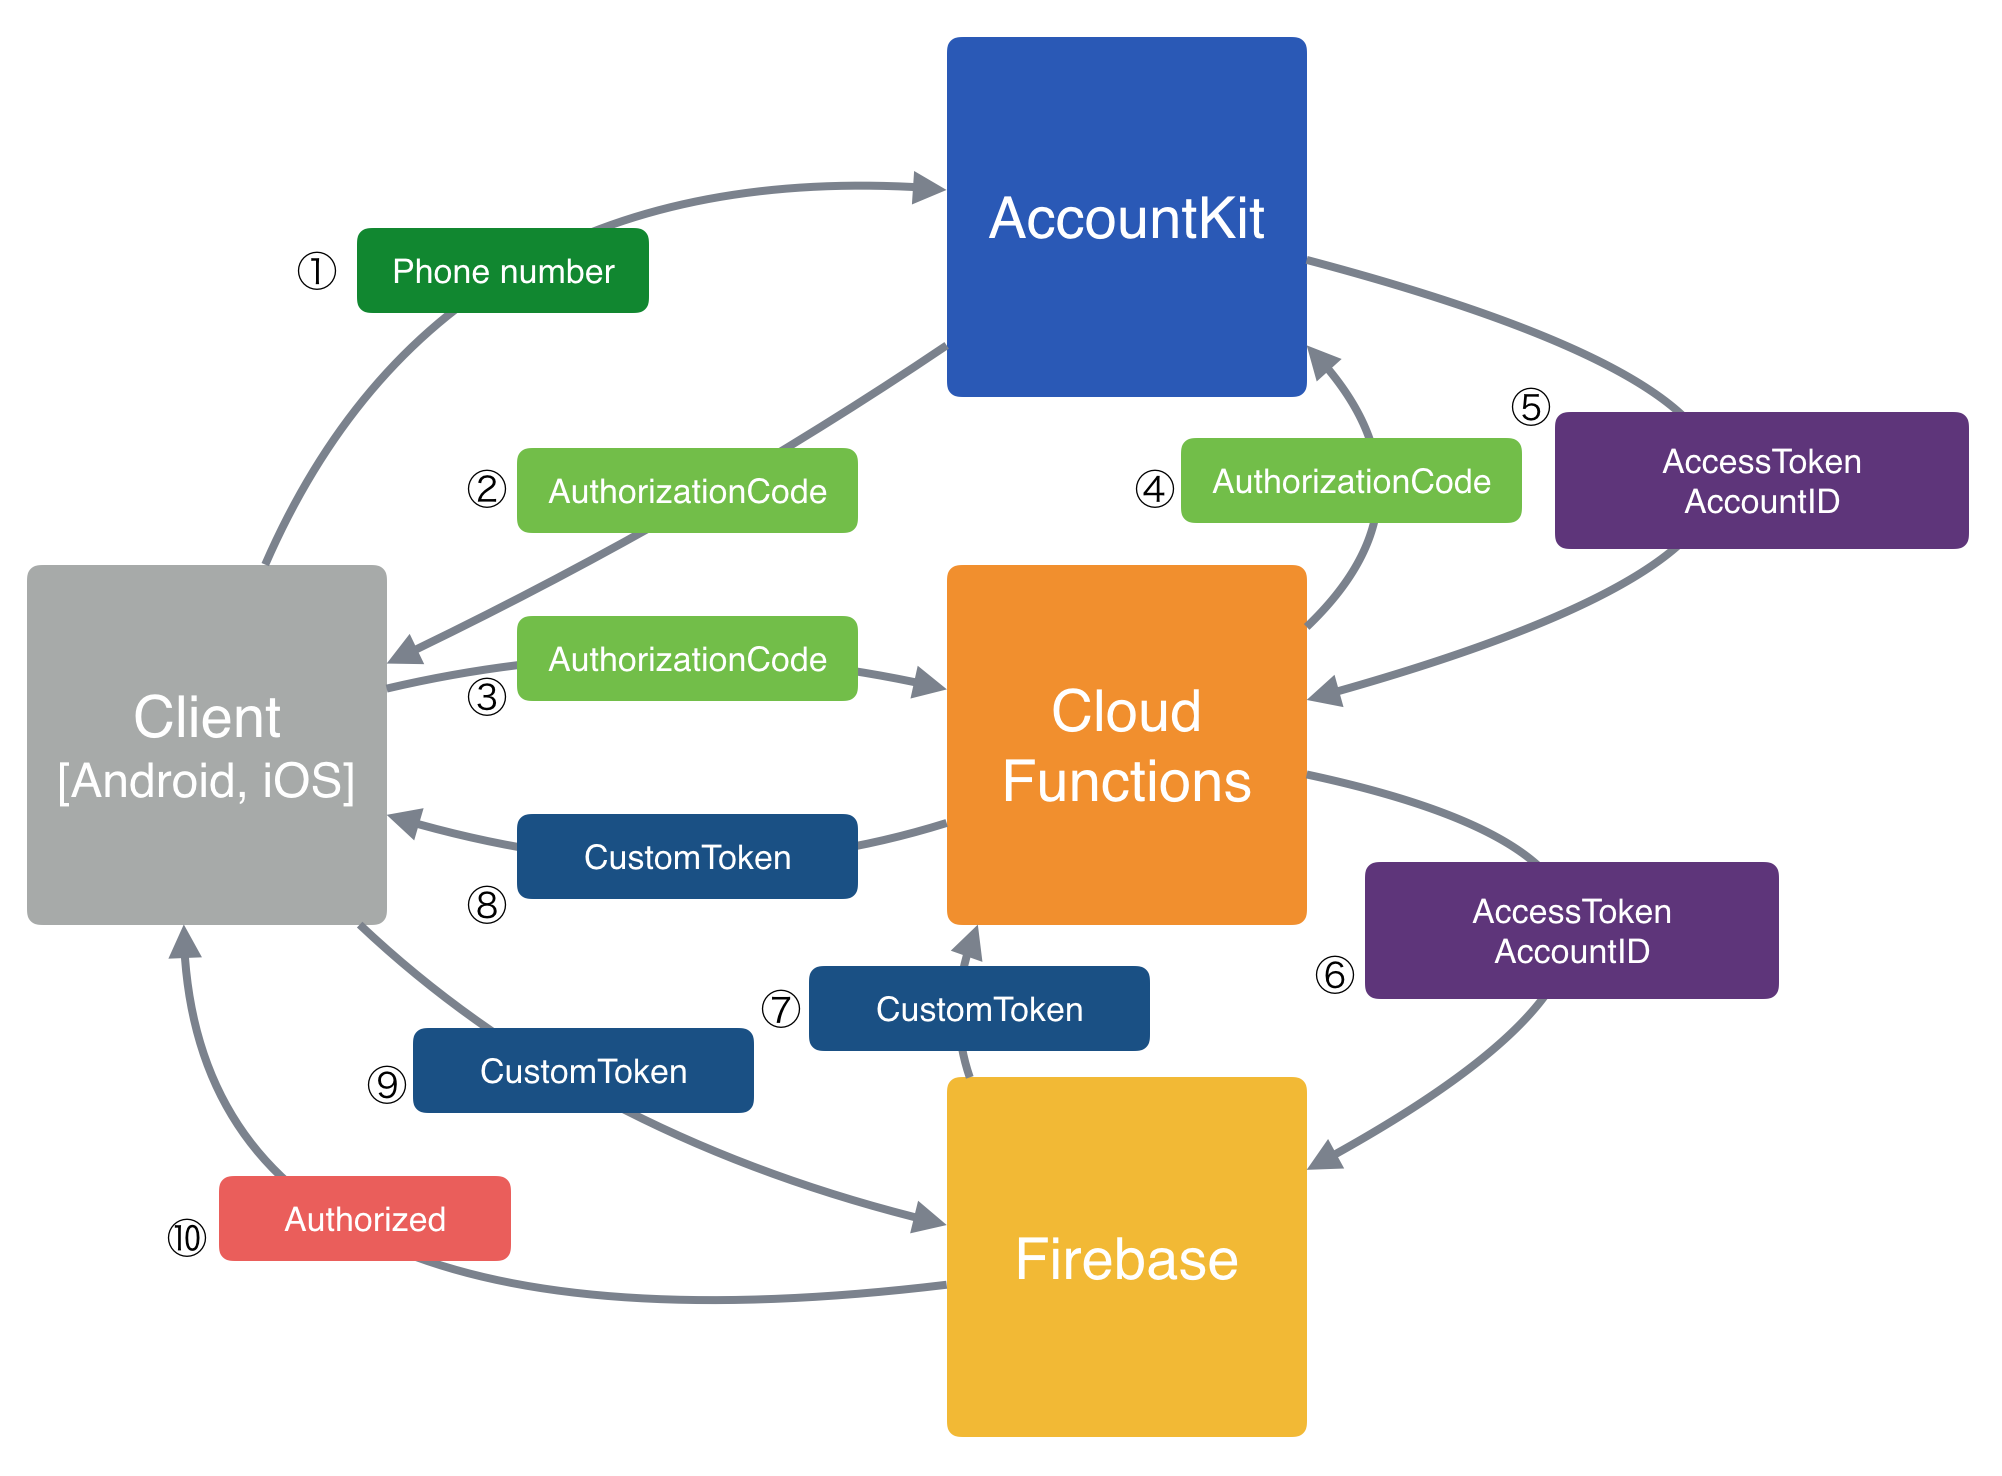
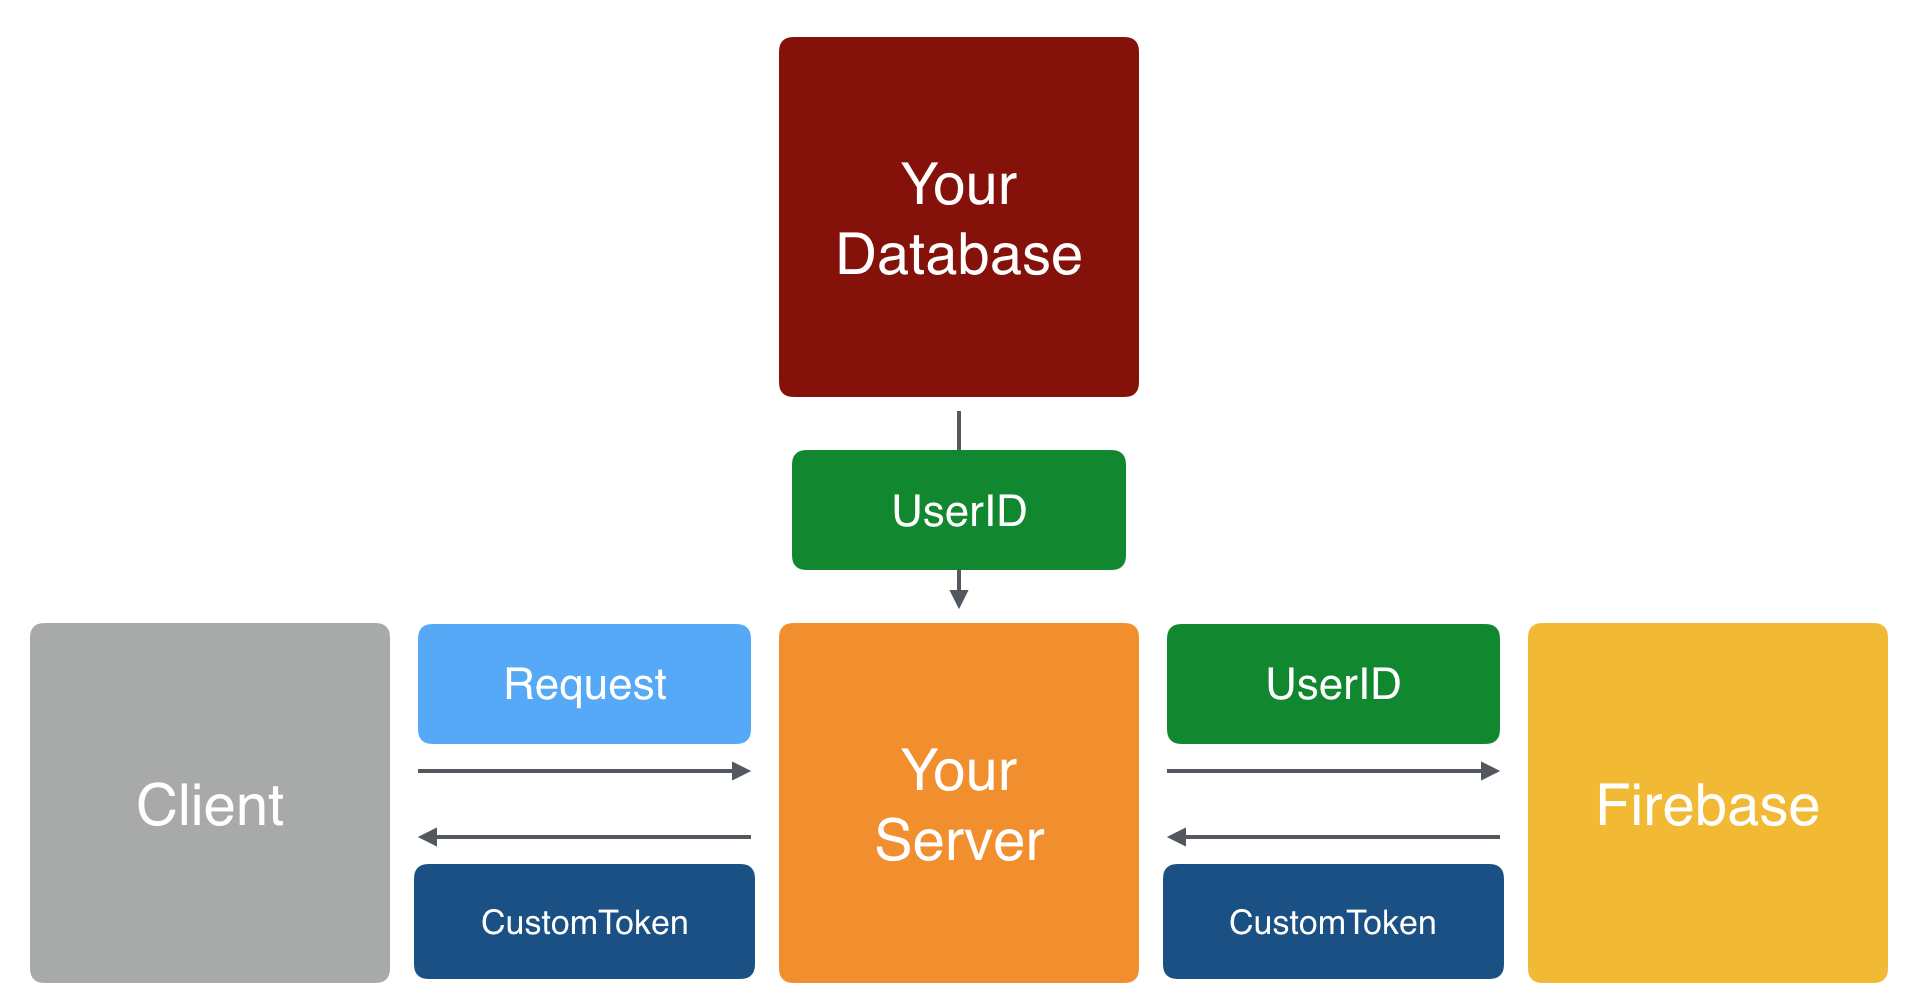
アーキテクチャ
概念図を示します。これを見ると複雑に見ますが一つ一つをおって行けば複雑な処理はしていません。
AccountKitから発行される短期認証コードをCloud FunctionsにPostしCustomTokenを取得します。
CustomTokenをFirebase渡すことで、ログインが完了します。
AccountKitの利用
AccountKitの認証方法
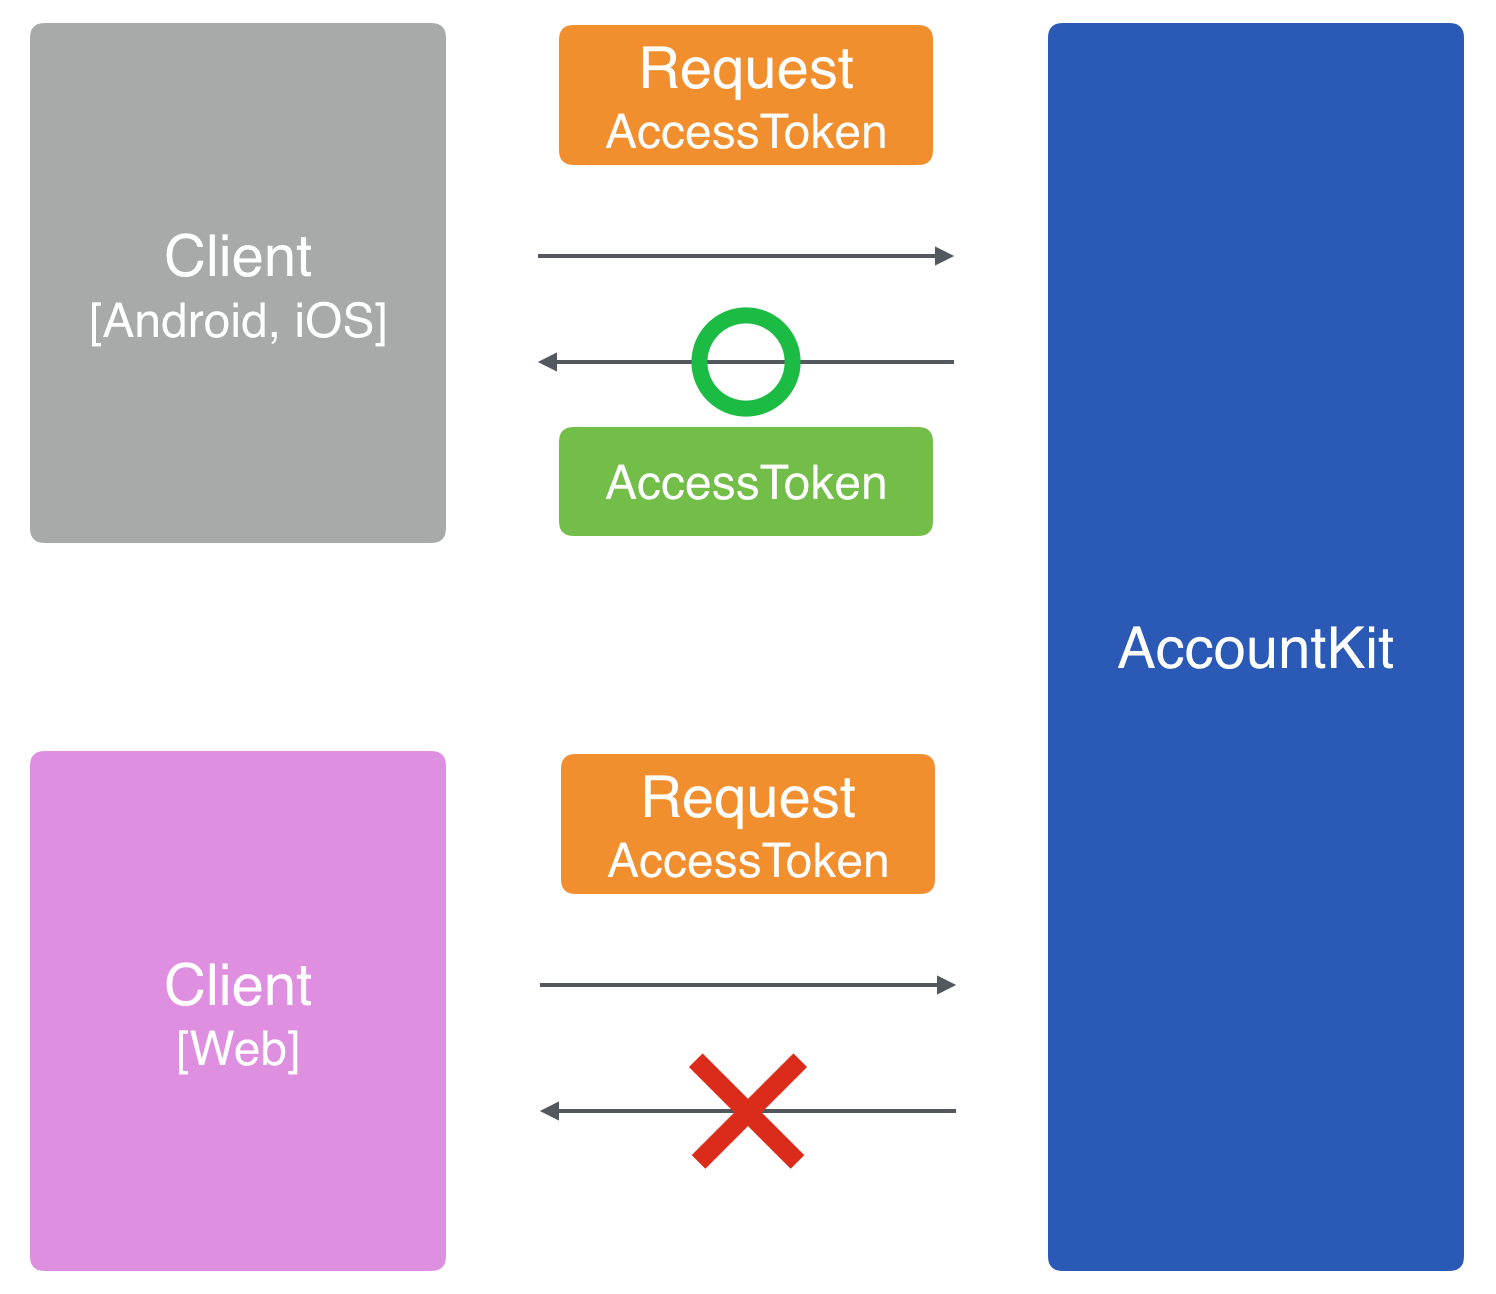
AccountKit認証方法は以下の2つが用意されています。
- アクセストークン
- 認証コード(AuthorizationCode)
この二つの大きな違いは、セキュリティの鍵となるアクセストークンをどう取り扱うかっているかです。
__アクセストークンの認証はネイティブアプリケーションにしか許可されていません。__Webアプリケーションでは、アクセストークンの漏洩の恐れがあるため認証コードを利用するよう制限されています。ネイティブアプリで取得したアクセストークンの取り扱いは開発者に委ねられています。アクセストークンを利用する際は漏洩させないよう最新の注意が必要です。
※アクセストークンを持ってAccountKitのAPIにリクエストするとユーザーID 電話番号 メールアドレスが取得できます。
認証コードで認証を行う場合は、認証コードをサーバーに渡してアクセストークンをサーバー間通信で発行してもらう必要があります。
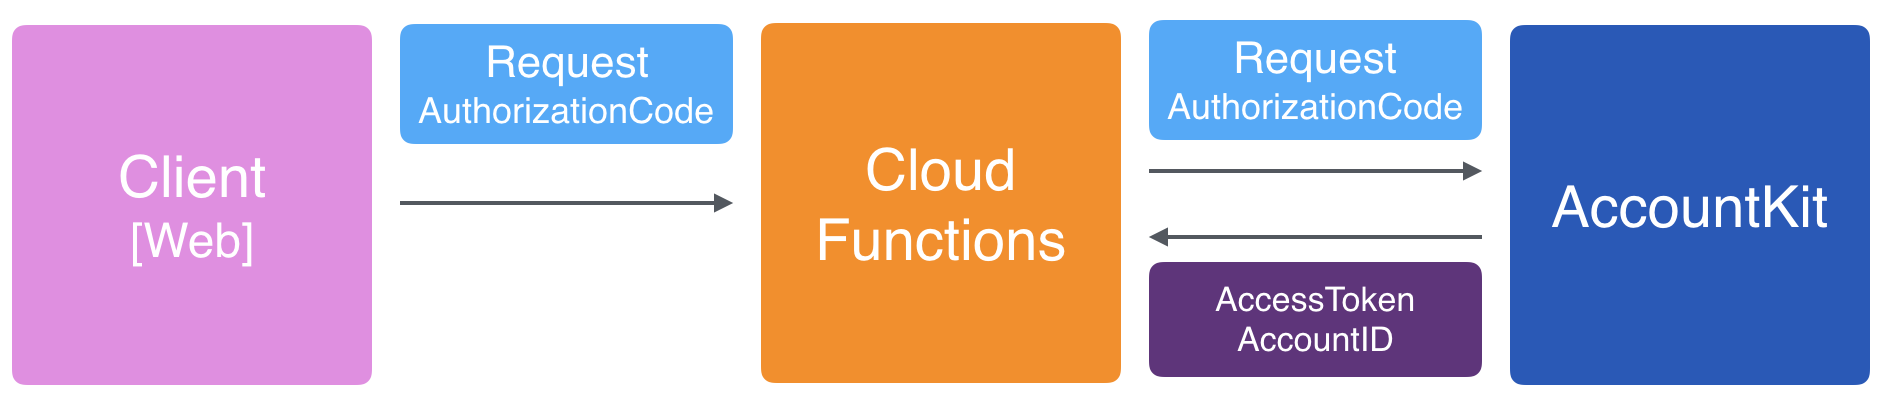
今回連携では、認証コードを利用します。
Firebase AuthのCustom Loginを利用するのでAccessTokenをクライアントを保持する理由がないためです。
認証コードを発行し、後の処理はCloud Functions(サーバー間通信)に任せます。
あとはクライアントで行うタスクは、レスポンスとしてCustomTokenを受け取りFirebaseAuthに渡すだけです。
Swiftのサンプルコードです。
// AccoutKitの初期化
let accountKit: AKFAccountKit = AKFAccountKit(responseType: .authorizationCode)

// AccountKitを起動して電話番号認証を行う
func login() {
    let inputStatus: String = UUID().uuidString
    let viewController: AKFViewController = self.accountKit.viewControllerForPhoneLogin(with: nil, state: inputStatus) as! AKFViewController
    prepareLoginViewController(viewController: viewController)
    self.present(viewController as! UIViewController, animated: true, completion: nil)
}

// AccountKitの準備
func prepareLoginViewController(viewController: AKFViewController) {
    viewController.delegate = self
    viewController.enableSendToFacebook = true
    let locale: NSLocale = NSLocale.current as NSLocale
    if let countryCode: String = locale.countryCode {
        viewController.defaultCountryCode = countryCode
    }
}

// MARK: -

// responseを受け取ってログインする
func customLogin(_ response: AccountKitLoginResponse, block: ((FIRUser?, Error?) -> Void)?) {

    FIRAuth.auth()?.signIn(withCustomToken: response.customToken) { (firUser, error) in
        if let error = error {
            debugPrint(error)
            block?(nil, error)
            return
        }
        block?(firUser, error)
    }
}
Firebase Authの利用
Firebase Authは複数のログイン方法を提供しています。
今回はCustom Loginを利用します。Custom Loginはすでに運用している既存サービスとFirebaseを結びつけることができるログインの方法です。FirebaseにUserIDを渡すことで同じUserIDをFirebaseでも利用できるようになります。
今回は既存サービスのDBをAccountKit、サーバーをCloud Functionsと見立ててCustomTokenを発行します。
Cloud Functions
Cloud Functionsを利用できるようにしましょう。Cloud Functionsはnodejsで動作しています。必要なモジュールはnpmを使ってインストールすることができます。
まず、npmを使ってFirebaseのコマンドラインツールをインストールします。
sudo npm install -g firebase-tools
Firebaseにログイン
firebase login
Firebaseプロジェクトを作る
firebase init functions
Firebaseプロジェクトをデプロイする
firebase deploy
firebase command
    auth:import [options] [dataFile]           import users into your Firebase project from a data file(.csv or .json)
    auth:export [options] [dataFile]           Export accounts from your Firebase project into a data file
    database:get [options] <path>              fetch and print JSON data at the specified path
    database:push [options] <path> [infile]    add a new JSON object to a list of data in your Firebase
    database:set [options] <path> [infile]     store JSON data at the specified path via STDIN, arg, or file
    database:remove [options] <path>           remove data from your Firebase at the specified path
    database:update [options] <path> [infile]  update some of the keys for the defined path in your Firebase
    database:profile [options]                 profile the Realtime Database and generate a usage report
    deploy [options]                           deploy code and assets to your Firebase project
    hosting:disable [options]                  stop serving web traffic to your Firebase Hosting site
    functions:log [options]                    read logs from deployed functions
    functions:config:clone [options]           clone environment config from another project
    functions:config:get [path]                fetch environment config stored at the given path
    functions:config:set [values...]           set environment config with key=value syntax
    functions:config:unset [keys...]           unset environment config at the specified path(s)
    help [command]                             display help information
    init [feature]                             setup a Firebase project in the current directory
    list                                       list the Firebases to which you have access
    login [options]                            log the CLI into Firebase
    login:ci [options]                         generate an access token for use in non-interactive environments
    logout                                     log the CLI out of Firebase
    open [link]                                quickly open a browser to relevant project resources
    serve [options]                            start a local server for your static assets
    tools:migrate [options]                    ensure your firebase.json format is up to date
    use [options] [alias_or_project_id]        set an active Firebase project for your working directory
環境変数をセットする
firebase functions:config:set my.debug=true
環境変数を取得する
firebase functions:config:get

// 結果
{
  "my": {
    "debug": "true"
  }
}
環境変数の削除
firebase functions:config:unset my
詳細はGet started with Cloud Functionsを参考にしてください。
HelloWorldなどを参考にすると十分に理解できる内容です。サンプルコードも充実しているので、ほとんどのことはコピペで可能です。
Cloud Functionsのエミュレート
Cloud Functionsのデバッグはエミュレータを使います。まだアルファ版のため問題もありますが、基本動作の確認ではこれで十分です。
Goolgeからcloud-functions-emulatorが提供されています。
エミュレータのインストール
sudo npm install -g @google-cloud/functions-emulator
※2017年3月22日現在で環境変数をセットしてもエミュレータから参照できませんでした。すでにIssueがありました
エミュレータの起動
functions start
エミュレータへデプロイ
functions deploy helloWorld --trigger-http
エミュレータのログを見る
functions logs read
※zshを利用の方はfunctionsコマンドが競合して動作しない可能性があります。functions-emulatorコマンドで代替えできるのこちらを利用するといいでしょう。
'use strict';

const functions = require('firebase-functions');
const admin = require('firebase-admin');
const cors = require('cors')({origin: true});
const Request = require('request');
const Querystring = require('querystring');

// Config
let config = functions.config();

// Firebase account key
let serviceAccount;

let projectID = process.env.GCLOUD_PROJECT;
if (projectID == config.project.development) {
  serviceAccount = require('./firebase_projects/development.json');
} else if (projectID == config.project.production) {
  serviceAccount = require('./firebase_projects/production.json');
}

// Facebook AccountKit
let accountKit;

if (projectID == config.project.development) {
  accountKit = require('./accountkit/development.json');
} else if (projectID == config.project.production) {
  accountKit = require('./accountkit/production.json');
}

admin.initializeApp({
  credential: admin.credential.cert(serviceAccount),
  databaseURL: 'https://' + projectID + '.firebaseio.com'
});

exports.login = functions.https.onRequest((req, res) => {

  // parse request
  cors(req, res, () => {

    let appAccessToken = ['AA', accountKit.app_id, accountKit.app_secret].join('|');
    let params = {
      grant_type: 'authorization_code',
      code: req.body.code,
      access_token: appAccessToken
    };

    let tokenExchangeURL = accountKit.token_exchange_base_url + '?' + Querystring.stringify(params);

    // Get access token & account id
    Request.get({url: tokenExchangeURL, json: true}, (error, response, body) => {

      if (error) {
          res.status(500).json({
            errors: [{
              message: 'Could not get access token.'
            }]
          });
        return
      }
      let accessToken = body.access_token
      let id = body.id

      var meEndpointURL = accountKit.me_endpoint_base_url + '?access_token=' + accessToken;

      // Get account infomation
      Request.get({url: meEndpointURL, json: true }, (error, response, body) => {

        if (error) {
            res.status(500).json({
              errors: [{
                message: 'Could not get user information.'
              }]
            });
          return
        }

        let countryPrefix = body.phone.country_prefix
        let nationalNumber = body.phone.national_number
        let number = body.phone.number

        let additionalClaims = {
          country_prefix: countryPrefix,
          national_number: nationalNumber,
          number: number
        };

        // Get custom token for Firebase custom login
        admin.auth().createCustomToken(id, additionalClaims)
        .then(function(customToken) {
          // Send token back to client
          res.json({
            custom_token: customToken,
            account_id: id,
            access_token: accessToken,
            country_code: countryPrefix,
            national_number: nationalNumber,
            phone_number: number
          });
        })
        .catch(function(error) {
          console.log("Error creating custom token:", error);
          res.status(500).json({
            errors: [{
              message: 'Failed to get custom token.'
            }]
          });
        });
      });
    });
  });
})